I’m a big fan of reducing the (play-distorting, -restricting, or -prohibiting) effect large stands have on gaming, and so chose to model squads with three figures on 10x15mm bases (~10 x 15m footprint at the game’s nominal 1:1000 ground scale). While a bit fiddly, they allow greater flexibility for players in the placement of their forces within the tabletop terrain where larger, more ‘normal-sized’ stands would not allow them to do what they’d like with their troops — many such examples can be seen/imagined in a study of the tabletops used where to-scale fields (or orchards) could not hold a platoon if the player wished to occupy it using, say, 25x32mm FoW bases for each squad.Using smaller stands/figures also helps reduce the ‘translation’ players must do (i.e.: What You See to What You Get) when viewing the tabletop battlefield to assess the situation.
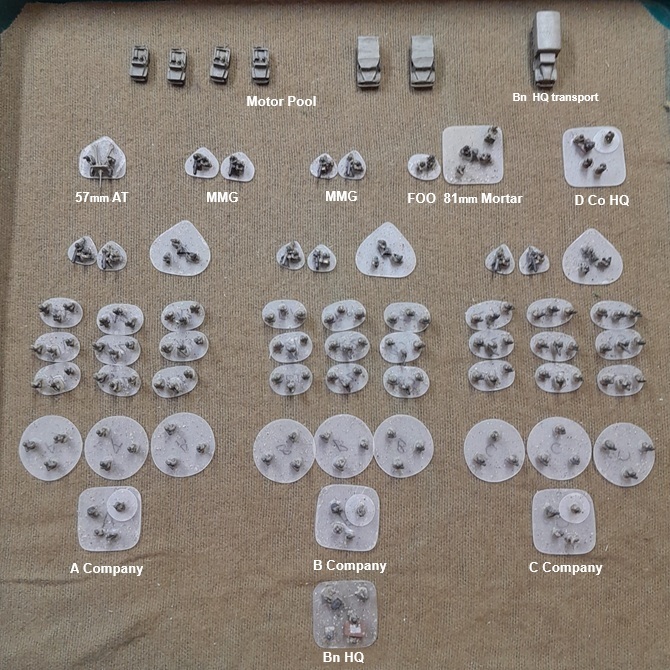
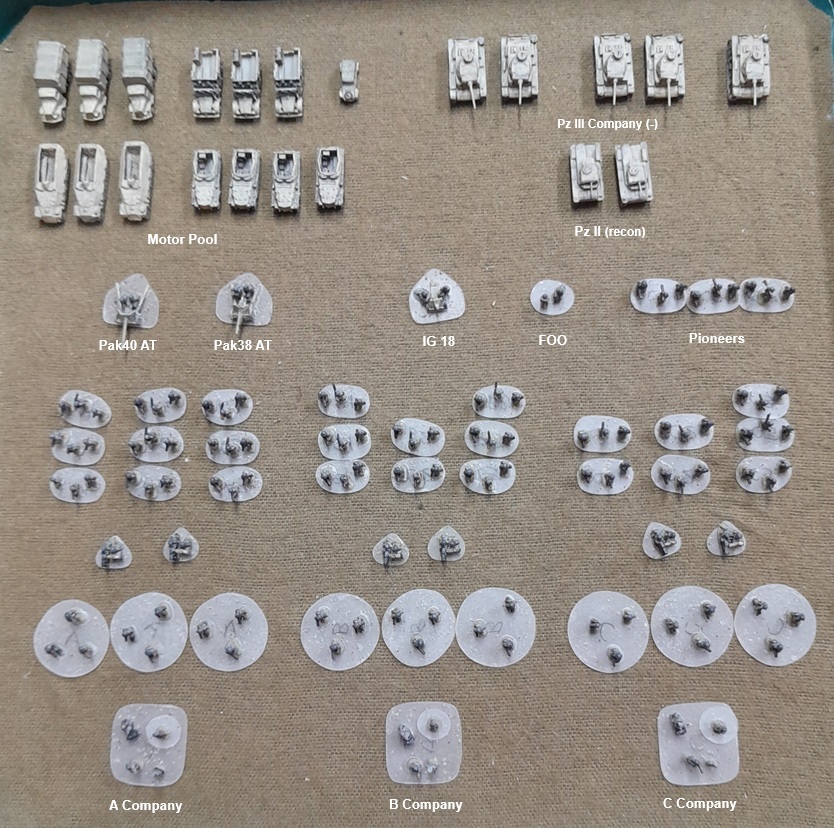
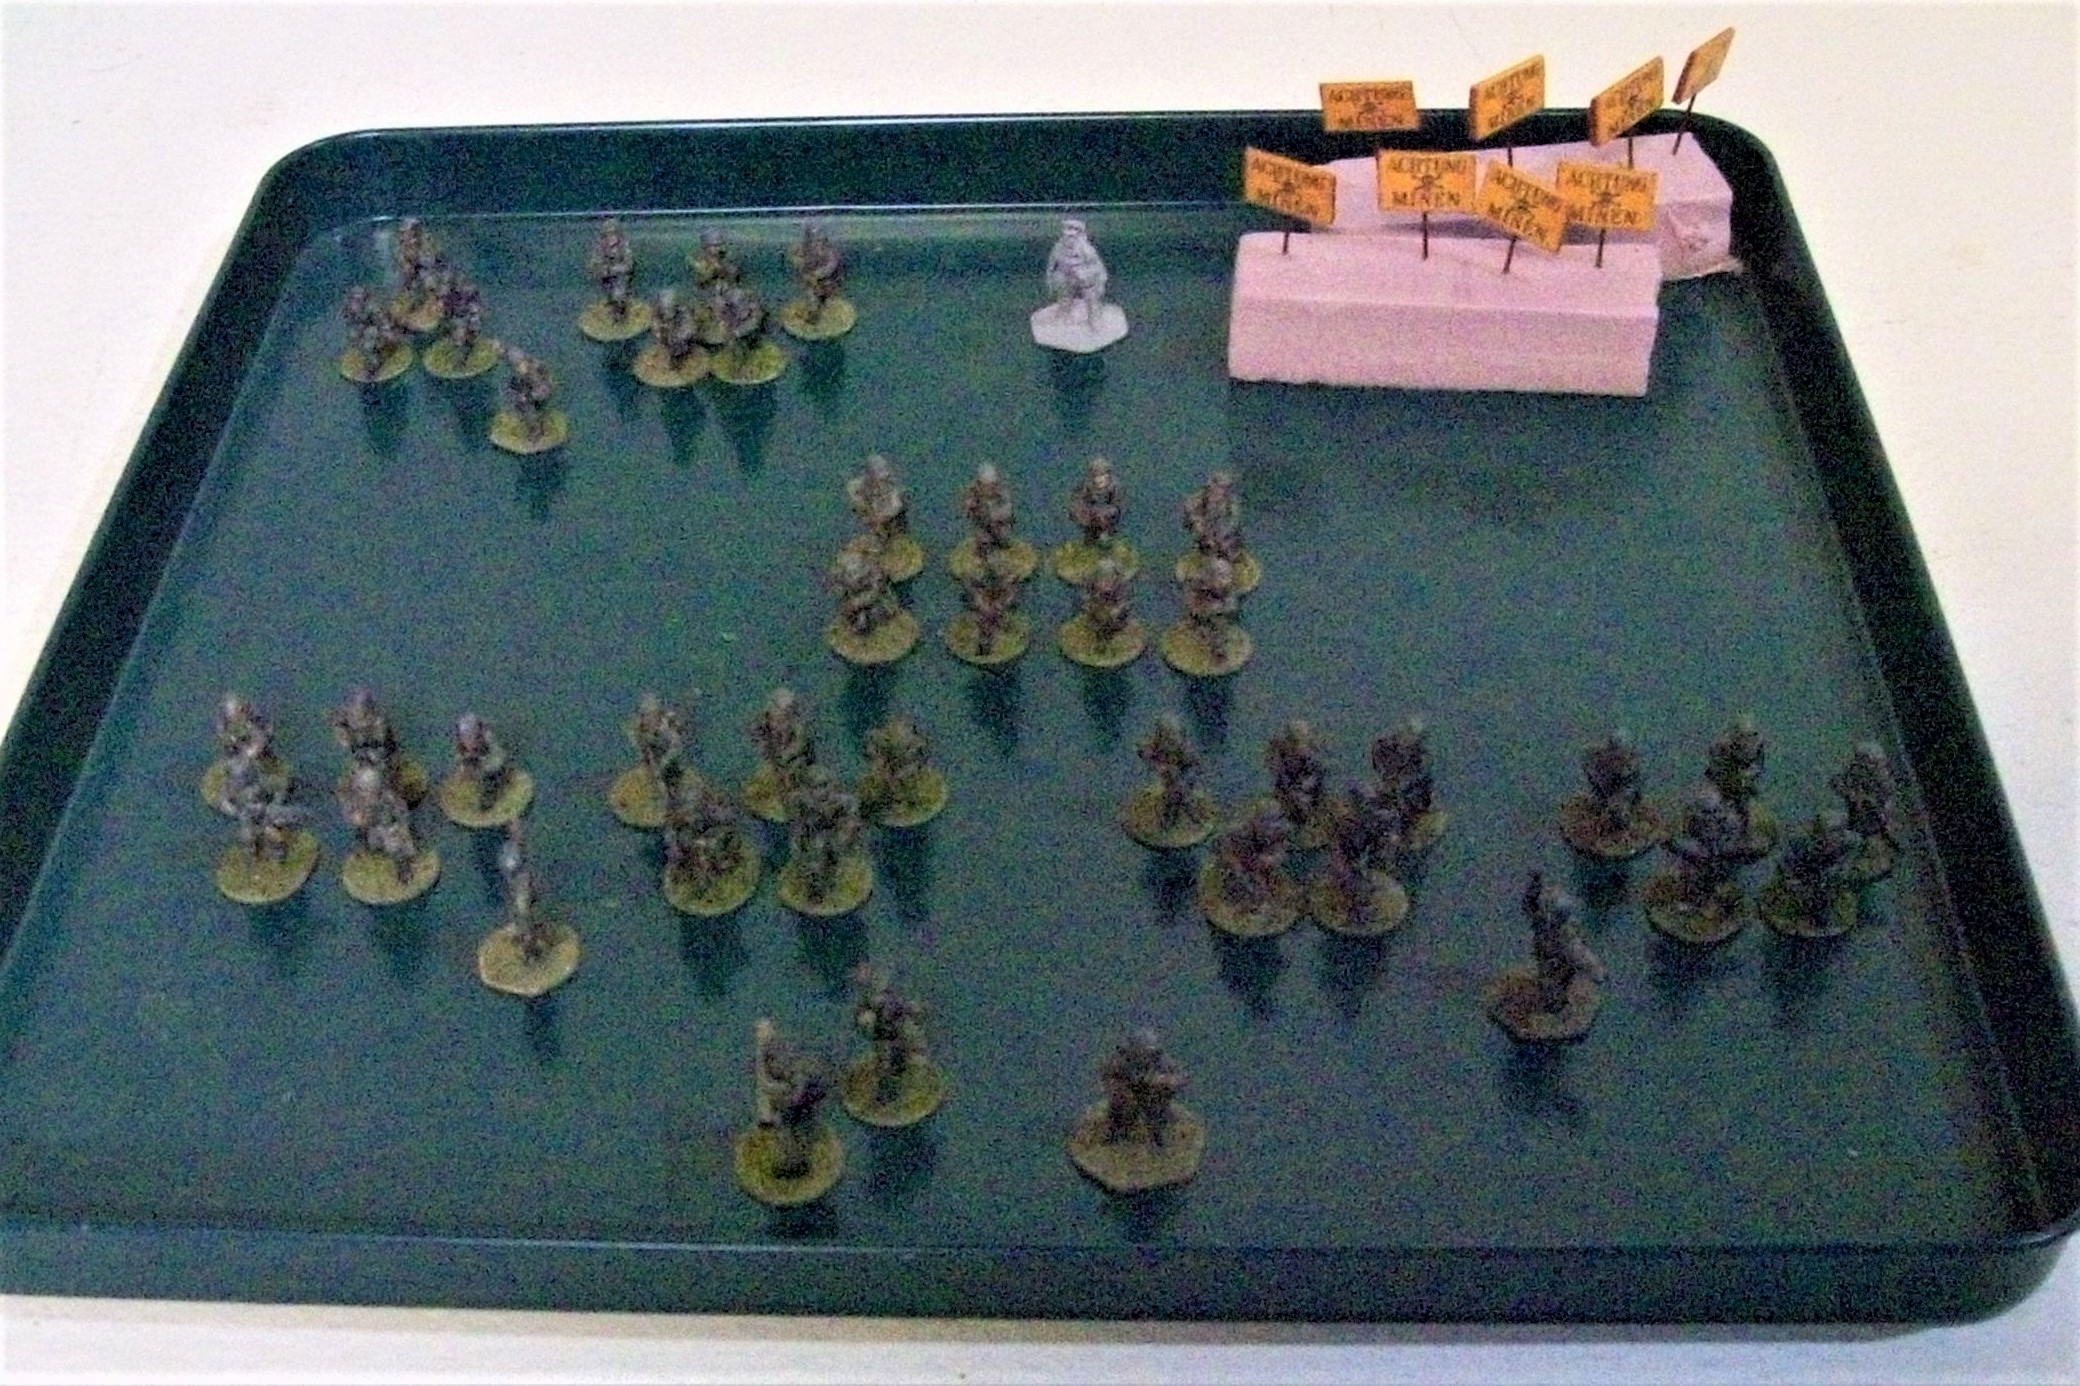
6mm (mostly)H&R minis. The 3-figure 20mm round pieces are Combat Patrol markers. The single figure on the Company HQ bases (magnetically attached) represents the Coy.HQ order which can be placed either: with another unit that is given a second order, with the Battalion HQ if used to increase those orders, or removed to indicate the HQ’s “Hesitant” status.
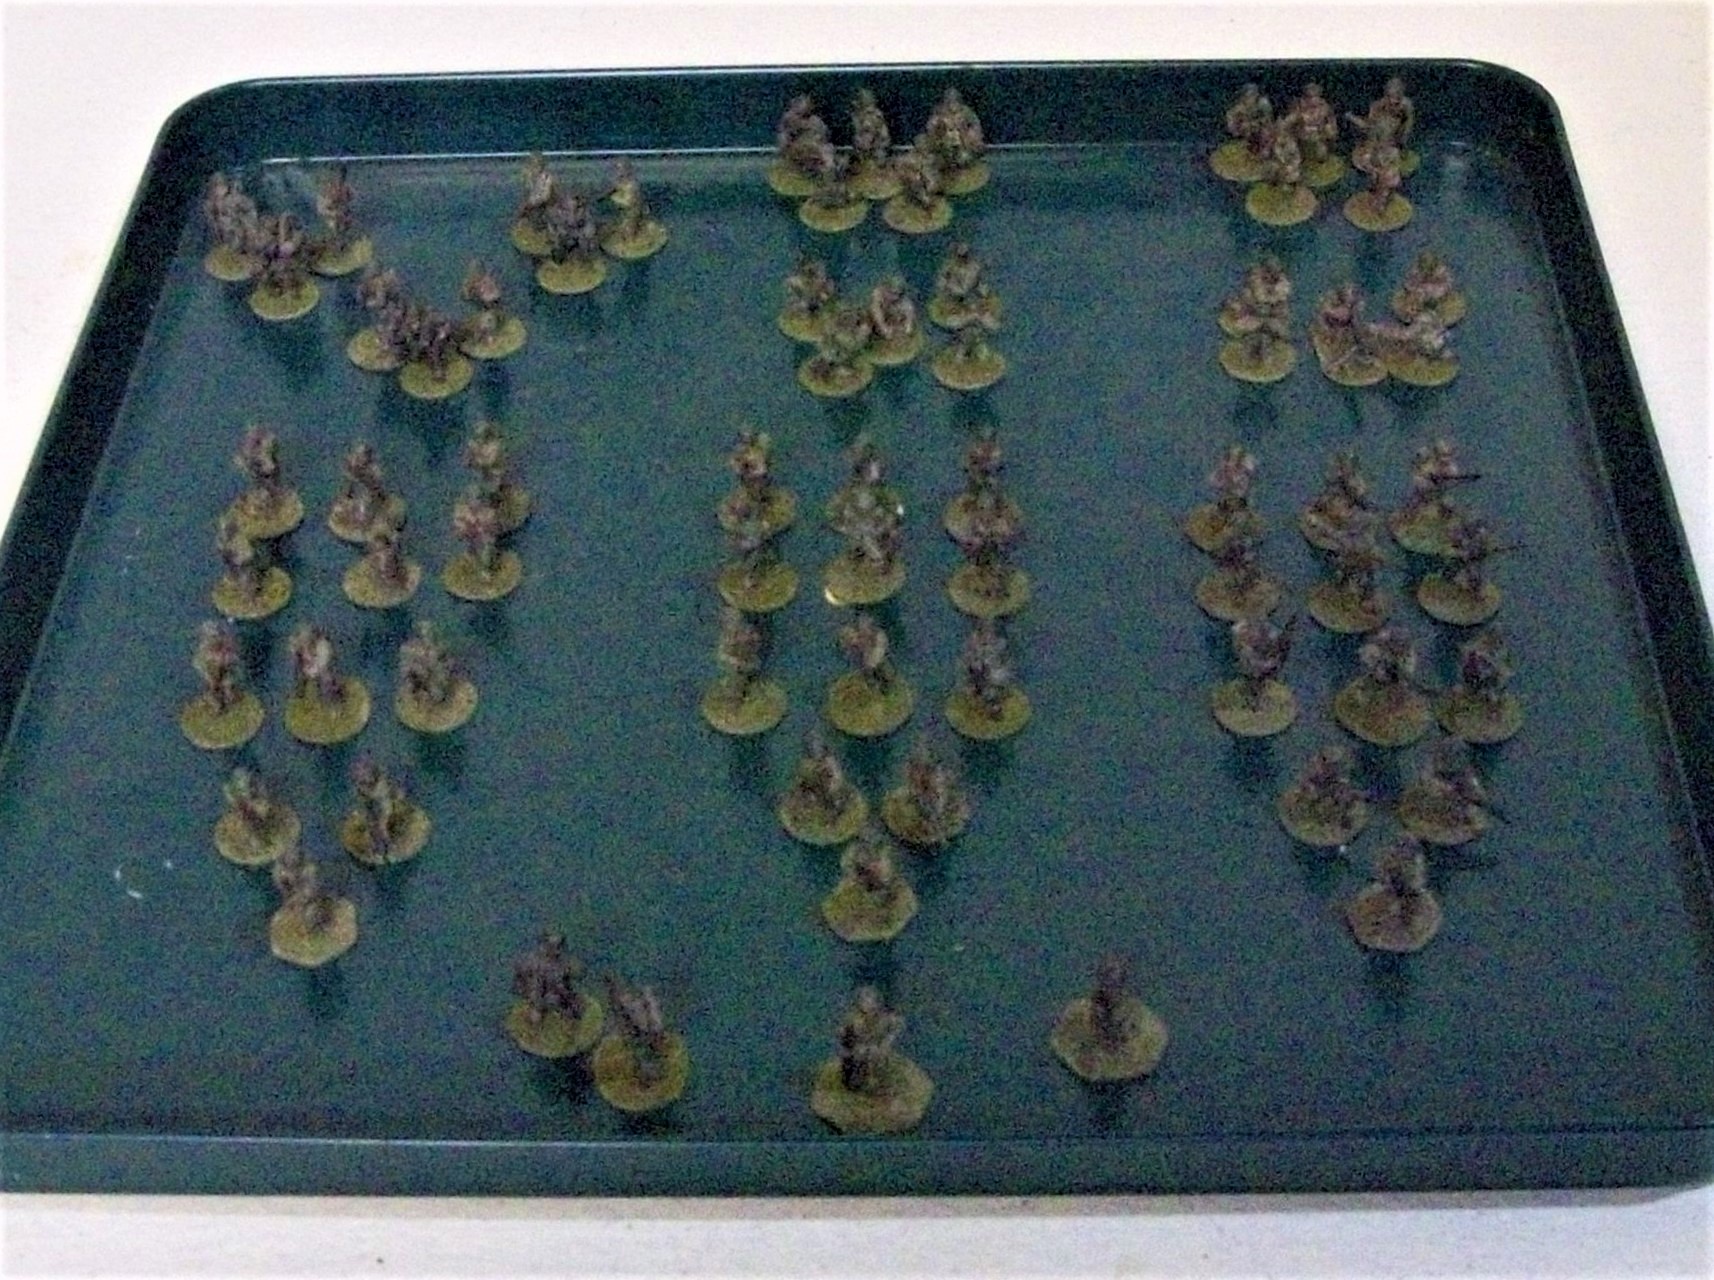
When I run out of 6mm figs/bases I use 15mm figs (based on ~1cm rounds for CoC).
The 15mm figs each represent a section (or team). The larger tan bases are the Company HQs(+ adj.”order” fig)
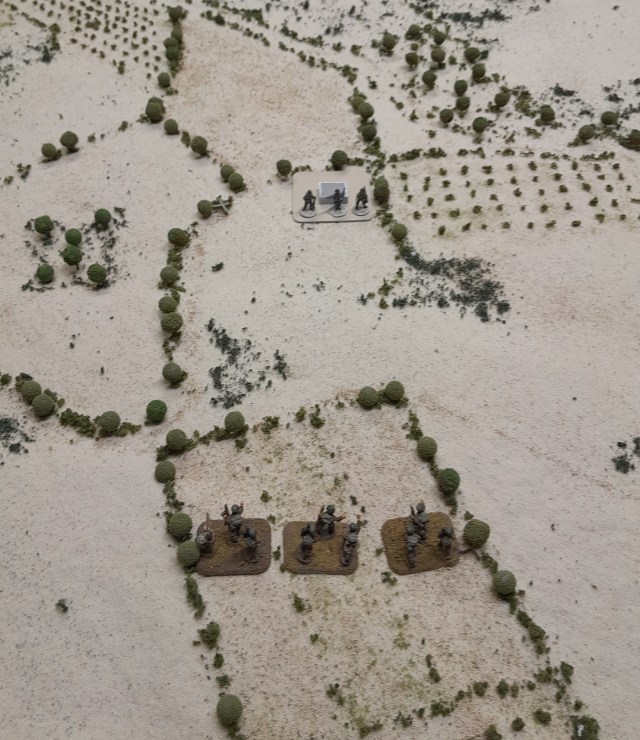
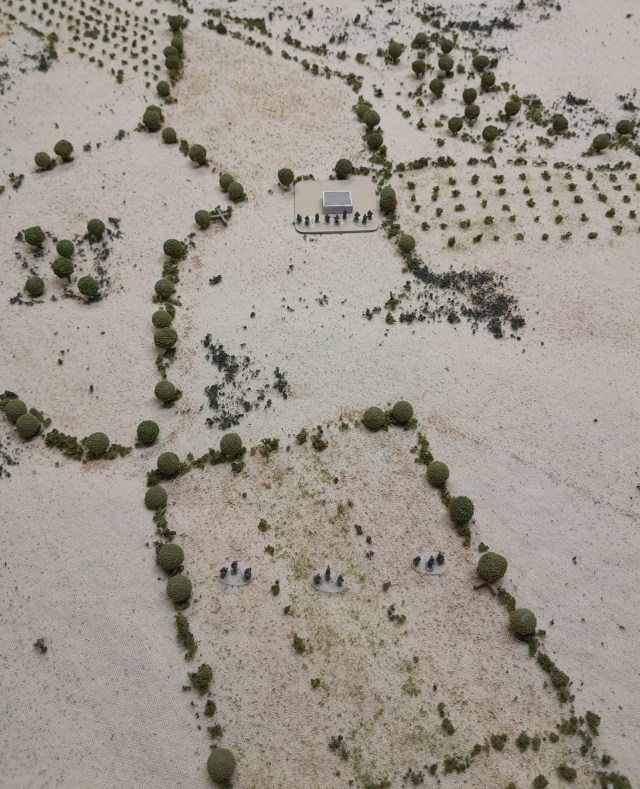
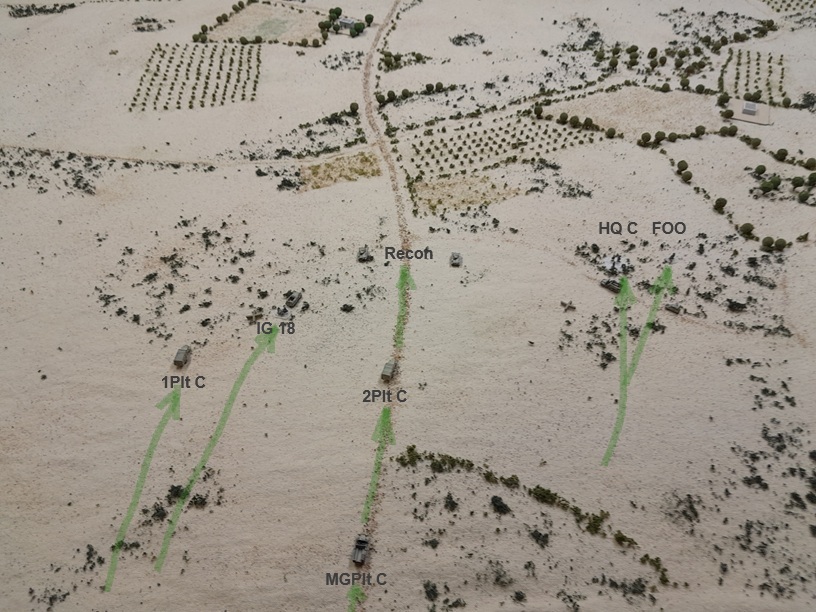
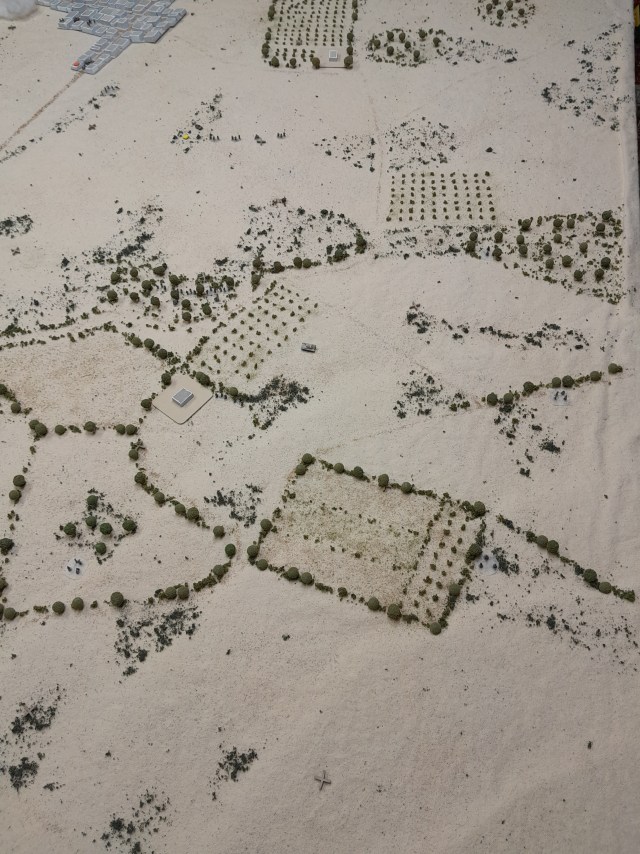
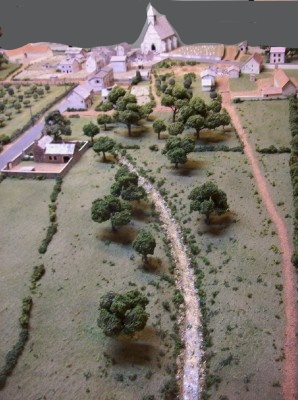
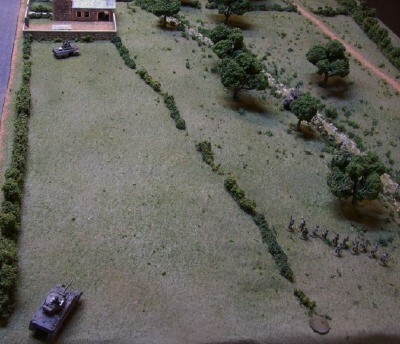
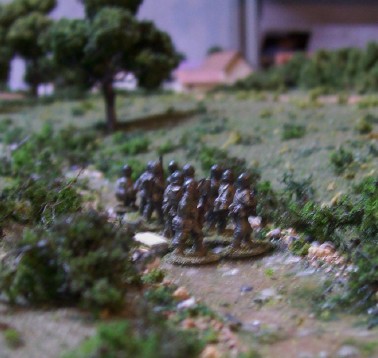
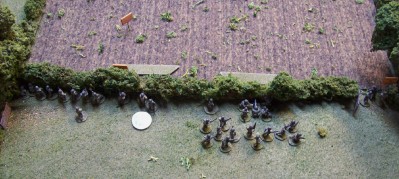
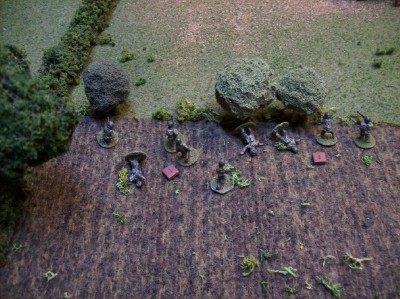
Comparison of 6 vs 15mm figs (on a Tunisian table). The platoon on the right/bottom is 200m away from the farm and spread across a 100m frontage…but it’s difficult to square that with the visual picture of the situation presented by the 15mm figs on small FoW bases (even if only using a single mini per squad as shown in the BUA) without players translating WYS to WYG – it would be even harder if the BUA and all the other terrain were also scaled to “look right” with 15mm figs. The 6mm minis are still 3x too large, but do a better job (imo) or presenting players with a ‘feel’ for the size/scope of the battlefield…or not
“There were giants in those days…”
(It may be that my limited experience/history with gaming pre-1900 mass-formations is the source for my aversion to using “giants” on the tabletop…dunno)
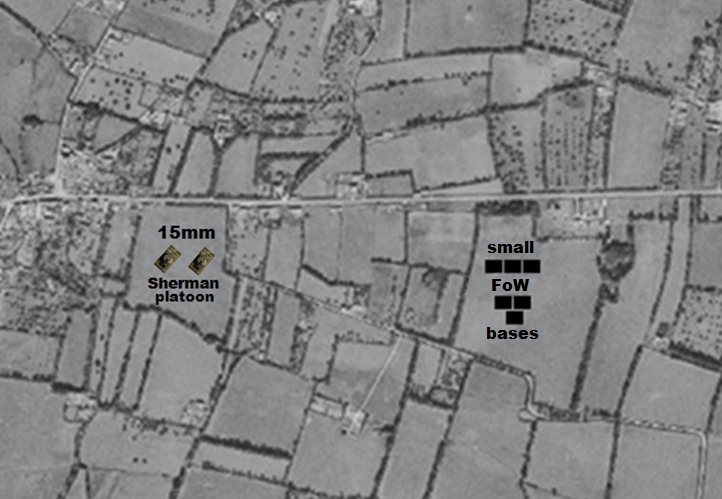
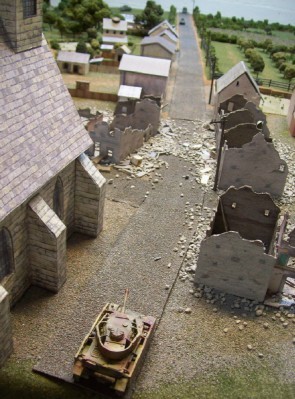
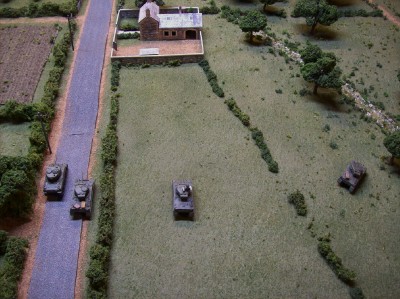
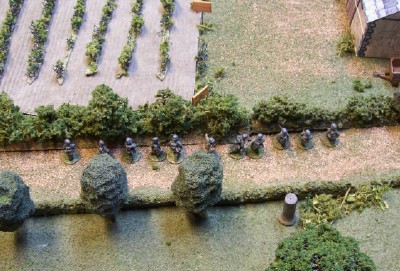
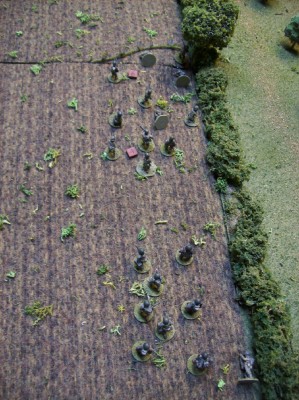
It doesn’t fit! A common defense in support of larger bases is their representation of by-the-book frontages. The trouble with this is that players are forced to use such “correct” formations even when they would be tactically unsound (or impossible) in some situations during a battle/game. Smaller (minimum-sized) bases, however, can represent any formation possible to larger ones as well as tighter/closer ones when/if the player chooses. Bottom line: It should be up to players -not the miniatures- to decide how their troops are positioned/deployed.
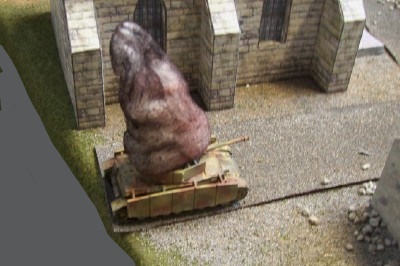
The photo shows how using small FoW bases (25x32mm) for each section/squad and/or 15mm vehicle models impacts their use on the tabletop. Fitting a platoon into the battlefield requires doing a ‘Godzilla’ with the models (stomping on the terrain), which reduces the value of the miniatures.
(I realize that not all battlefields present such restricted terrain, but limiting scenario choices to just “open” spaces -and/or altering/fudging the historical ground- seems to be an avoidable difficulty by simply using minis/terrain more in line with the game’s ground scale…or not)
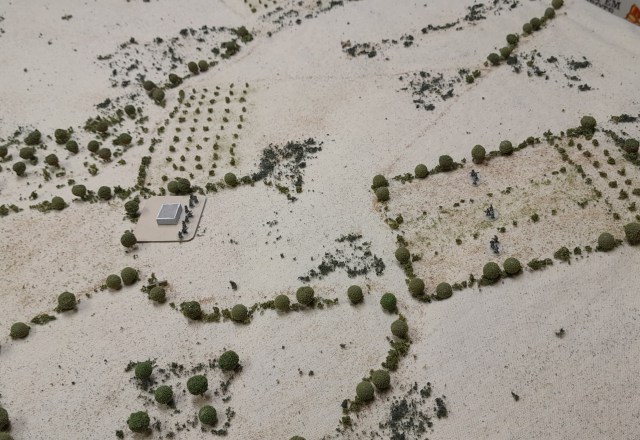
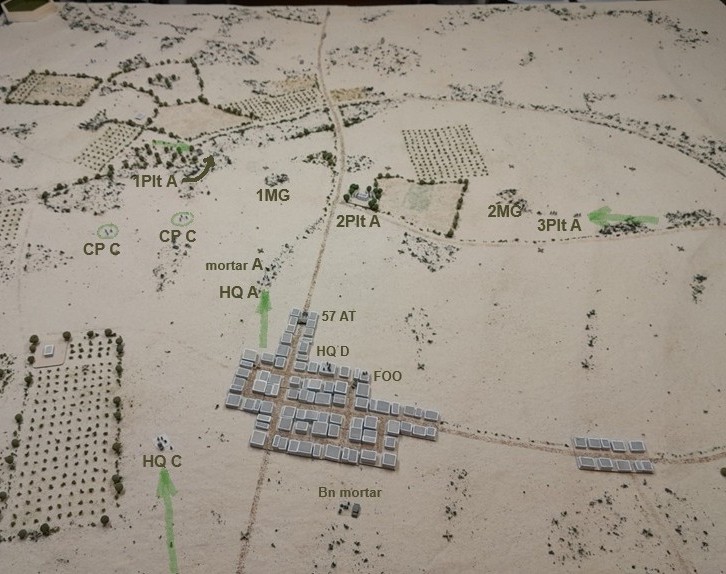
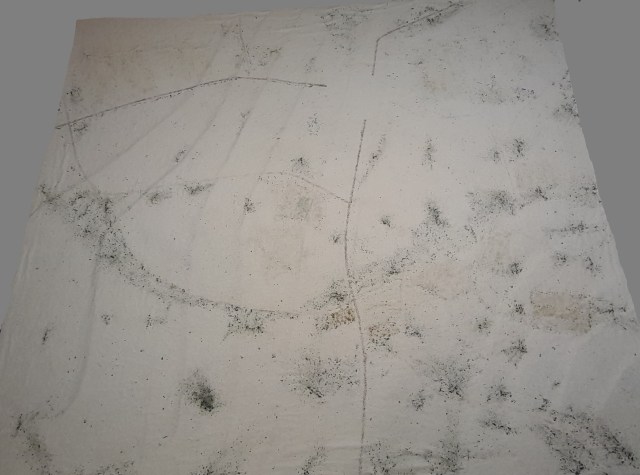
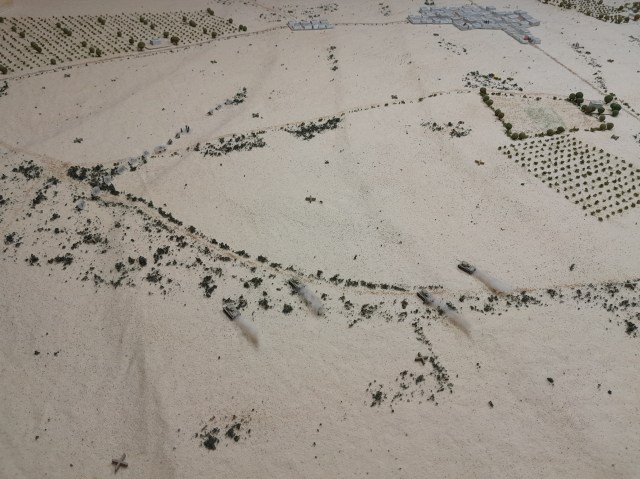
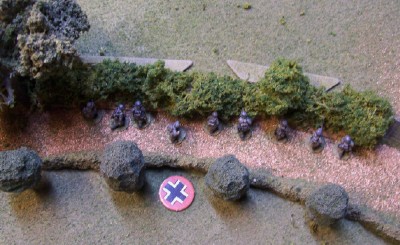
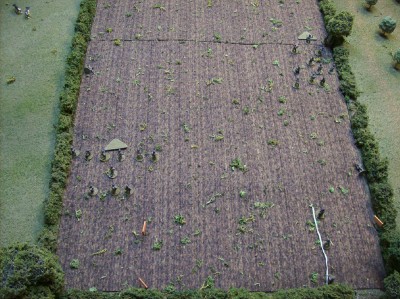
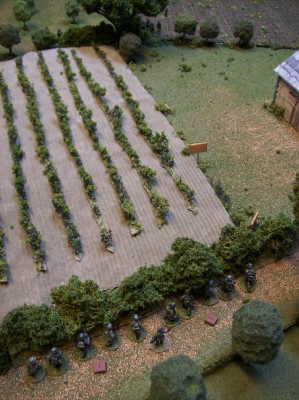
The “Empty Battlefield”: Highlighting the benefit to the battlefield picture presented to players using smaller figs/stands.
Ground / Contours
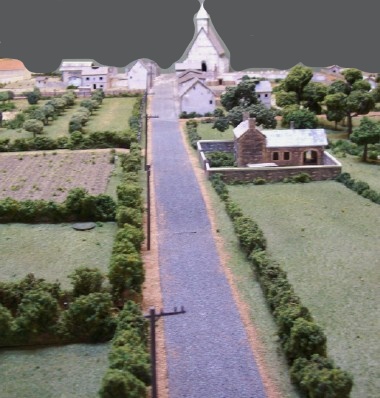
I use a ‘cloth over foam’ method as a base for the tabletop (usually flannel bedsheets over 6mm insulation boards) using contour information from https://contourmapcreator.urgr8.ch/ from either a historical location or -if an imaginary battle- from a suitable place: Relying on reality to (mostly) create the battlefield is easier (imo) than fretting over terrain set up, and helps to model the challenges faced by the commanders at the time. It can be a tad tedious cutting the levels, but since (for myself) the enjoyment of the results outweighs the annoyance it’s the path I choose to take – ymmv.
Built Up Areas
50m x 50m cardboard(~1mm?) with simple foam blocks – these were intended to be test pieces that would be replaced by nicer 3D prints, but…well…time has passed…and they still work, so…
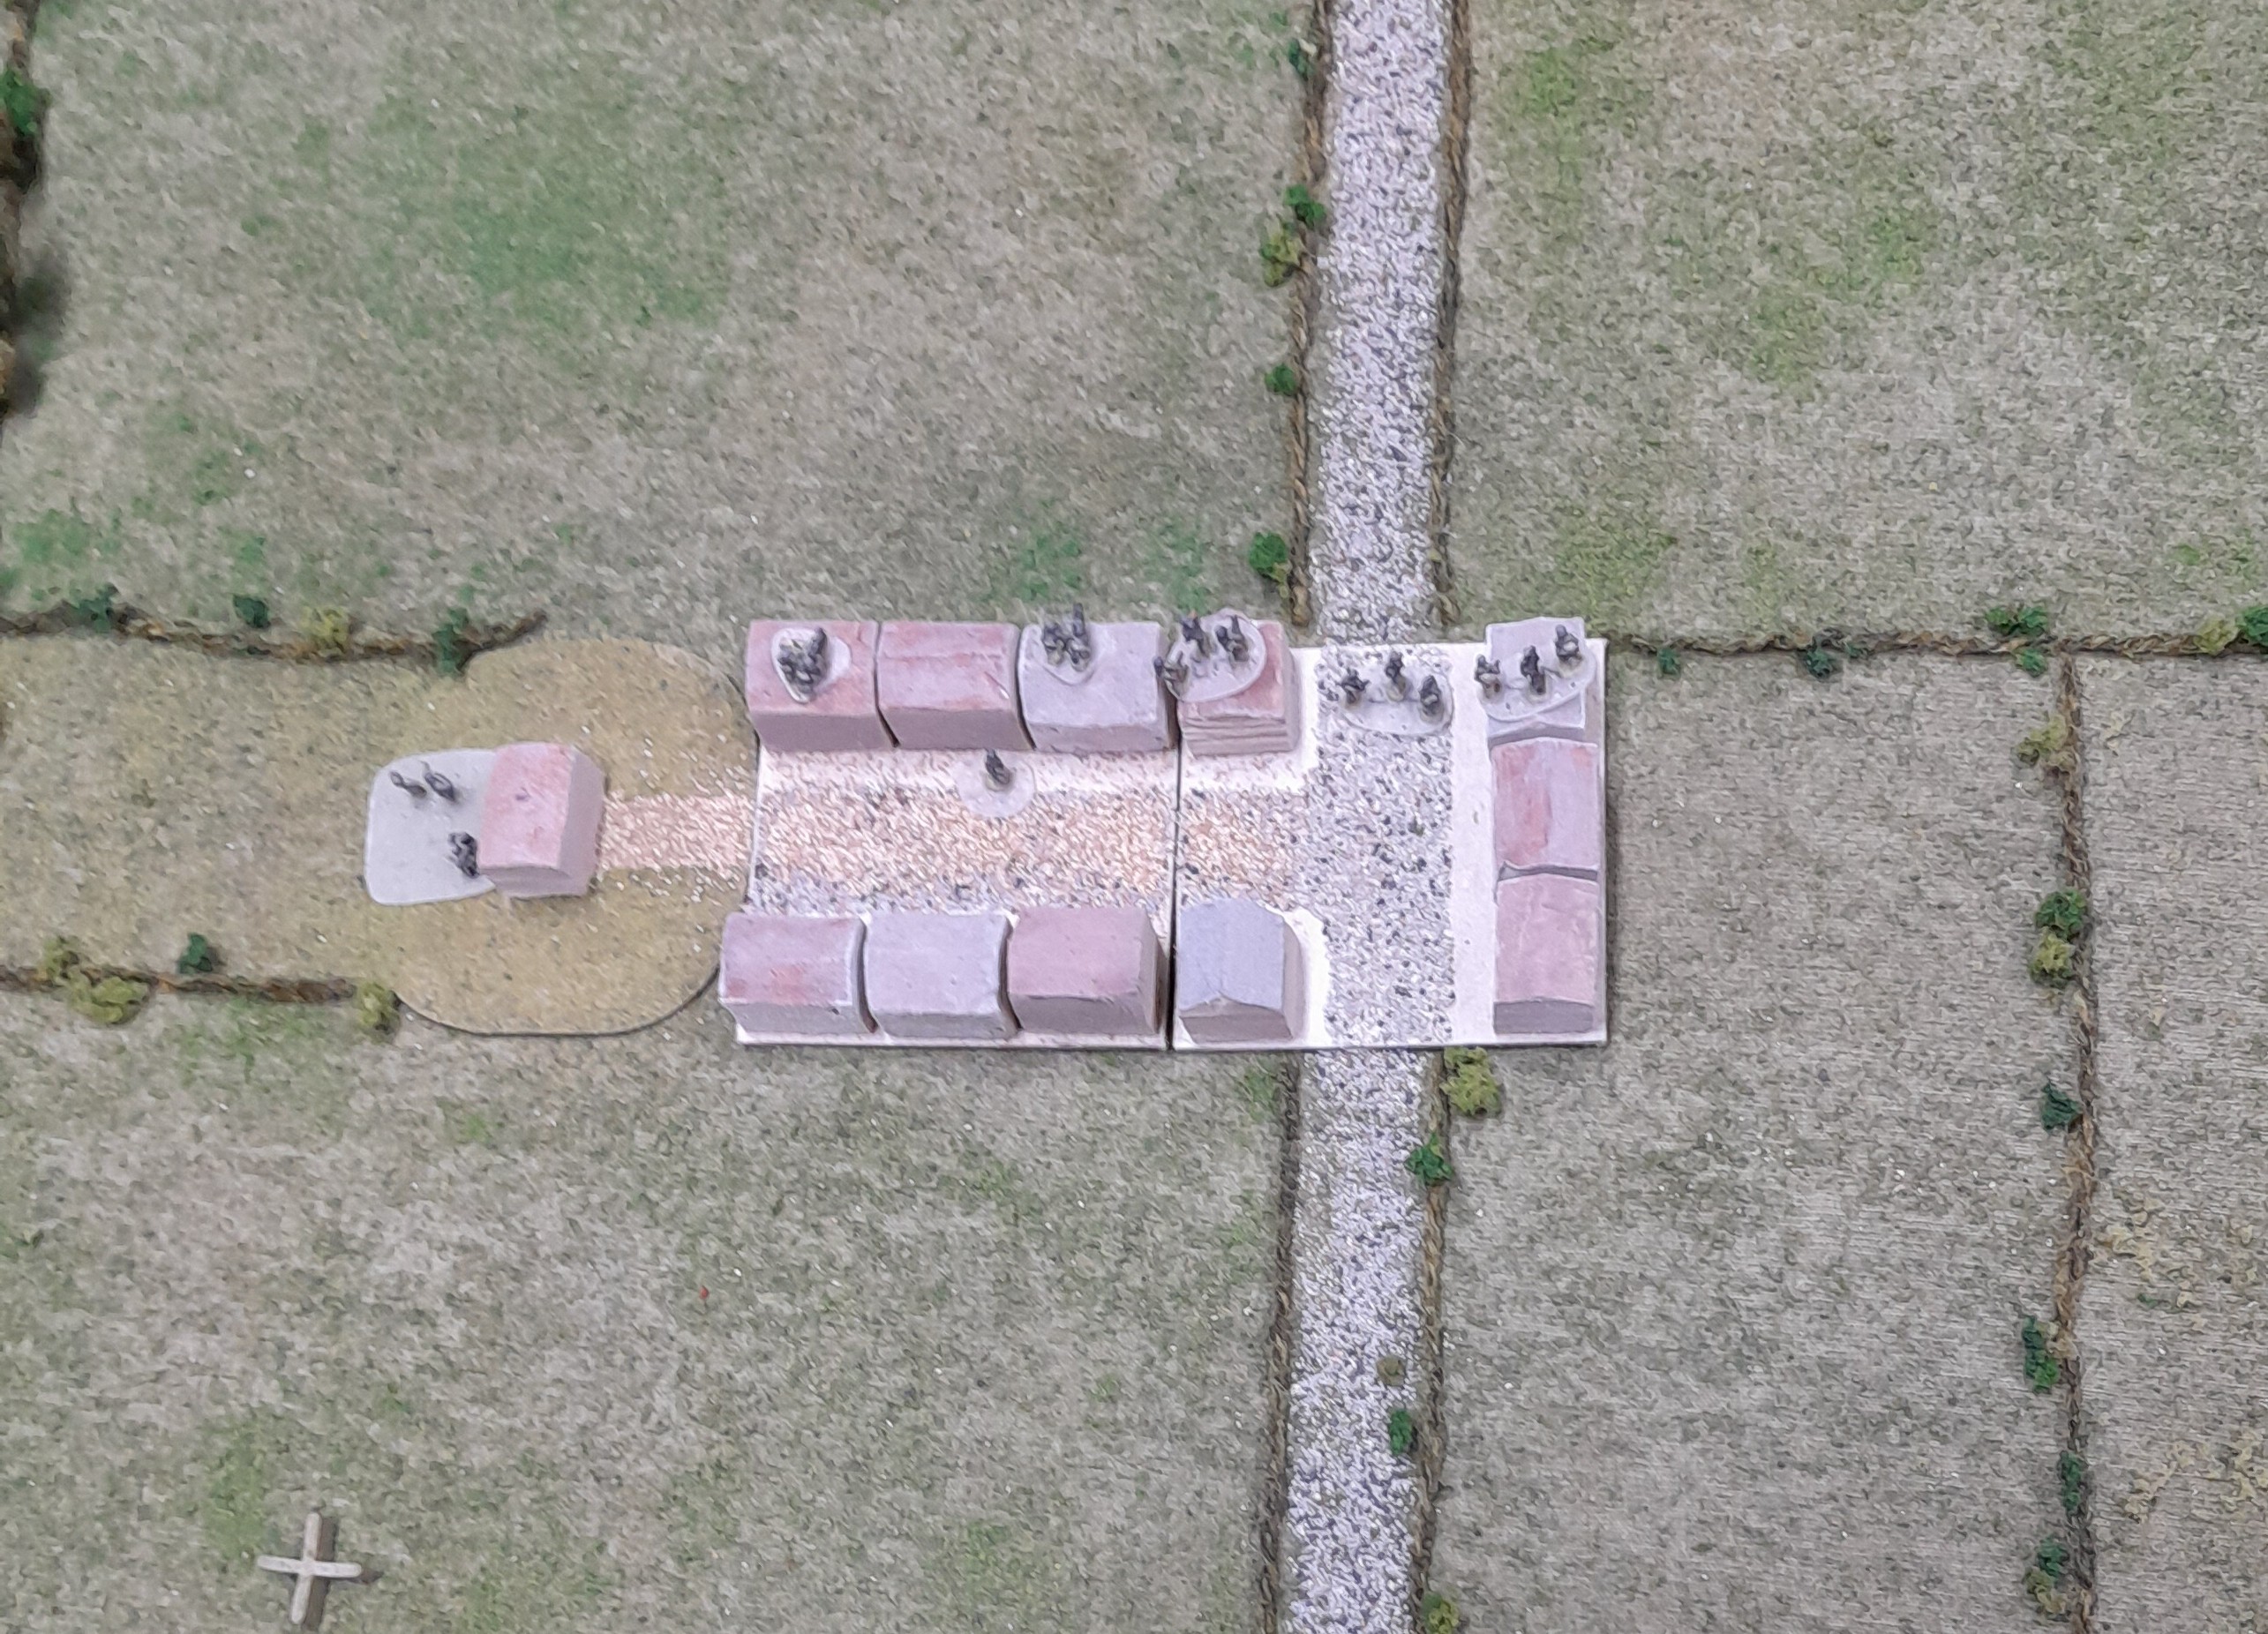
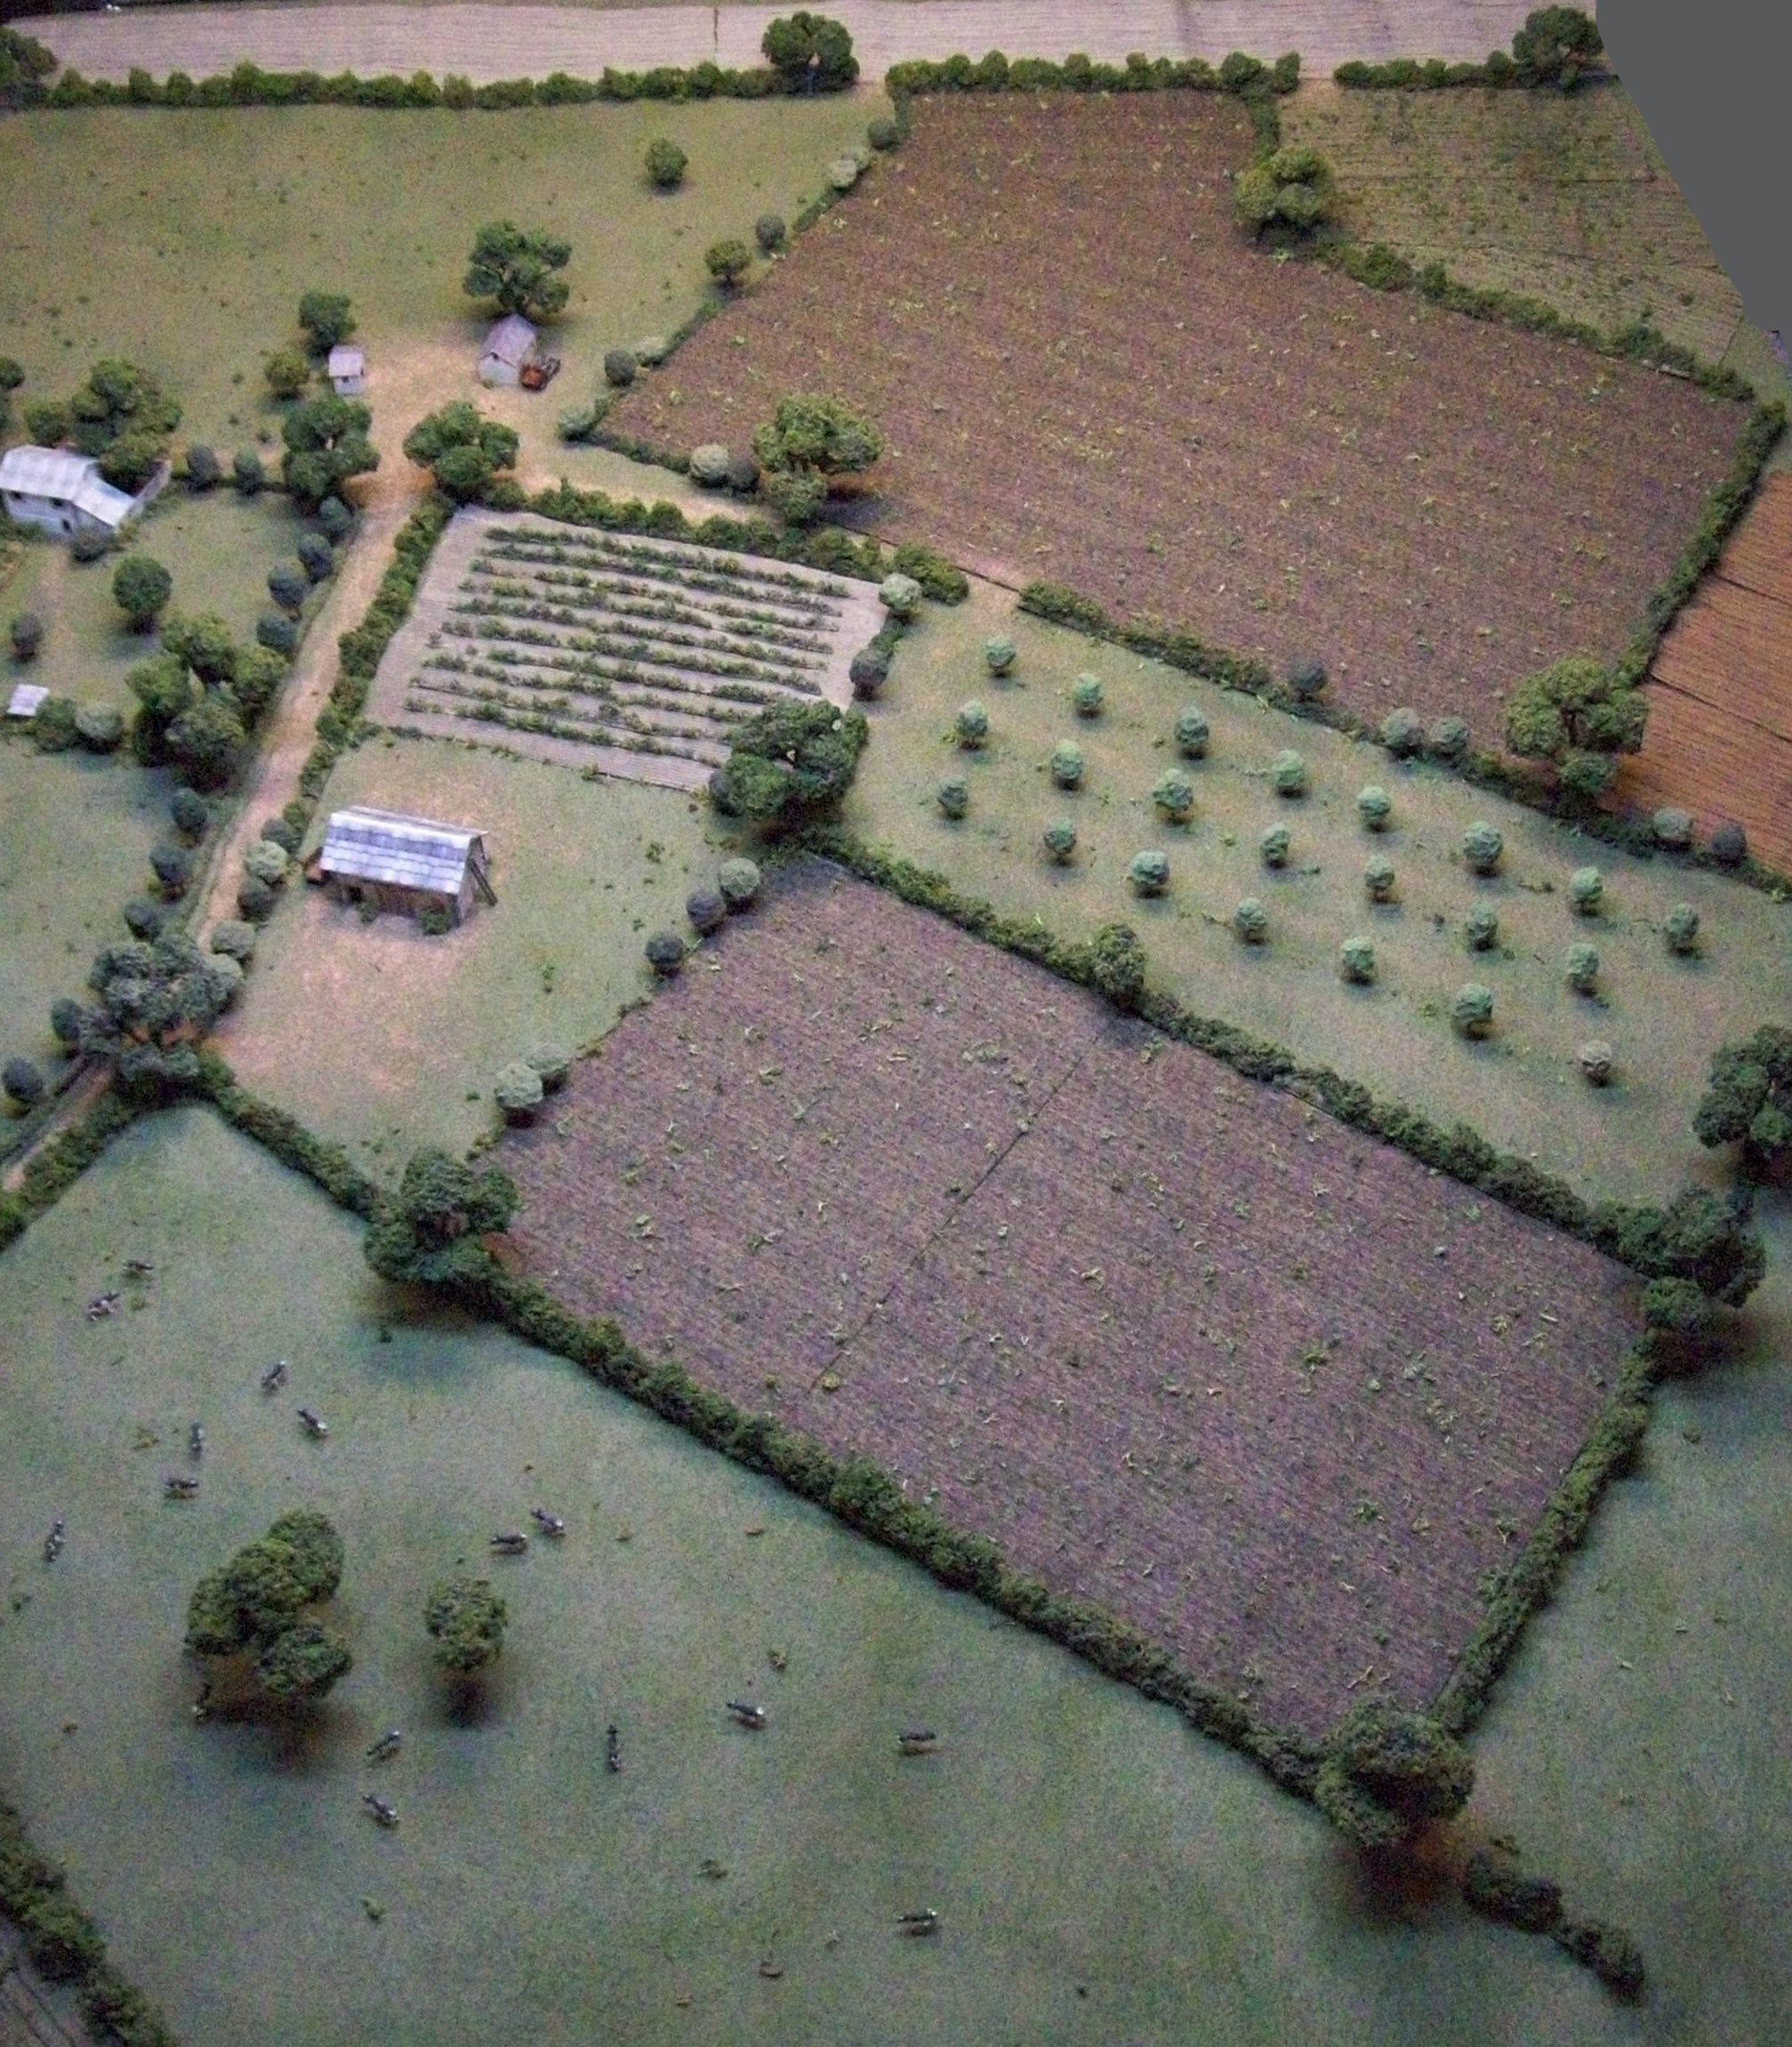
Farmsteads
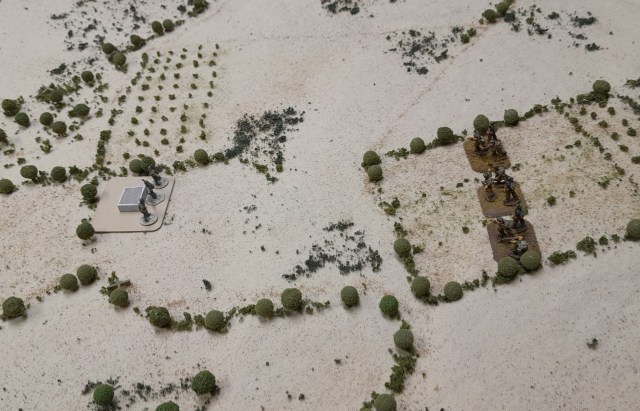
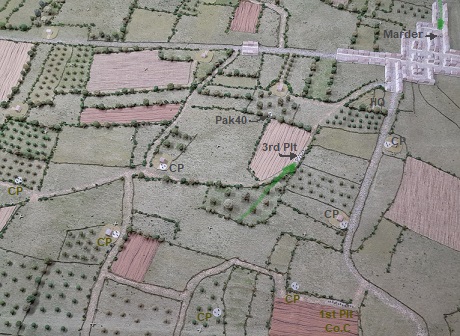
This shows a Rifle platoon w/att Pzrshrk in the upper farm and an AT section in lower farm.
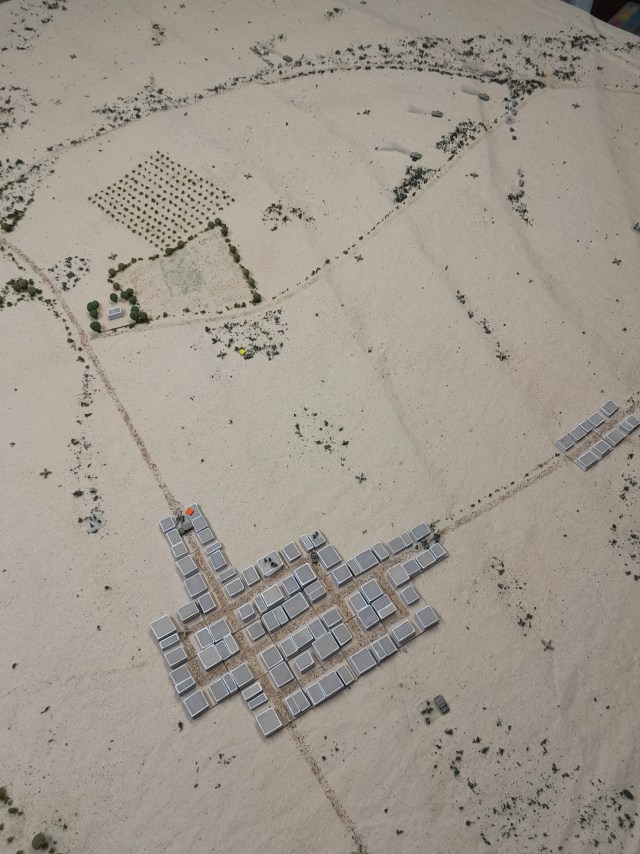
Village / Town
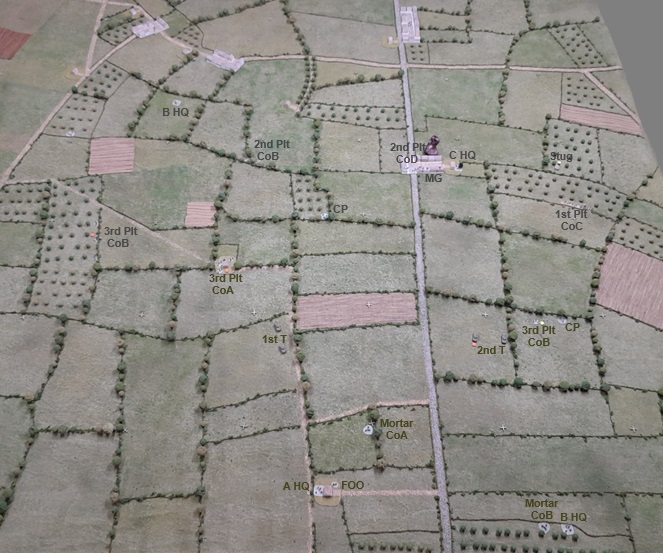
This shows (from left to right) a Company HQ in farm on edge of BUA holding an MG platoon (w/HQ ‘order’) and Rifle platoon.
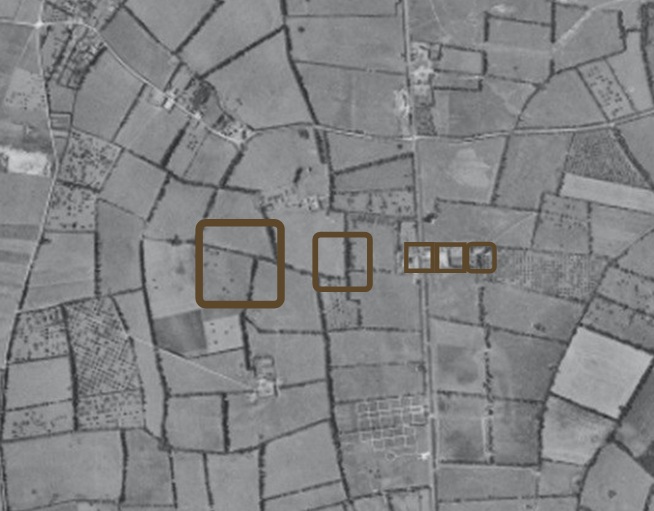
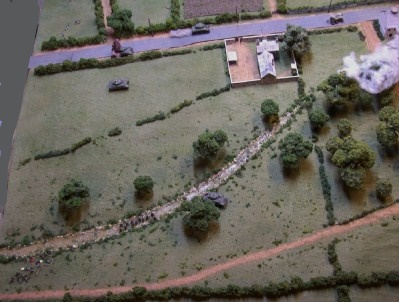
How does the BUA size compare to what it’s meant to represent?
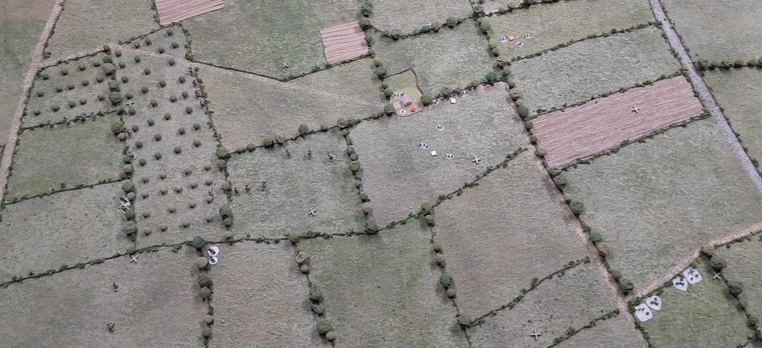
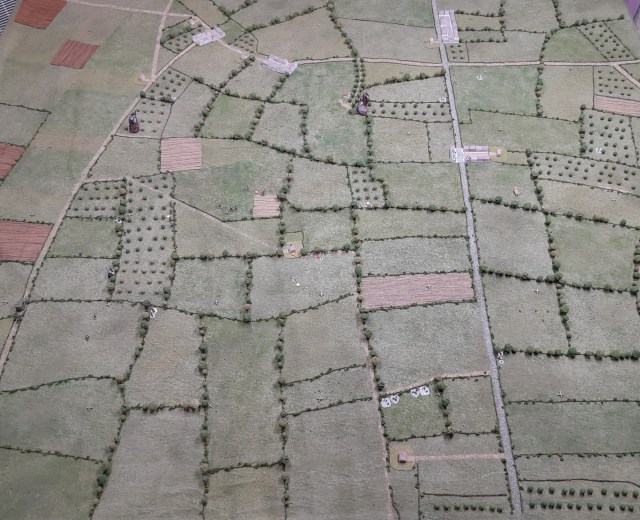
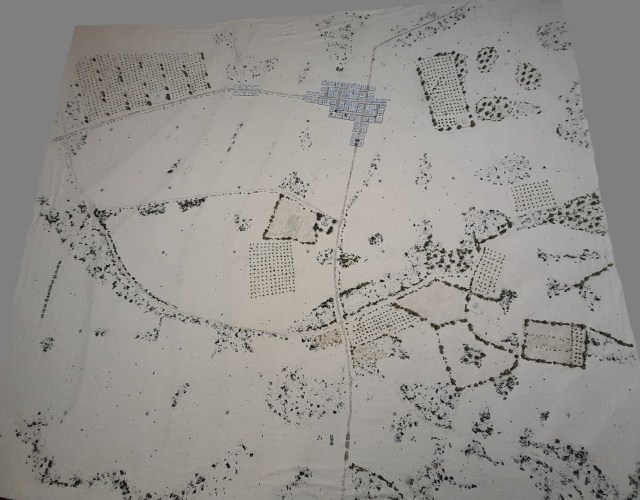
This shows my BUA bases on a recon photo of the area in the Village/Town example shown above, along with 100x100m and 150x150m footprints – which would be hard to use without seriously rearranging/altering the battlefield.
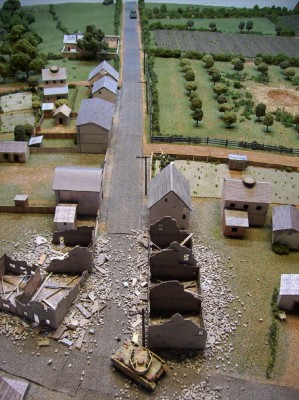
This game is based on George Wilson’s first day of combat as a new 2nd Lieutenant in the 22nd Regiment as told in his book of the above title. On the second day of Operation Cobra his platoon (with a tank platoon of the 3rd Armored Division) is ordered to enter/secure the town of St.Gilles from the west side after the main column is held up on the north. The German forces in defense consist of elements of the Panzer Lehr and 275th Divisions scrambling to stem the tide of the American penetration. The rules used are “Chain of Command” by TFL with 15mm miniatures. The 70″ x 80″ table is a rough attempt to model the terrain west of the town. Period recon photo from https://ncap.org.uk/ :
I ran out of building models, so left off the ones at the intersection on the far leftthinking that they wouldn’t play a big part in the coming battle…and I was too lazy to build them!
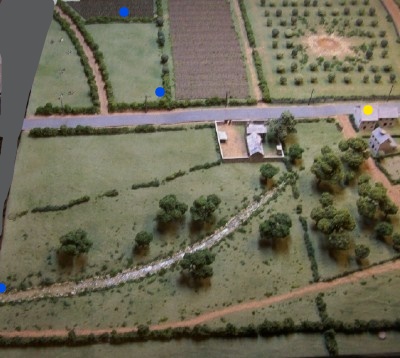
American Jump-Off Points are shown in blue, German in yellow.
The scenario is ‘Hasty Defense’ from the ‘Blitzkrieg 1940‘ supplement (modified slightly), with the Americans tasked with clearing two of the three town zones (north, center, south) and exiting a unit off one of the respective paved roads. A morning visit by P-47 fighter-bombers made some dents in the town and surrounding countryside (‘Stuka’ rules applied from supplement).
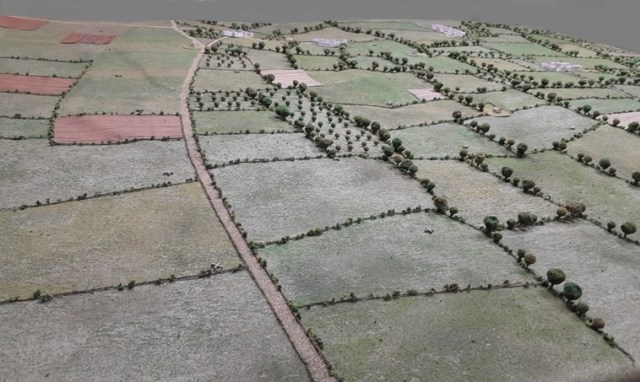
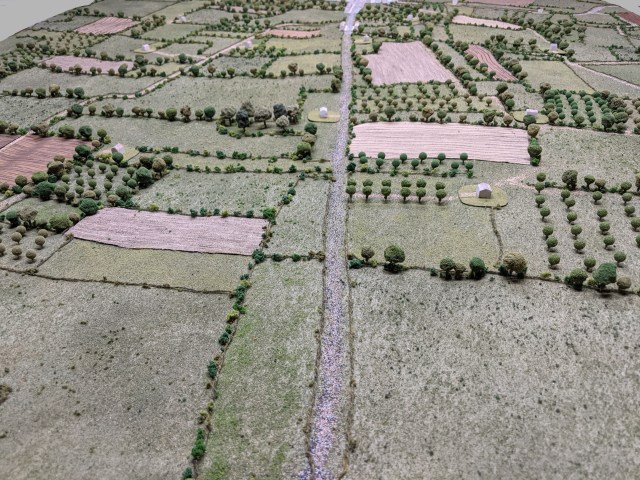
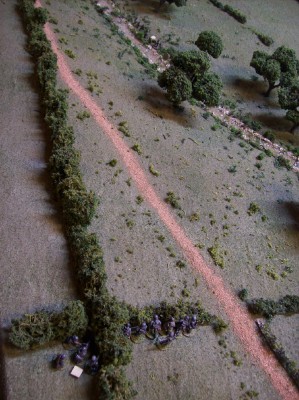
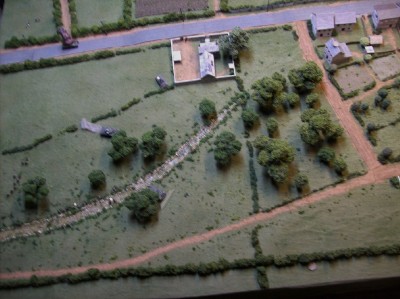
The US left flank approach was across open fields and a bombed orchard. The road in the center was closely bordered with hedges/fences and went past the blacksmith’s sturdy compound. The right side held a sunken stream that led to a small woods on the edge of town.
The U.S. deployed a squad and tank to the right and moved down towards the stream, while an M20 scout car raced up the road in the hopes of capitalizing on the bomb-shaken nature of the Germans as the 76mm-gunned Sherman kept watch on things ahead. A MkIV saw the scout car and thought a burning hulk might help squelch American morale and took the risk of nosing out to take a shot.
Unfortunately for the German the shot only scared the crap out of the M20 commander, while the return overwatch fire from the Sherman made short work of the panzer…
On the right, the Americans made slow, steady progress down to the stream…
The Germans -having failed in the tank fire exchange on the road- gambled on hitting the Americans here and opened fire with a MMG dug into the corner of the hedgerow, along with a supporting section with two LMG teams and -while they’re at it- a panzerfaust round at the Sherman.
The MG fire caused some casualties but was not as decisive as the German hoped, and while the tank driver became a casualty and the crew shaken the Sherman was still in the fight.
The reaction by the Americans on the exposed Germans was brutal: A fresh squad up the hill, the tank platoon leader’s M4, and the M20 (who, after recovering from its brush with the MkIV, turned off the road to the protection of the smithy) all added their fire to that of the squad and tank at the stream.
The poor Germans got in a bit more fire but soon broke for the rear, carrying their knocked-out leader and leaving behind four of their comrades. Morale fell hard.
Back up on the road, the Sherman moved forward slowly while the commander kept a close watch on the town ahead. A Pak 40 opened fire from the corner of a garden on his left, but caused only a glancing blow. The tank’s return fire was much more deadly, killing three of the gun crew. There was no time for celebrating a win, though, as a second MkIV (which had deployed out of sight to the north of his burning comrade) crept out to take a shot.
The American was quicker on the draw and fired first (player used a CoC die to interrupt) but missed. The German shot hit but didn’t penetrate. The duel wasn’t over, though, as the German interrupted the American in the subsequent phase and scored a solid hit, brewing up the Sherman.
No celebration for the Germans, though, as the turn ended and the subsequent loss of morale from the routing of the MG team and the section (with the wounded leader) meant the game was over.
situation at the end of the game
I intend to give the scenario another go and see if the Germans can hold out a bit longer – if for no other reason than to justify the time spent building the table! ; )
Once more unto the breach…
The Jump-off Points set for the second game. The Americans shifted slightly to their right, with a JOP down at the stream. The Germans have one forward in the center again, but have pulled back on the flanks a bit.
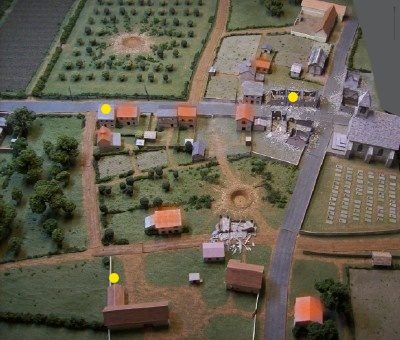
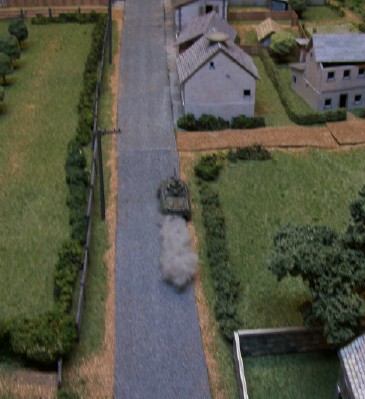
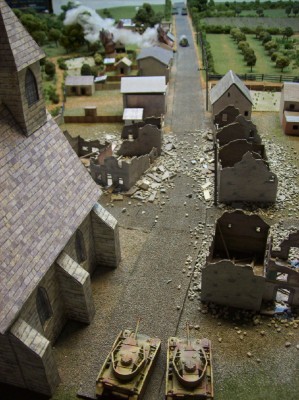
Something that was included but not noted in the first game: The P-47s have left some of the buildings unstable and in danger of collapsing – these are indicated by orange shading. Also: I found (after playing the first phases) that I forgot to roll for burning buildings as well, so here is a shot of the two in the center (flanking the German JOP) that are on fire and laying down smoke (that blocks LOS)…spoiler alert! Yes, that thing on the road looks suspiciously like an M20 on its side…oops
The Americans begin with each platoon (infantry and armor) rolling a double phase. The green Lieutenant comes on across the stream with a squad, while the scout car races up the road (like last time: hoping to shut down the forward JOP, but fell short by 1″).
The tank platoon takes the opportunity granted by the dice to deploy everything, hoping to take advantage of the P-47’s disruptive effects and get well in before the Germans have a chance to react.
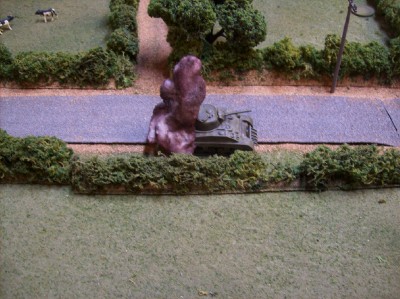
The Germans had been planning to keep their powder dry this time and not stick their noses out to get shot, but… A MkIV commander noticed that the M20 had come far enough up the hill to block the LOS of the Sherman on protective overwatch* and couldn’t resist the temptation. No explosion resulted, but a satisfying wreck that blocked the road was a good enough outcome…especially when the 4-point drop in American morale is considered!
* being able to judge LOS on a table which includes elevation makes the trouble of setting it up worthwhile!
The German infantry chose to play along after rolling a double phase themselves. Noticing that none of the tanks had LOS (yet) to the JOP at the wall on their left, the U.S. squad at the stream was on their own for the moment. A section of two LMG teams deployed at the wall and opened fire. Four consecutive phases later (the result of three double-phase rolls!) the U.S. squad was on the verge of being pinned and the squad leader was wounded. Not the decisive result hoped for by the Germans (no kills and no effect on morale), but not bad.
A couple game notes: 1) Per the ‘Stuka’ rule (which I forgot to mention in game one) the Germans deployed with 3 points of shock which the leader was able to remove over the course of the phases. 2) I know allowing multiple, consecutive phases of firing such as this has been debated. I view/interpret such occasions as representing the equivalent of a single, very effective round of fire, the great impact of which (ie: shock and KIAs) reflecting the severity/success of the attack and not representing the target taking multiple phases of fire.
The U.S. Lieutenant and wounded Sergeant of the 1st squad rally a bit of the shock, and the 3rd squad deploys into the stream to help share the trouble. It’s a good thing they do. The Dice Gods then double down on my ‘this is how I view consecutive phases of fire’ as the Germans pour four more rounds of fire into the area. The troops in the stream are out of LOS so the three kills fall on the rifle team of the 1st squad as well as knock out the Lieutenant, but sharing out the shock keeps the original squad from breaking. Still, it’s not a fun time in the stream and morale falls to 4.
After rallying off some shock, the 3rd squad moves slowly up the stream out of sight of the deadly MG fire.
Up in the center, the 76mm-gunned Sherman moved over a titch to line up the MkIV and got revenge for the M20. No explosion, but the Germans bailed out in a hurry, so ‘Good enough’, and the German morale fell to 6. The platoon leader then ordered the two tanks on the road to join him in a steady advance while the #1 tank continued down the hill in the hopes of getting line-of-sight past the trees to the Germans at the wall, but no joy.
The Germans had thought to pull back from the wall, end the turn (and the deployment hindrance/shock of the Stuka rule), and prepare for a last-ditch stand in the town. Instead, sensing the opportunity the wavering American morale presented, chose to stay put and pour more fire onto the first U.S. squad and use their CoC die to ambush the first Sherman with the Panzerschreck team from behind the smithy.
The MG fire from the wall managed to pin the U.S. squad down by the stream, but the ambush failed miserably (the German team rolled snake eyes…”I thought you loaded it!” “No, you told me You did!”).
Undaunted, the Germans decided to deploy a second MkIV on the road, taking advantage of the fact that the American tank commanders were busy with not driving into each other and not watching out for trouble as well as the M20 wreck which blocked LOS for the 76mm-gunned Sherman. The shot was on target, but bounced.
In their phase, the U.S. infantry platoon sergeant came on to sort the mess in the stream while the tank platoon leader got on the radio to do the same up on the road, and it looked as though they would emerge from the flurry of attacks during the German phase relatively unscathed, but…
…the Germans weren’t done, yet. The MkIV used a newly obtained CoC die to interrupt the orders being given by the American tank platoon leader and send a second round down range on the same target: result = boom-goes-the-Sherman, and the morale of the U.S. forces dropped to zero.
So the score for the scenario is now tied at one win each. For all the rules mistakes and poor tactics/decisions made it was a fun game. Dunno…I may give it another go… ; ) Here’s a shot of the end this time:
What If? -the difference table size makes
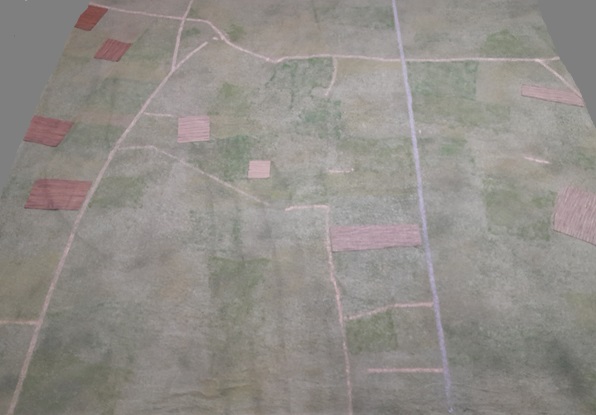
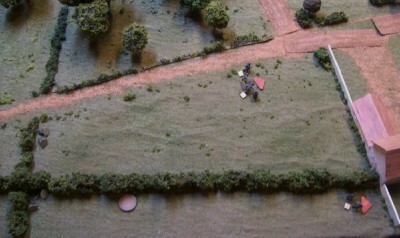
I enjoy the luxury of being able to game on a table that is larger than the ‘standard’ 4×6-foot. The 70″x80″ layout I have provides more than half again the surface area for a given scenario and – along with the use of ground-scale-figures – does a good job of presenting a picture of what sort of space is being represented. Besides the aesthetics, though, is the impact table size has on the game itself. I know this is very much stating the obvious, but I thought it of interest to post a photo of the same scenario if it were to be played as illustrated in the ‘Blitzkrieg supplement’ on a 4×6 table with the attackers entering on a long edge.
By moving the attacking edge up to the hedgerow on the west side of the orchard, the resulting Patrol Phase allowed the Americans to get a JOP right in the edge of town. The narrative this presents is, IMO, completely reasonable, and would result in a completely different game. Again: I know this is obvious, but figured it wouldn’t hurt to show/say so. ; )
For those who may want a more extended view of the table I made a short tour video:
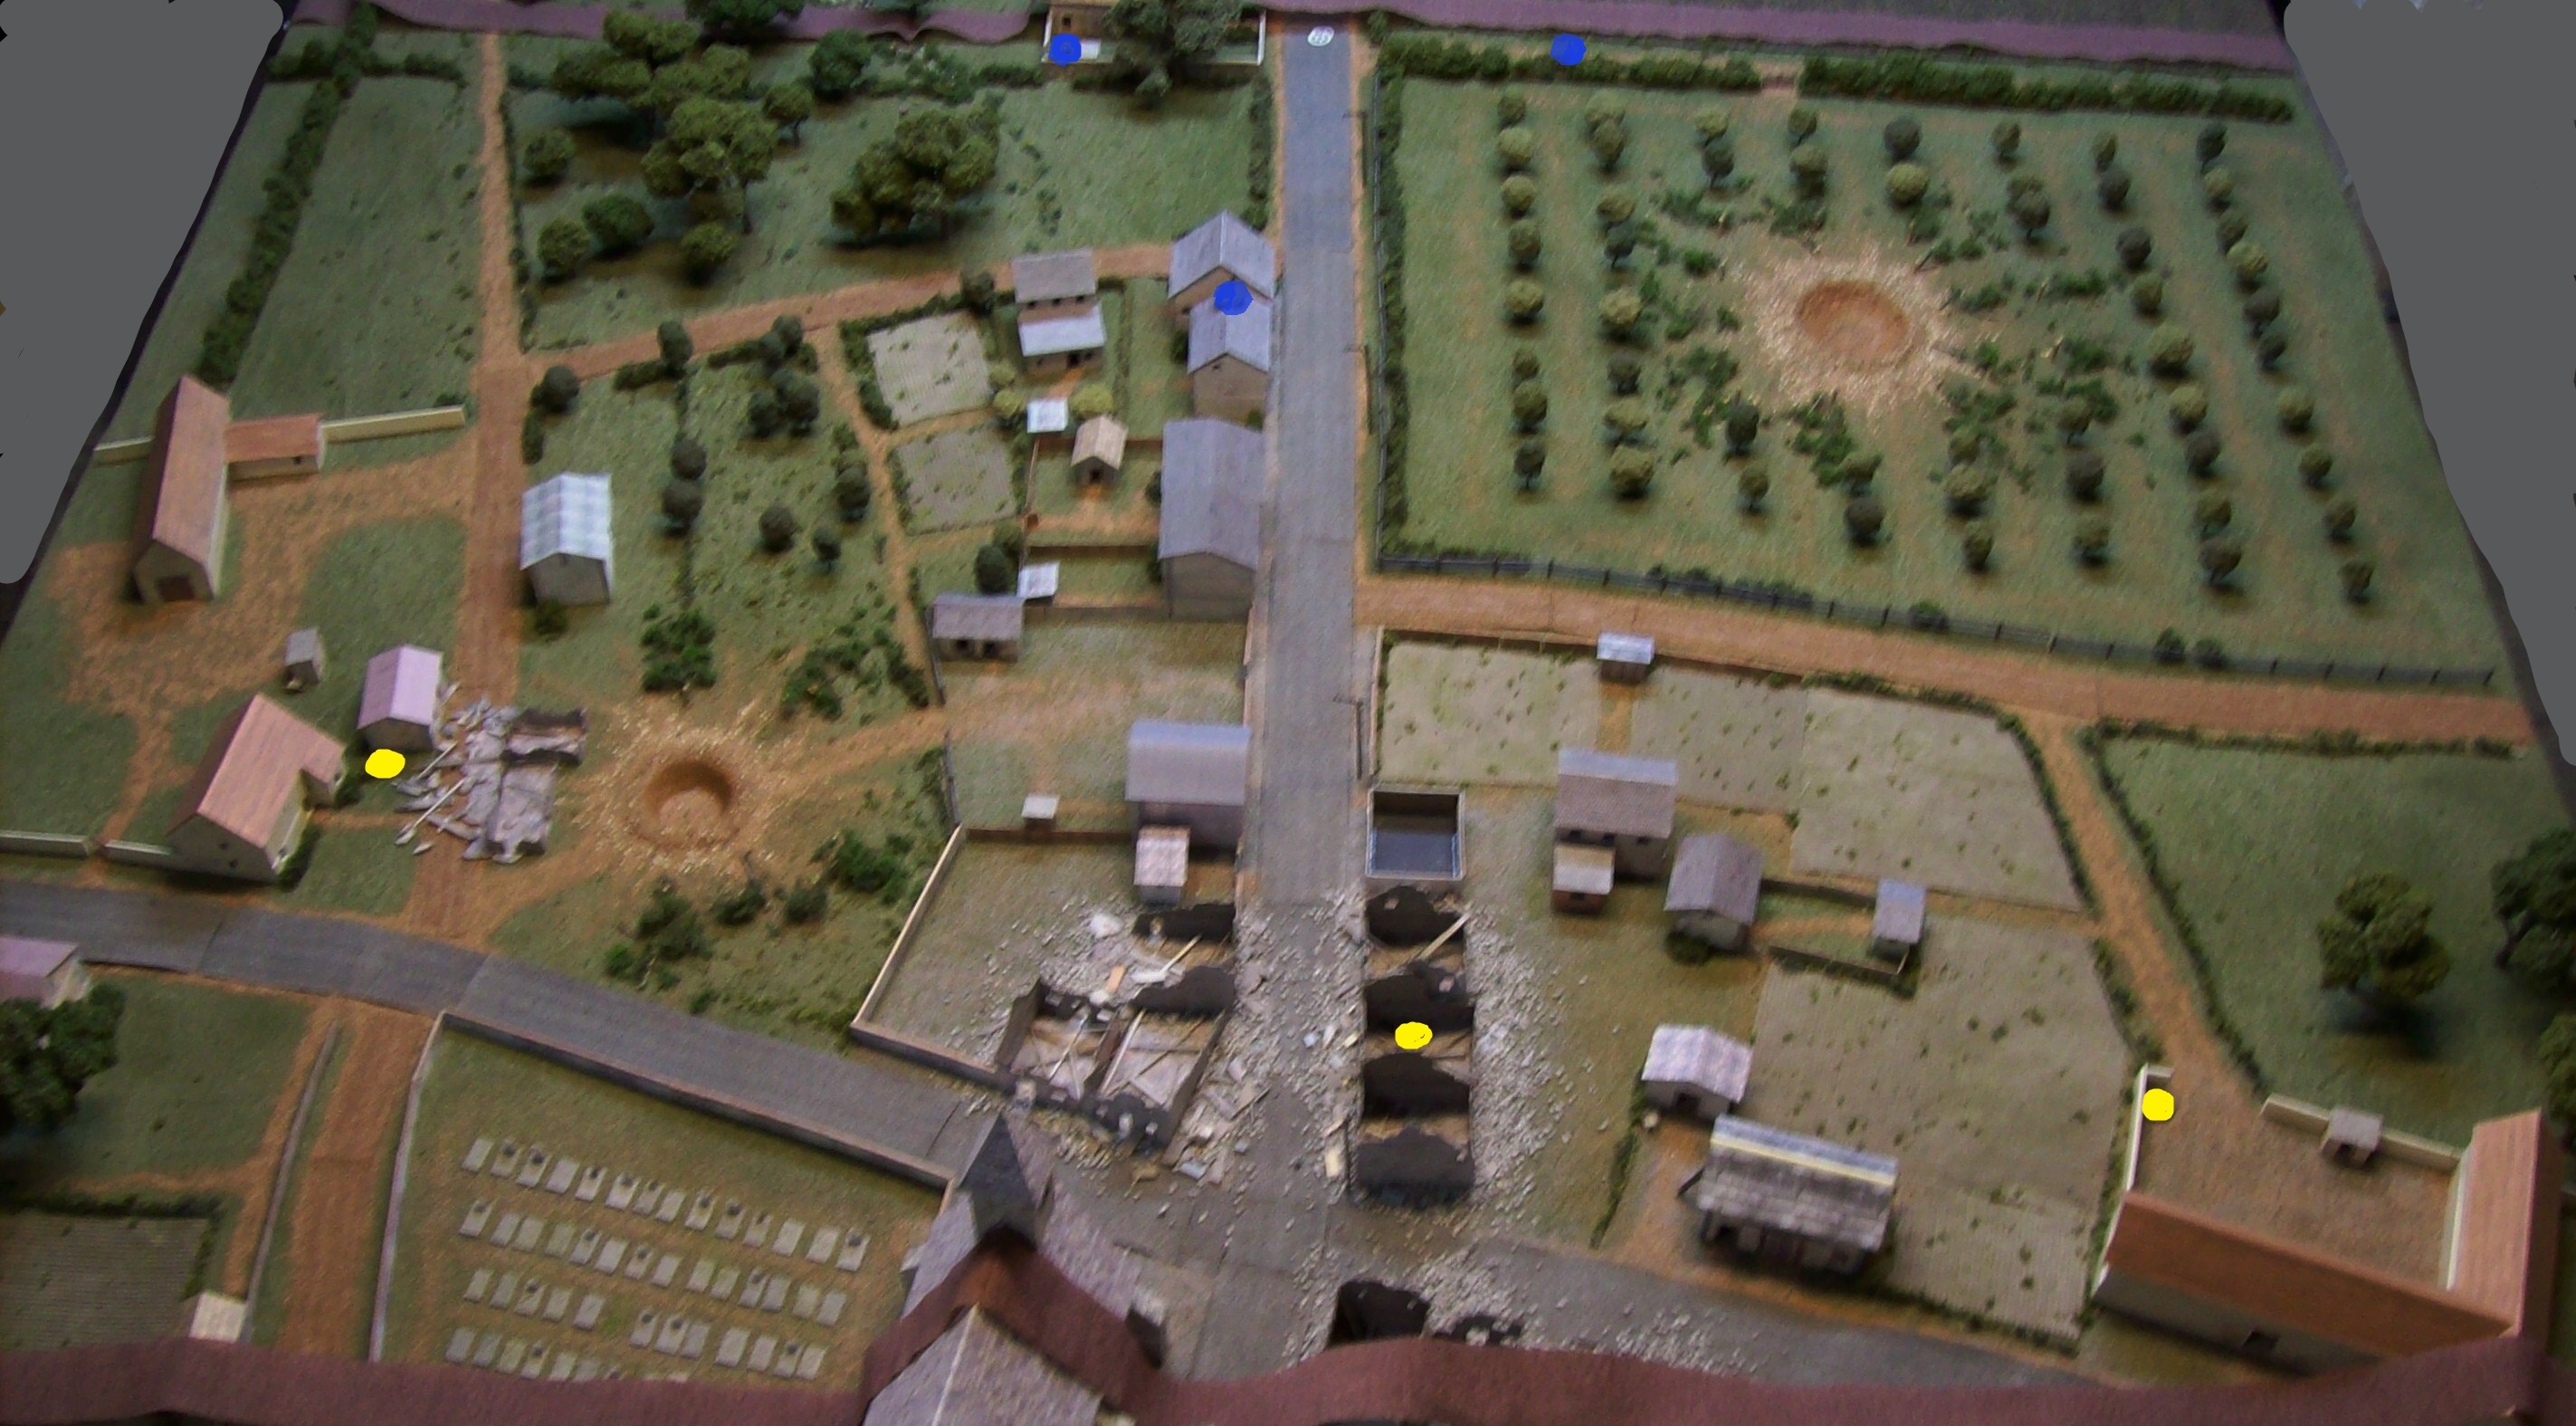
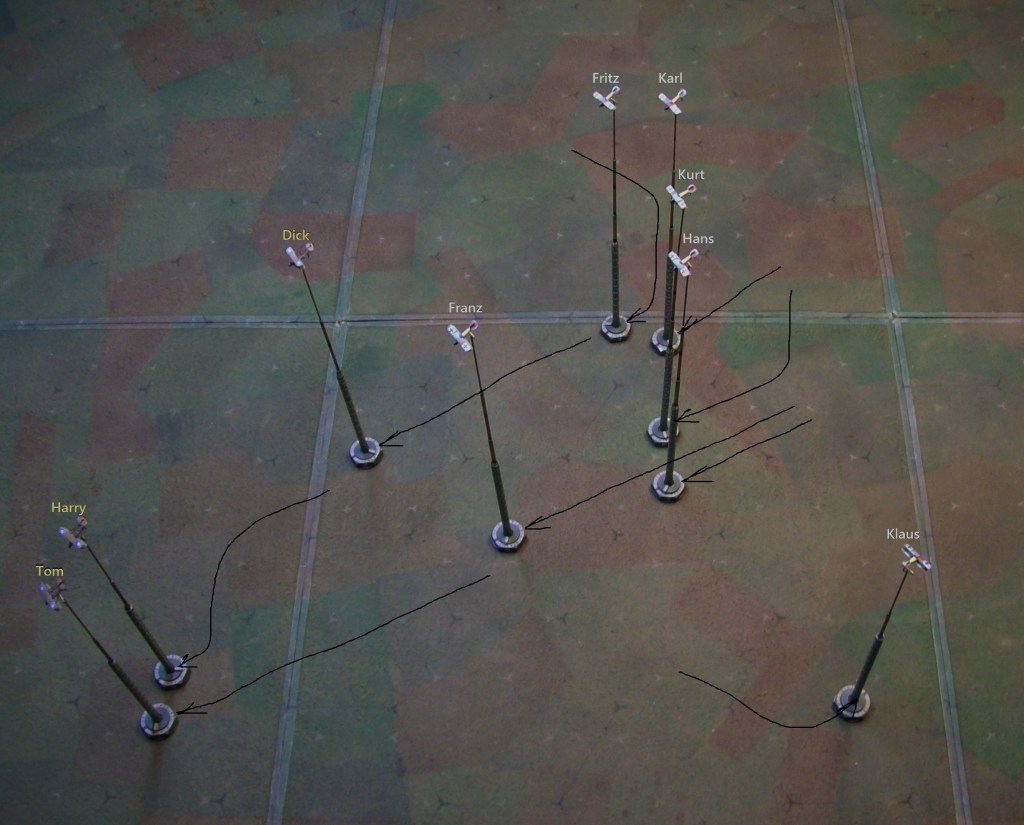
The game is set in the sky on the German side of the lines near Baupaume where 24 Squadron tangles with Jasta 2 on a regular basis. The action is based on a real event. The names have been changed to protect the innocent. As this is played solo, a rudimentary AI (ie: roll a d6!) was used to guide the action when “What would the pilot do here?” questions arose during the course of the game.
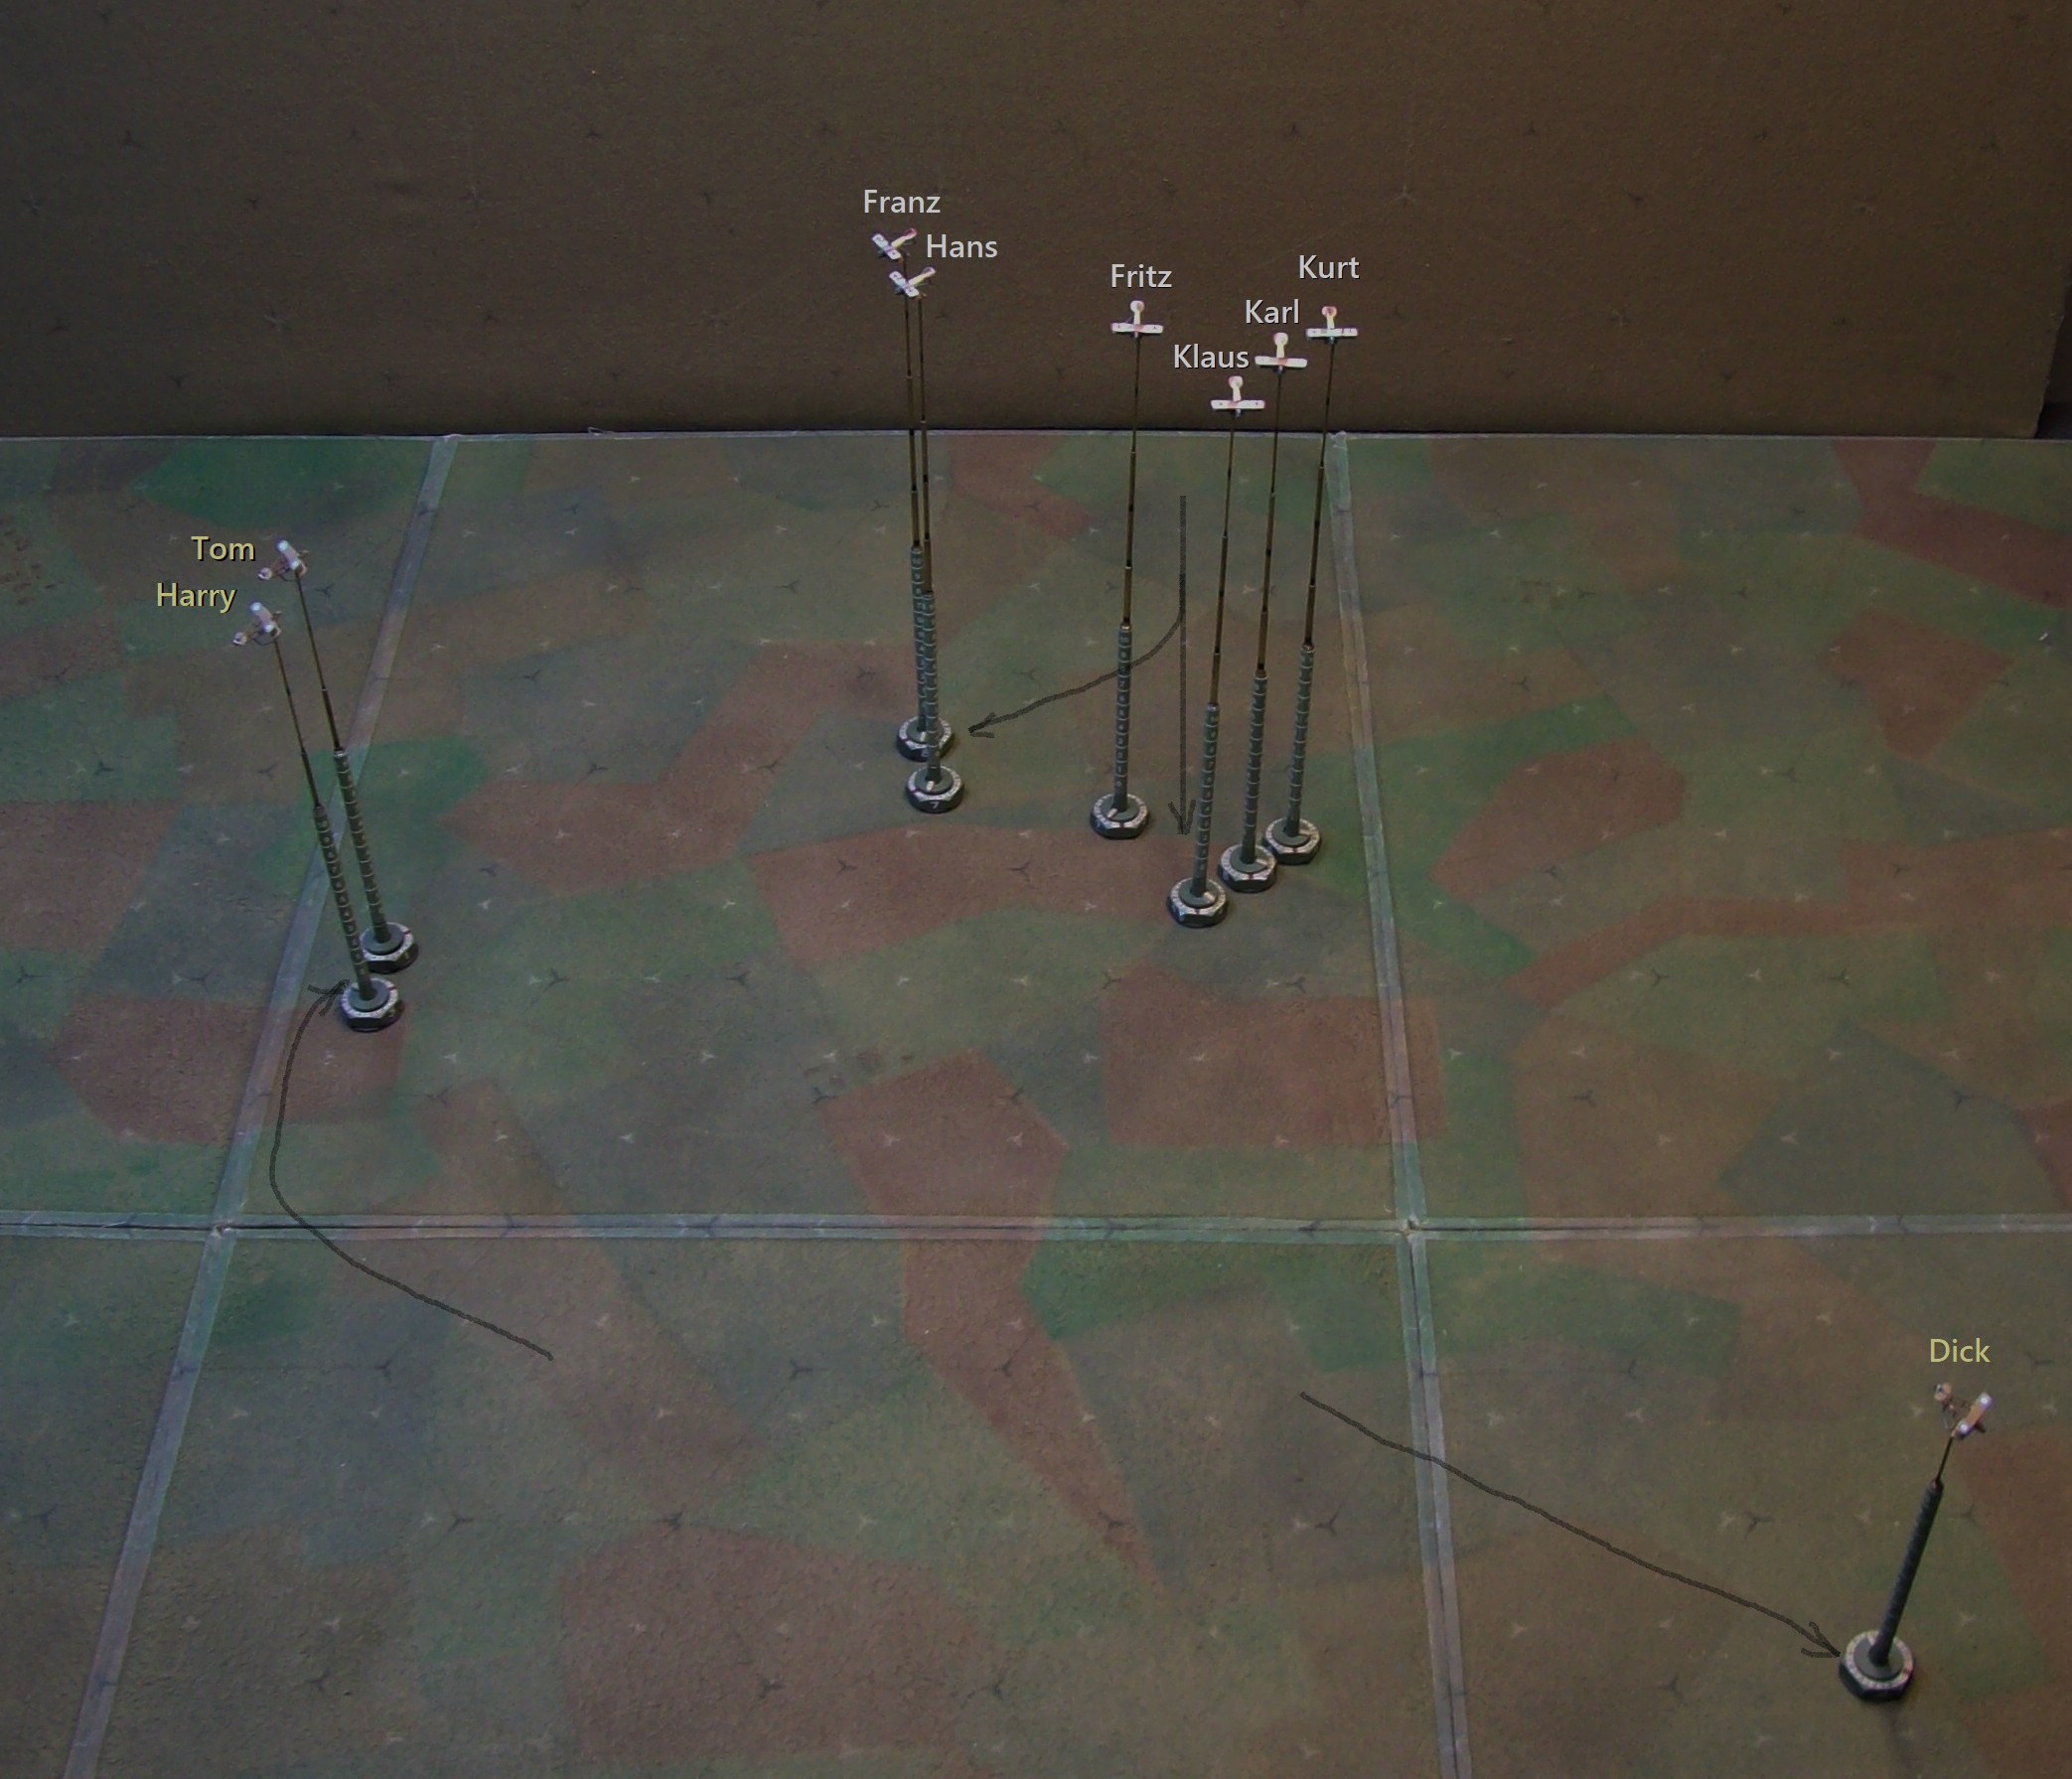
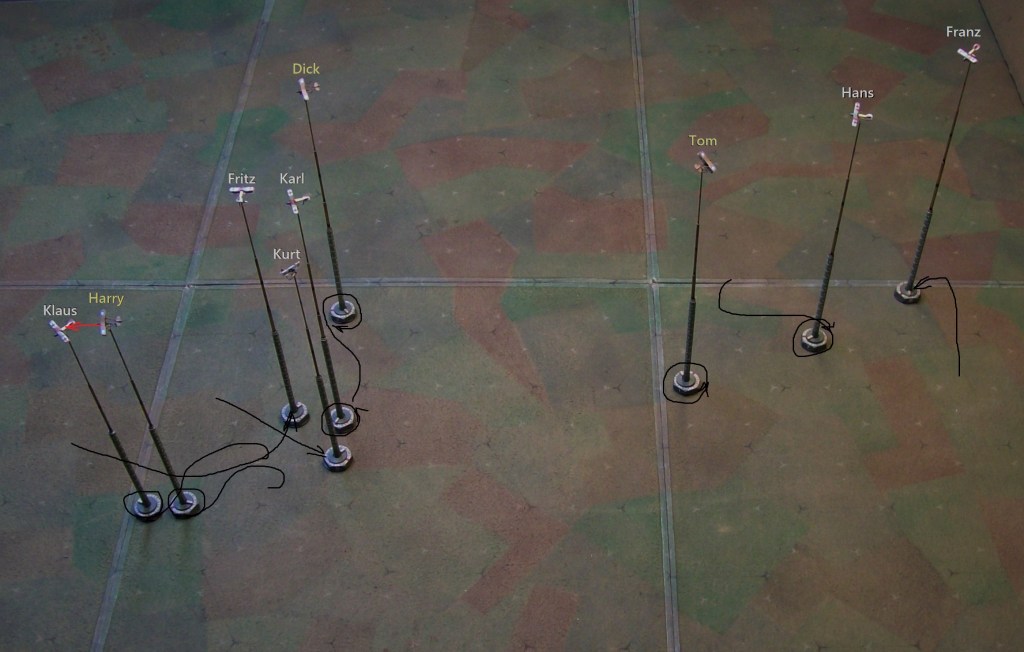
The rules used are my unborn homebrew set. The miniatures are 1/300 H&R. The table is marked with two sets of hexes – black and white: apologies for the difficulty in making them out in the poor photos. This game uses the black set to indicate the ‘engagement areas’ (~600′) within which the models are placed to show their general locations – when the black scribbles that show the movements each turn are drawn as a circle it represents an aircraft maneuvering within that particular area as opposed to moving between them. While a degree of staging has been done to create sensible visuals, it needs to be remembered that the rules do not attempt to represent the exact location of the aircraft at any particular moment, and there are a few ‘open seas’ shifts of the models to keep the action from falling off the edge. It should also be noted / stressed that the main purpose of this AAR is not to present much (if anything) in the way of pretty, but to highlight the type of game the rules produce where the combatants jockey across miles of sky.
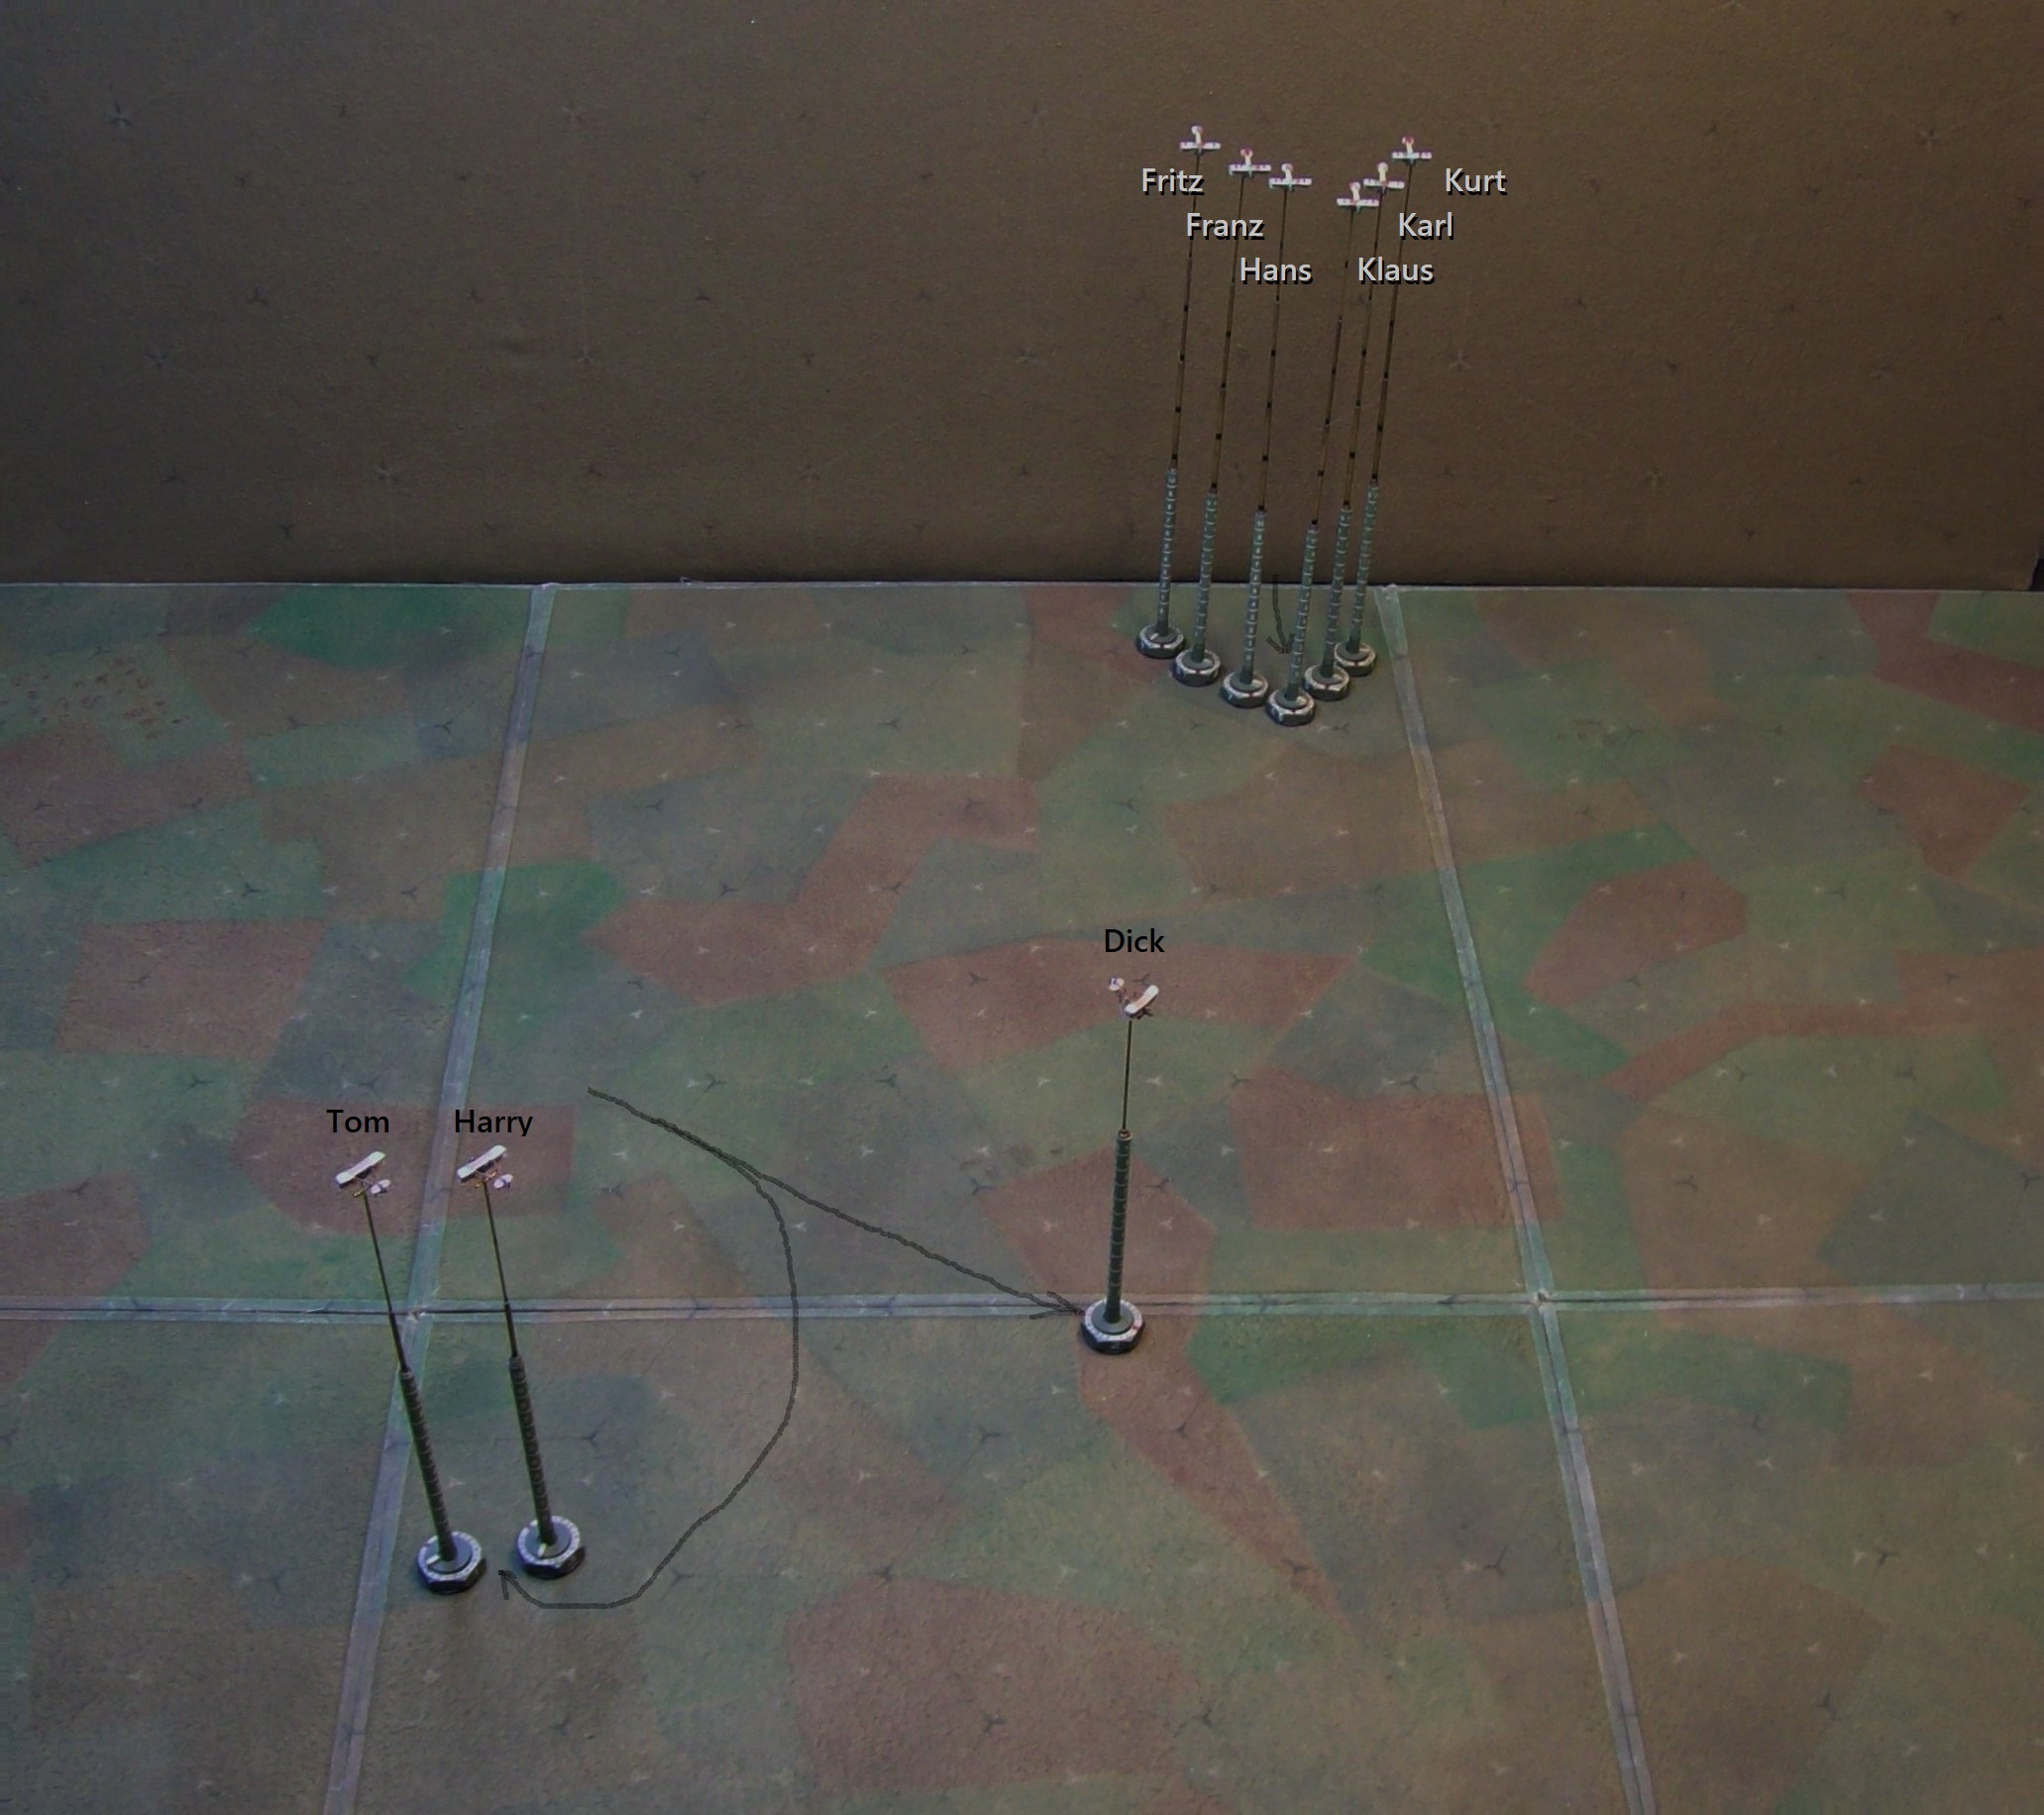
The scenario begins with the British chasing a two-seater into German territory. The leader of the DH-2 flight spots a flock of Albatros approaching from the North.
Tom, the British flight leader, turns back towards the lines. Harry stays with him, but Dick has the bit in his teeth and continues pursuit of the (now 1-1/2 mile distant, off-camera) two-seater as the German flight closes in, diving from their perch 2000′ above the British.
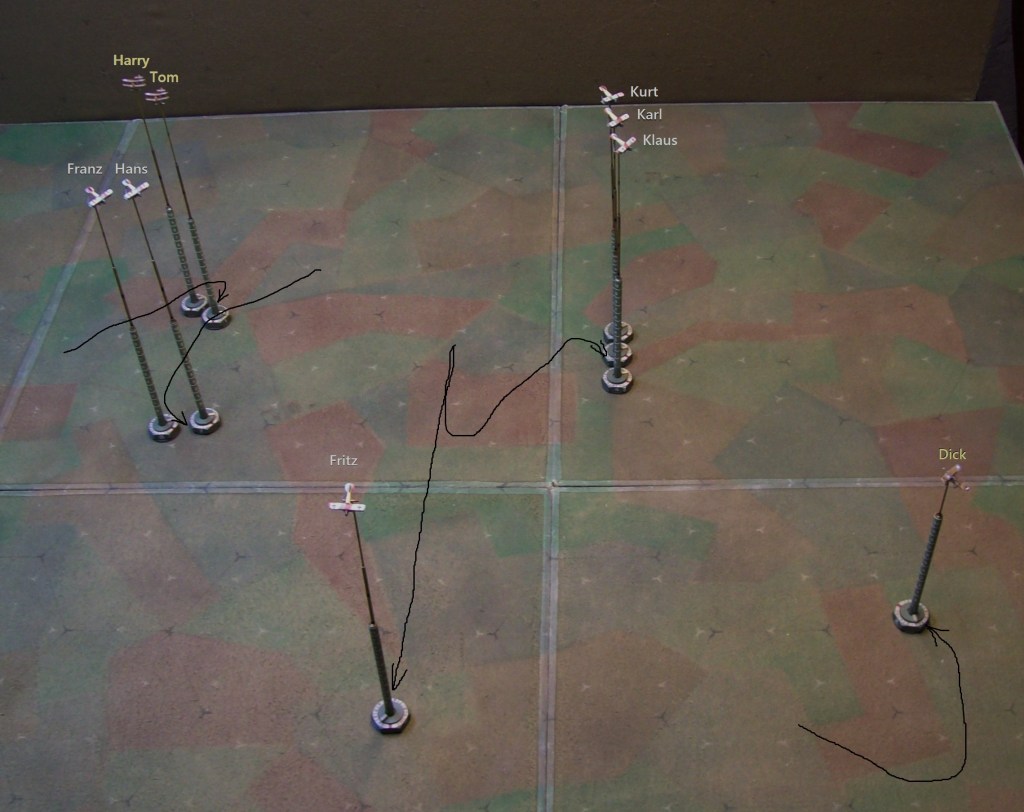
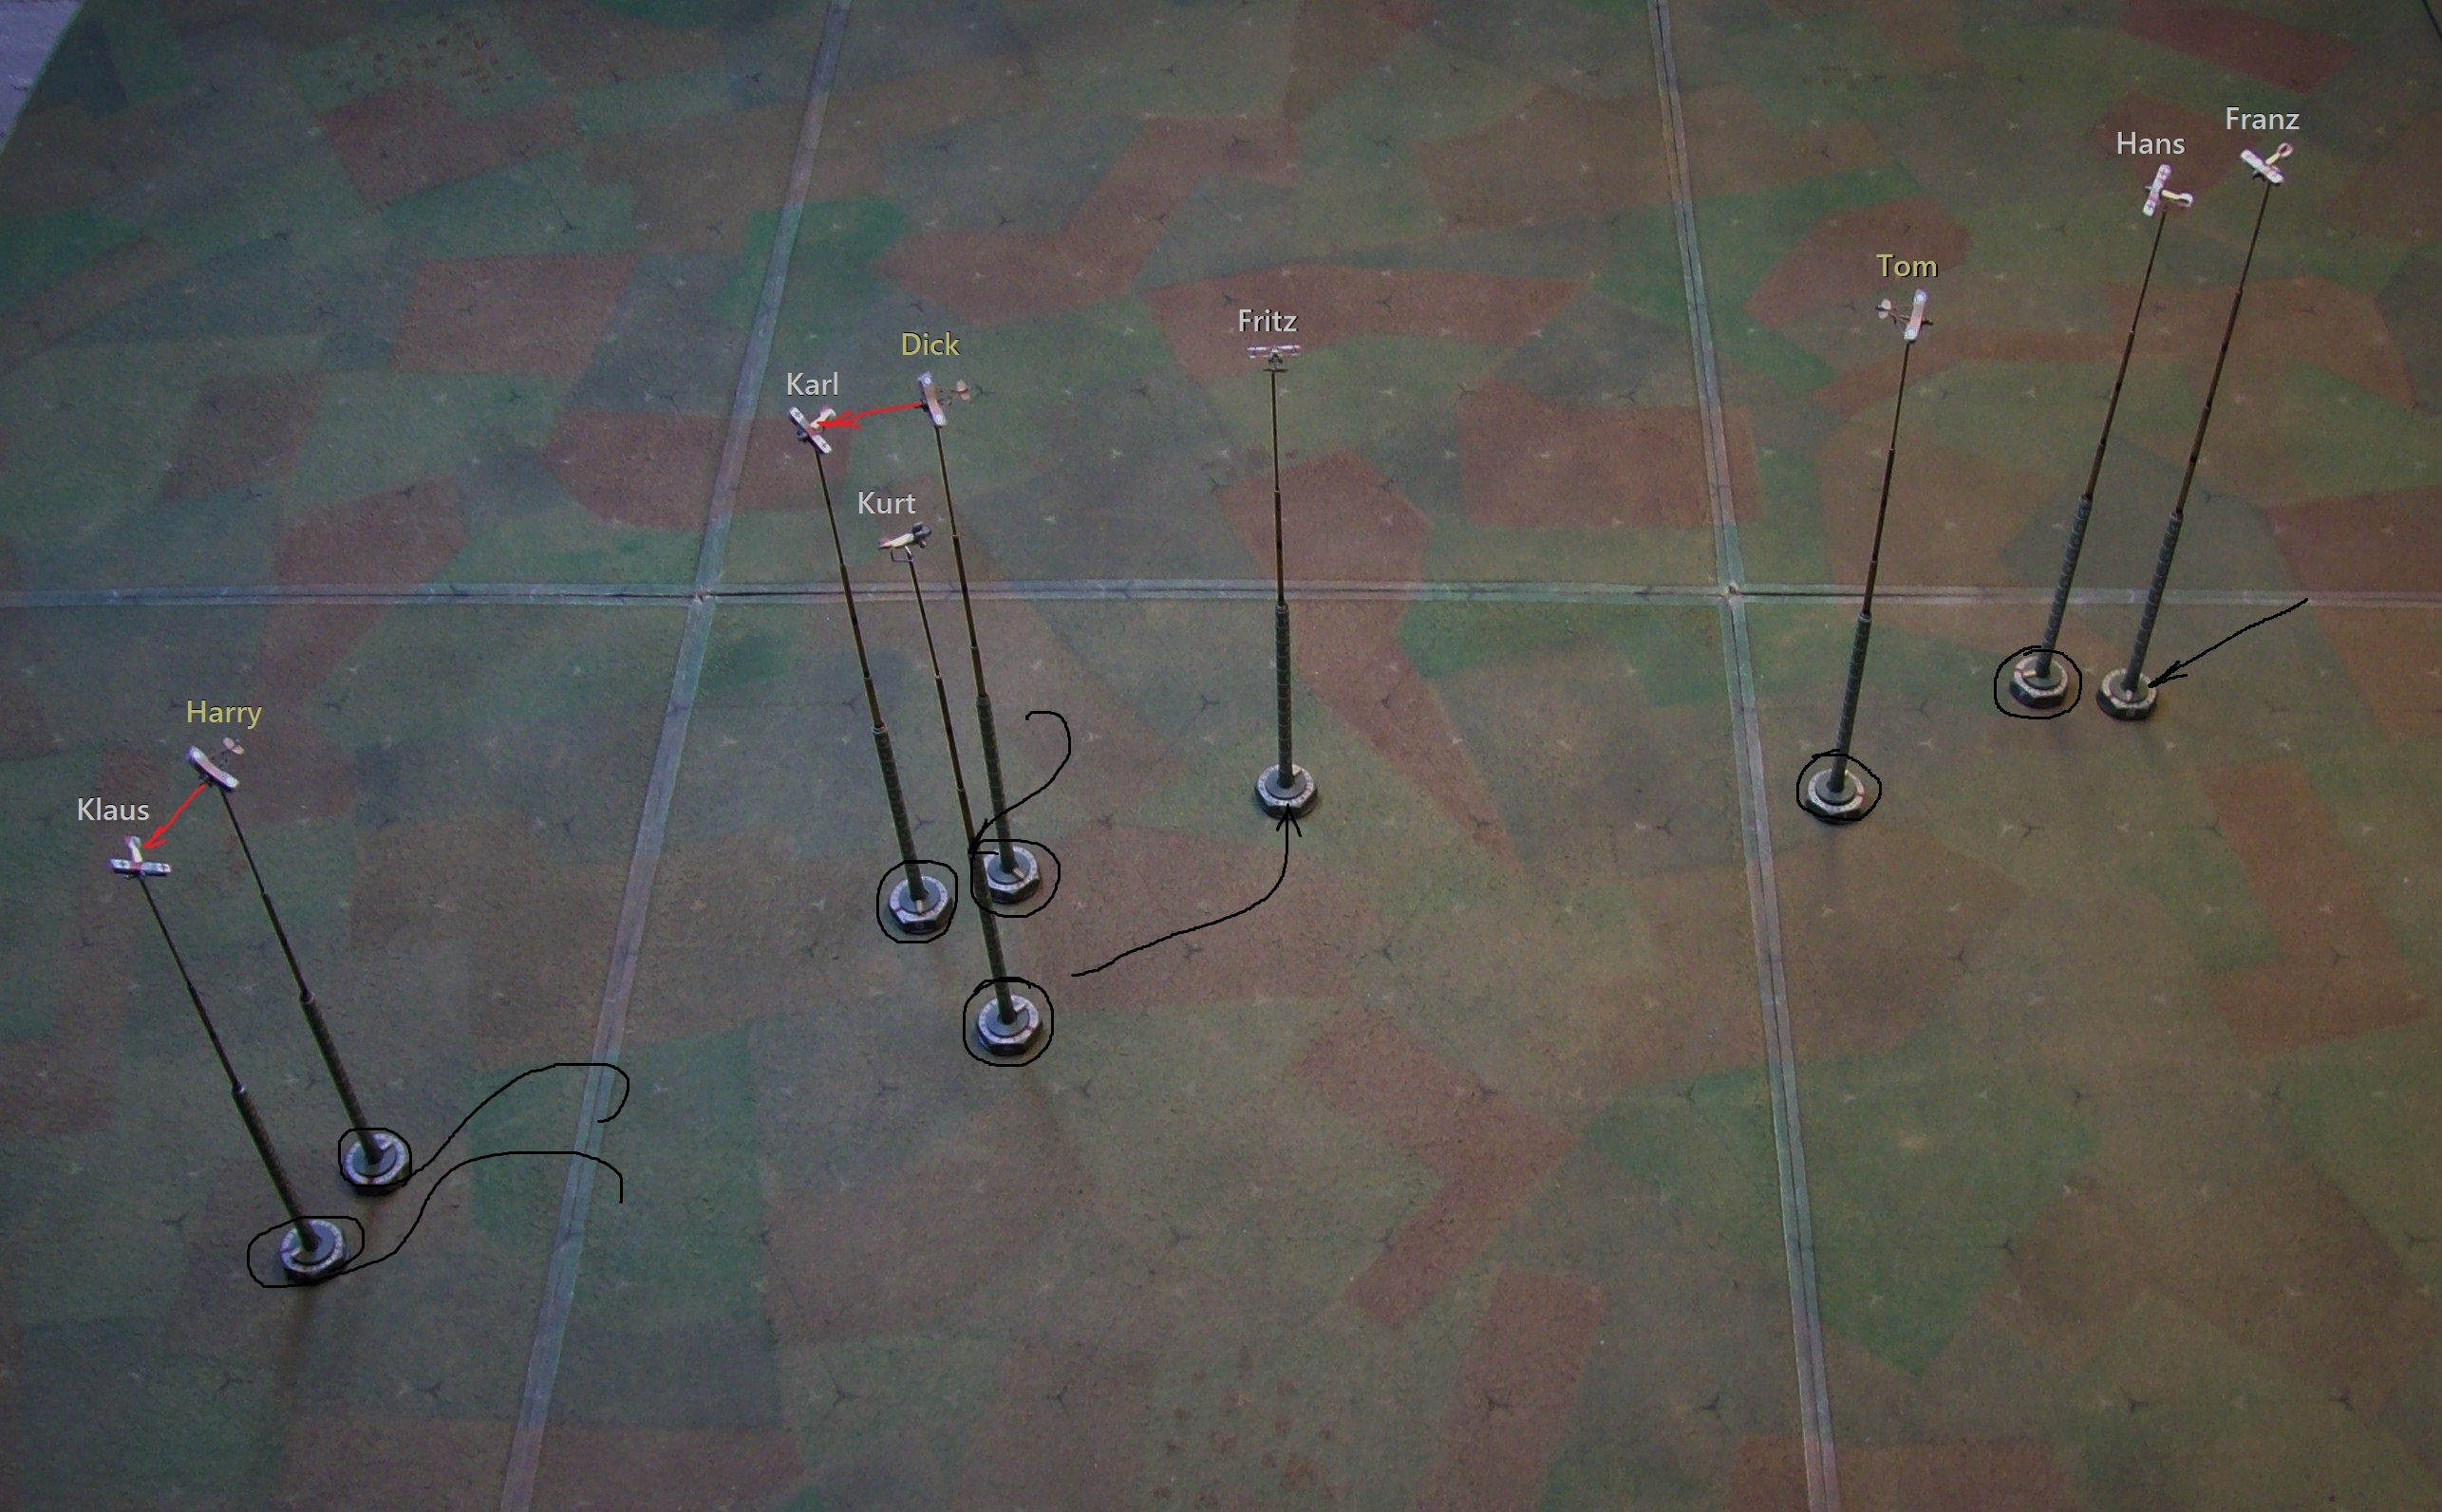
Noting the loss of one of his flight, Tom leads Harry in a climbing turn back towards the Germans, whose leader has signaled for Hans and his two wingmen to deal with that pair while he continues towards the lone ‘Vickers’. Fritz -the rookie in Hans’ group- has his head in the cockpit and fails to follow his leader’s detachment. Spoiler alert: It’s going to be a frustrating sortie for Fritz. Dick realizes that the ‘Whale’ is outpacing him and that no joy is to be had in continuing the pursuit – a quick look around reveals plenty behind him, though it may be a stretch to call it ‘joy’…?
Klaus leads Karl and Kurt in a series of broad turns to burn off speed as they continue their dive towards Dick, who has no qualms about climbing and turning to face the 3:1 odds against him. Hans does the same sort of maneuvering, but loses his spot on the pair of DH-2s so that now the British are positioned behind and Tom signals the attack. Fritz continues to direct his attention to anything but where it should be, and finds himself alone in the sky at the controls of a diving aircraft that is barreling along at well over the recommended speed limit – he pulls his finger out and eases the machine level and makes a broad turn to begin looking for…well…anything.
Fritz moves back to where the action is but has no luck in spotting it. He doesn’t have a monopoly on bad luck, though: Tom and Harry’s individual moves to position themselves cross each other and Harry must break off to avoid a collision, leaving Tom alone in the pursuit of the pair of Germans whose different speeds (resulting from varying engine performance) have caused them to separate as well as they unsuccessfully search the sky. Things also don’t go as planned for Klaus whose rather violent diving maneuvering costs him the company of Karl who can’t quite follow-the-leader. Surprisingly, Kurt -the rookie of the trio- manages to stay on Klaus’ wing. All is for naught, though, as the experienced Dick works his way out from beneath the attack – though he still faces those long odds now from two sides.
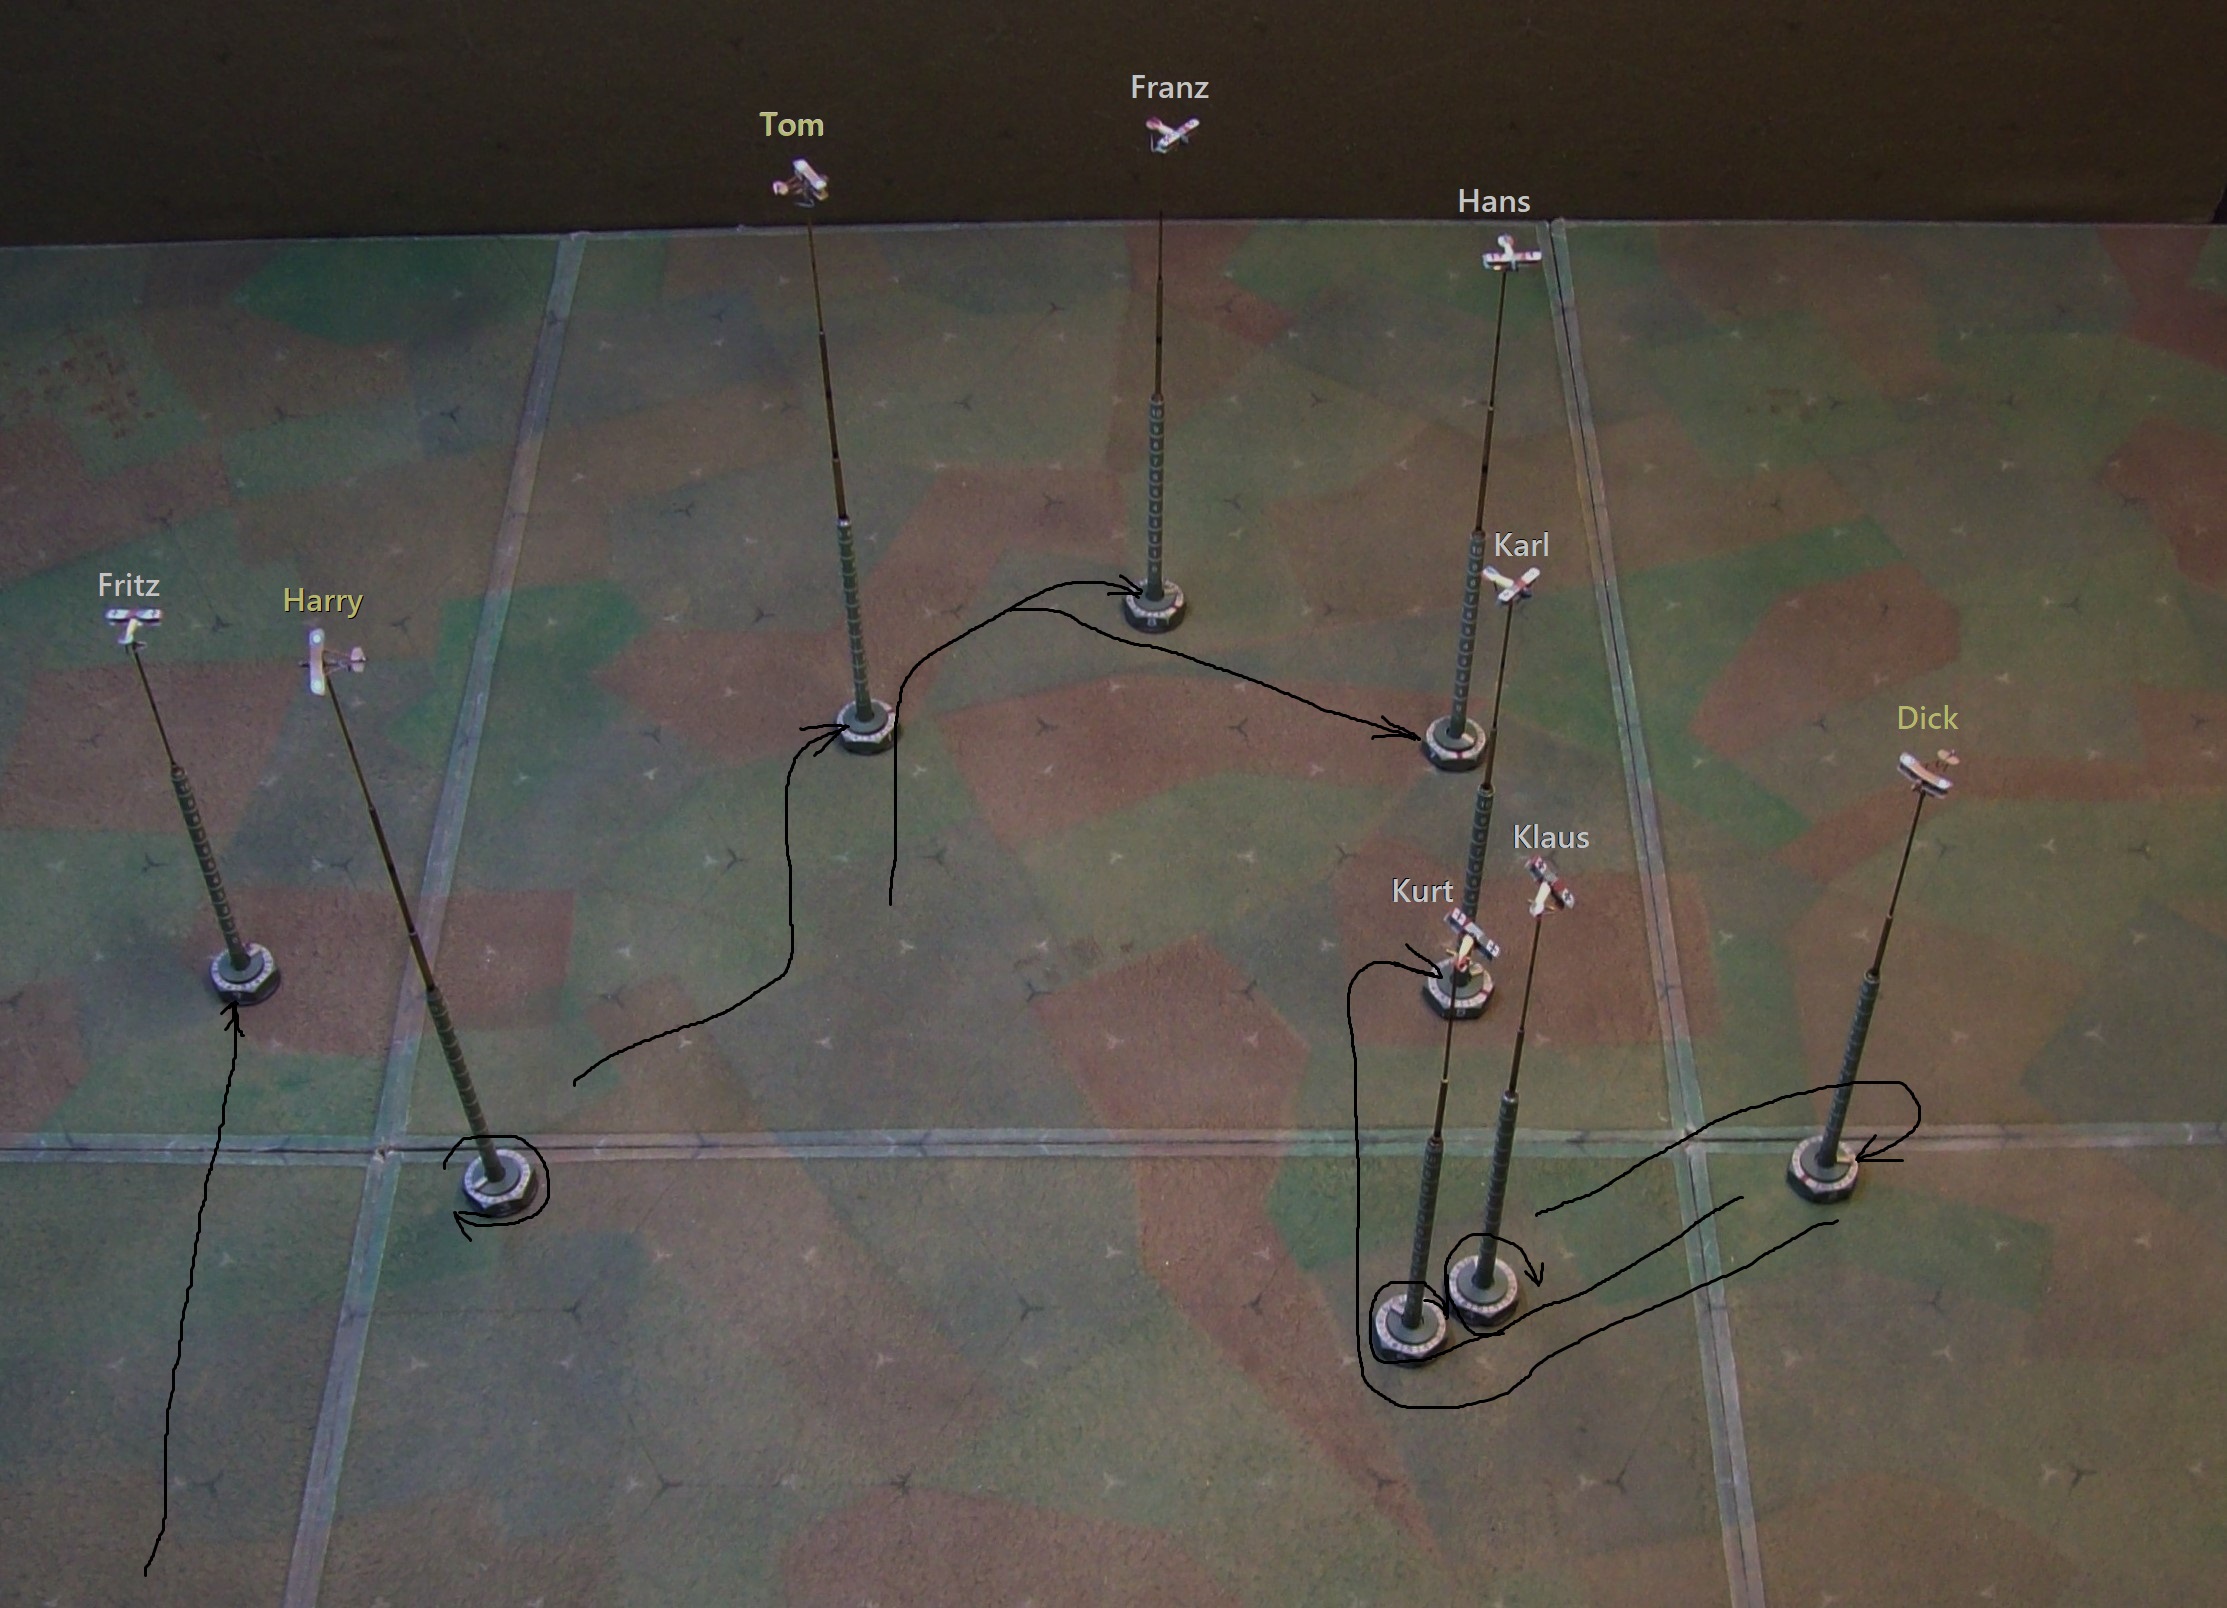
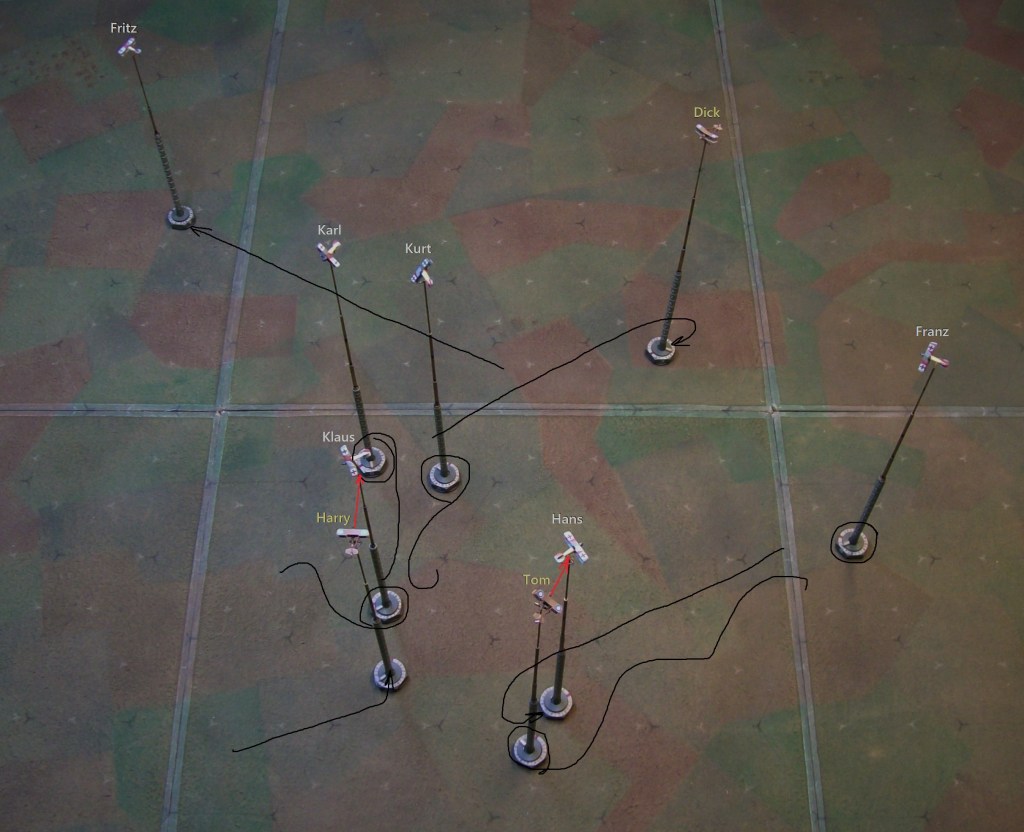
First shots fired: Dick has concentrated on dueling with Klaus, which has left him open to Karl’s attack – no hits are scored, though. Kurt continues to stick to Klaus through every maneuver, but doing so uses all his attention and he fails in the other, key wingman duty: To look around for trouble, and doesn’t notice Harry who -after sorting himself out from the near-collision with Tom- has worked his way over to improve the odds for Dick. Tom continues his solo pursuit while the two Germans (Hans and Franz) unsuccessfully search for signs of their foe. Fritz -a mile away in the large, (seemingly)empty sky- finally gets a bit of good fortune (the dice can’t always be against you!) and manages to spot the fight developing behind him.
A couple of turns combined – the photo shows the end of the second.
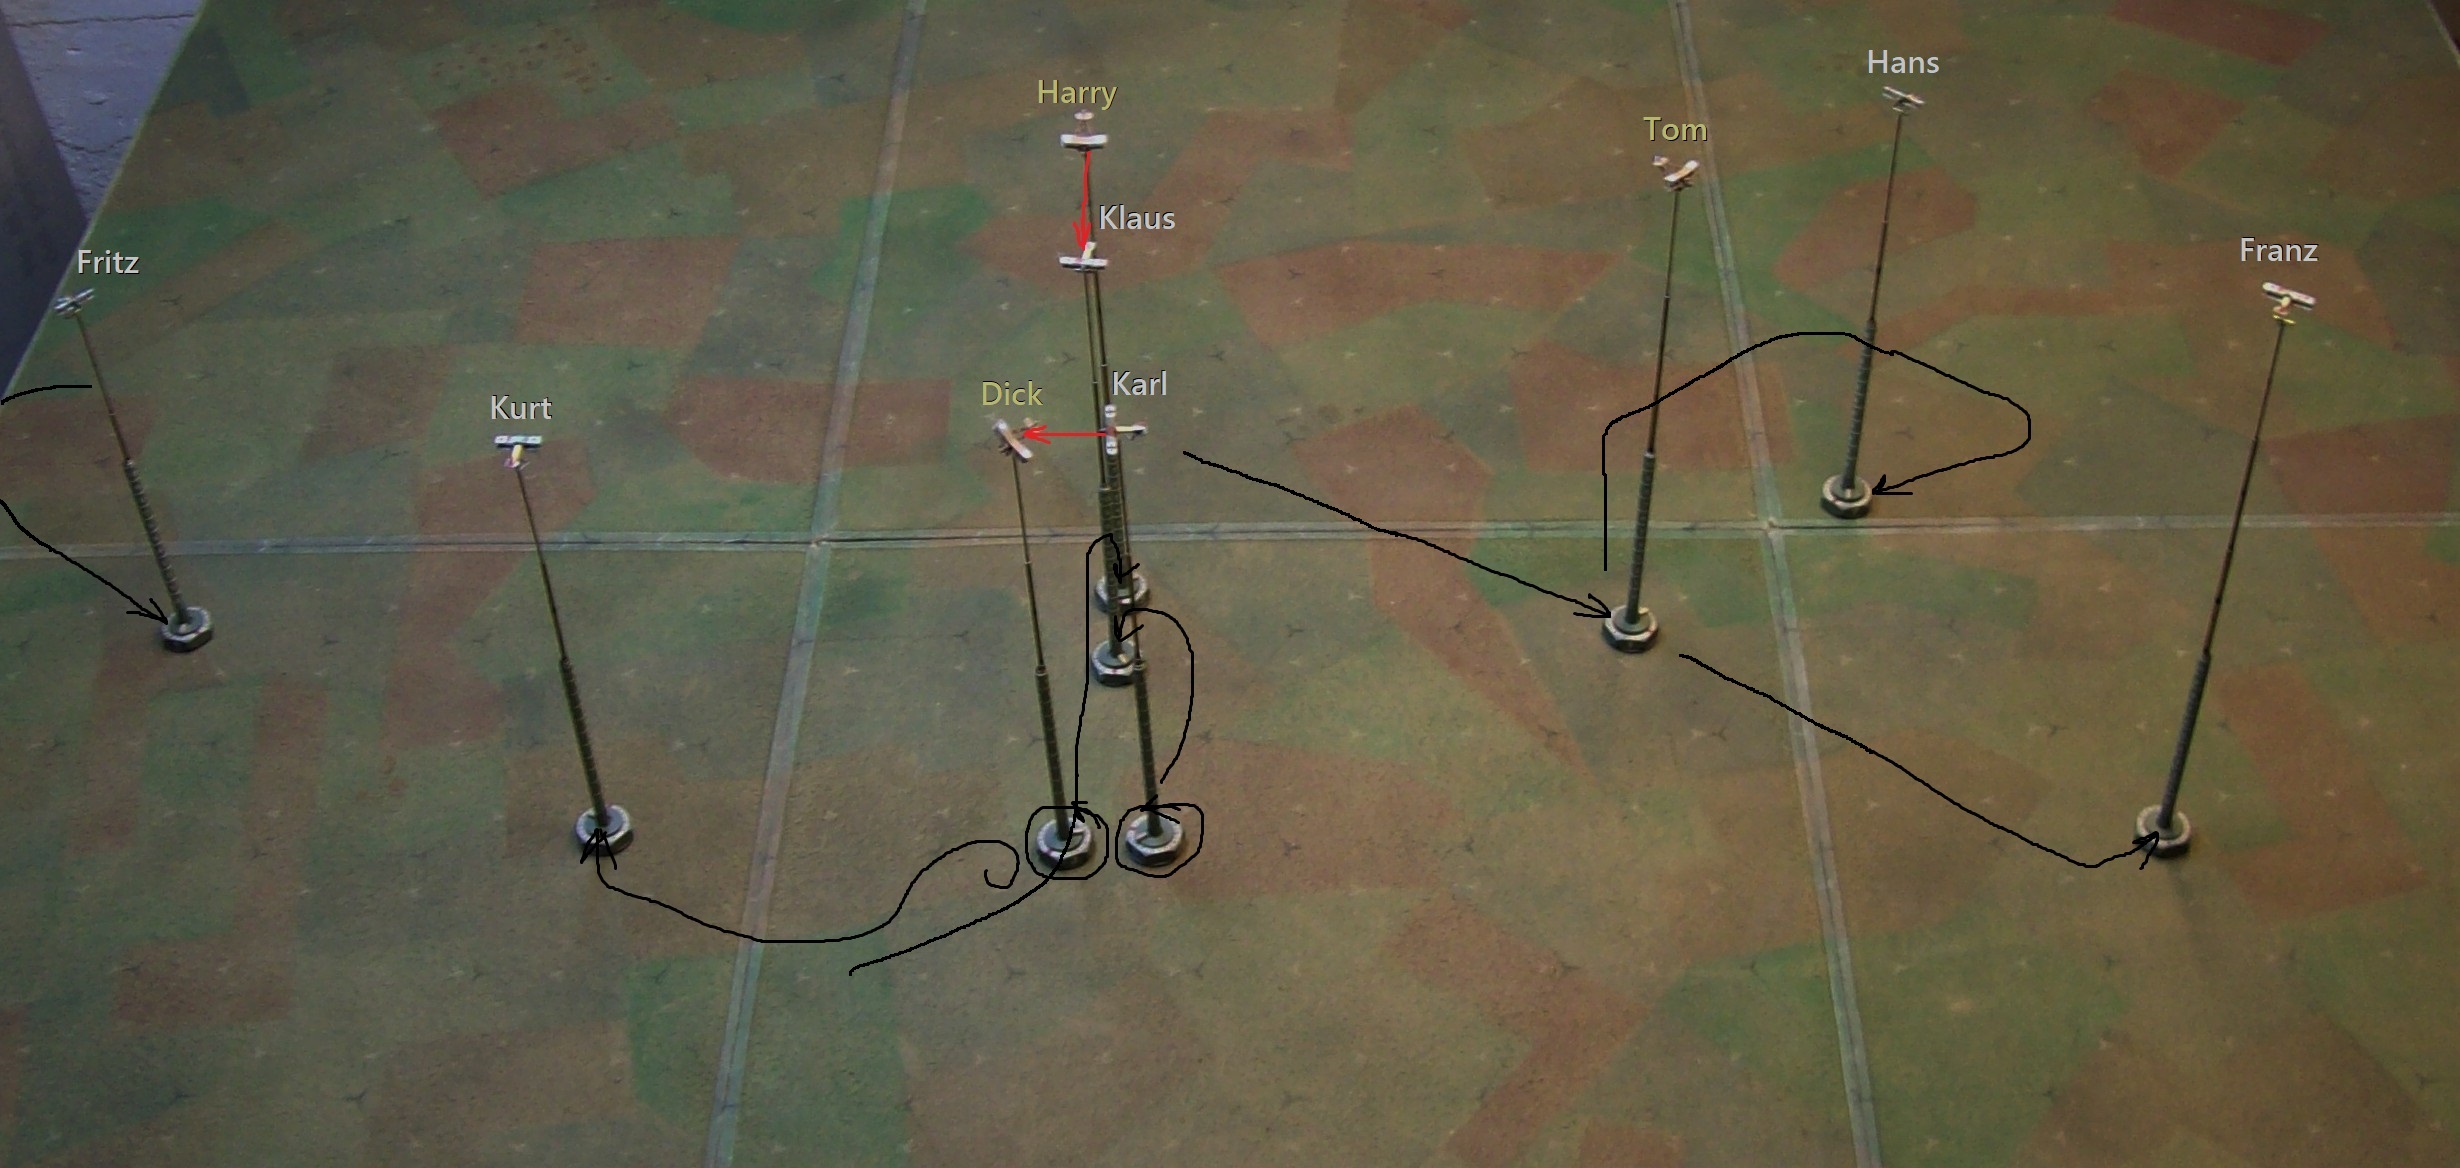
The action in the center was messy as both Karl and Klaus got shots off on Dick amid the swirling, but only Klaus managed to put a few holes in the DH – nothing to worry about (yet). Kurt continued earning flying points for sticking to his leader, but also continued to fail noticing Harry who positioned himself above the fray in a good place to witness what happened when Karl -intent on his target- got in the way of Klaus’ own attack. Karl -unaware of the trouble he’d caused- finally managed to land hits on Dick (who will be forced to make a morale check as the result of getting hit by an unseen enemy). Klaus and Kurt, though, are forced to leave the area (in separate directions) maneuvering to avoid colliding with their clueless comrade. Harry took full advantage of the chaos and followed Klaus out of the area – only to see his well-laid attack fall apart when his Lewis stopped after a couple rounds and required some pounding and cursing to cure the problem and prevent a jam.
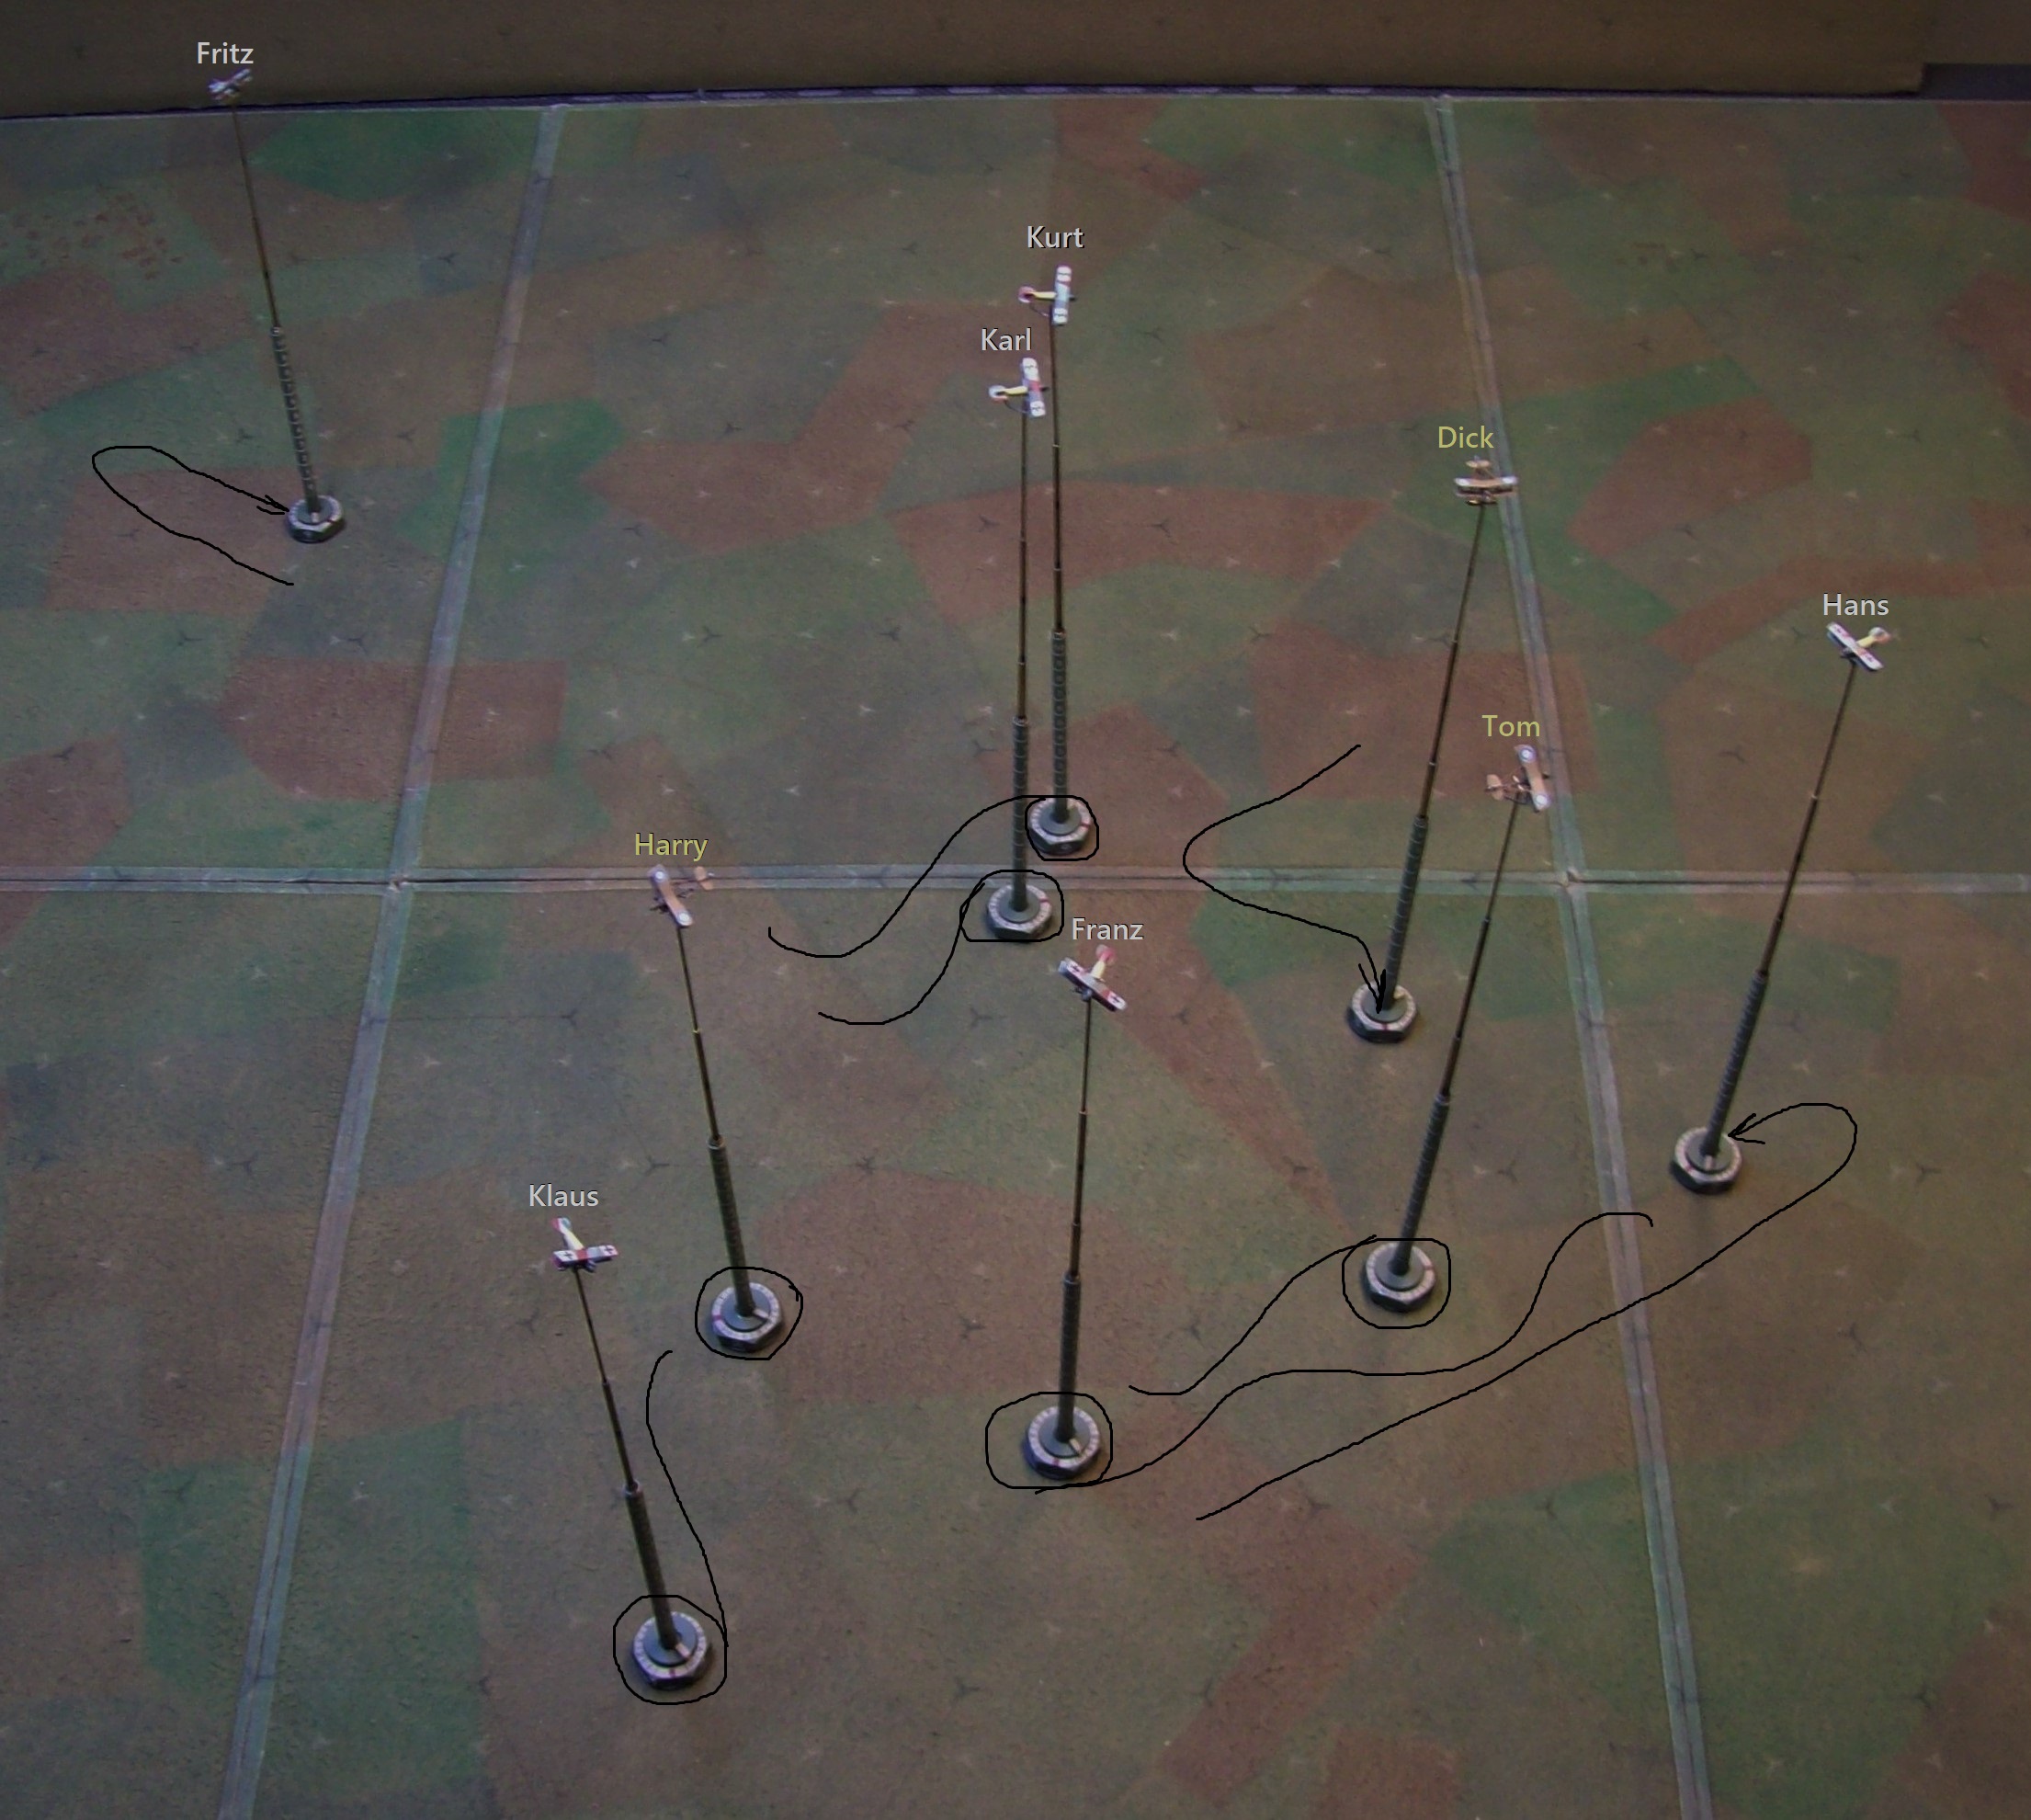
Tom is still after Franz, who seems to have taken Fritz’ role of futile searching. Hans manages to spot Tom, and turns to set up an attack. Fritz? He’s on his way back, hoping for a chance to show himself in the fight in a better light than ‘Where were you?’
Fritz closes in and picks Dick out as his target from amongst the confusion as -on the right- the Englishman separates himself from the fray: Fritz is now almost within range to fire and make his mark! Kurt -the other rookie- has recovered from the fright of the near-collision and manages to get back to where he was (although below the other aircraft in the area) – but where was Klaus, his leader?
Harry pursued Klaus through the fray as the German searched the sky for some sense of order. Suffering a fusillade of bullets that tore into his Albatros, seriously damaging the ‘craft, let Klaus know that -though unseen- someone was there, and he’d be facing a morale check similar to the one Dick took.
Dick passed his check after taking hits from Karl (getting shot at is part of the job, eh?) and took a few more holes before managing to give the German the slip and find a little breathing room in which to assess things.
Tom, Hans, and Franz perform a cautious dance as none of the three is willing to take the risk of closing to within effective range.
The dance on the right continues – a dullness that Fritz would welcome as his plans of attacking Dick are dashed when they collide -literally- with those of Karl. The poor rookie frantically maneuvers and dives away from the near-miss, but he’s in better shape than Karl who -upon sorting himself out from the mess- finds himself in a bigger one with Dick firing at him. Small mercy: None of the bullets finds more than the nothing that makes up most WW1 planes. Kurt circles up to help – Dick may be the one shooting now, but he still faces poor odds.
The real loser of the turn is Klaus, who fails his morale check and maneuvers randomly to avoid the fire but is unsuccessful in evading Harry who applies more damage to the suffering Albatros which now demands much of Klaus’ attention as more than a few of its pieces-parts are not quite right. The only bright spot for Klaus is the nature of the Lewis gun: The drum in Harry’s is now empty.
Bullets fly on the right as the combatants finally take the plunge, but to little effect. Franz’ shots go wide and he fails to stick with his target, and Tom lands but a single hit as he chases Hans around the battlefield – poor results for an entire drum of ammo…a fresh one -and a reassessment of the situation- is in order.
Dick resets his aggressive attitude and maneuvers to keep Karl and Kurt at arm’s length while he, also, takes stock of the situation – ‘Attack Everything’ are good words, but there seems to be quite a lot of ‘everything’…
Harry is fortunate to slap in a fresh drum of ammo on the first attempt and turns to see Klaus, who -in contrast to the cautious mood of Tom and Dick- remains aggressive but struggles to control his ‘craft and ends up presenting himself as a target to Harry – ‘Why not?’ says Harry, as he squeezes off a snapshot. Nothing further of note damage-wise, but enough to squelch the remaining combative spirit in Klaus who decides that ‘The better part…’ may be the way to go.
Fritz…poor Fritz. We see him once more hurtling along at breakneck speed away from the action. He spies the trenches ahead and curses: His newly-won position in the Jasta lies in serious jeopardy.
Fritz wrenches his Albatros around in a fierce turn that tests the mettle of his ‘craft and himself, determined to get back up to the fight and restore his lost dignity. His potential foes, however, have replaced ‘fighting’ with ‘surviving’ on their lists of things to do as the British pilots take time to stay clear of the enemy – even Harry chooses not to pursue the stricken Klaus as the German takes his leave.
Time to go. While the German flight leader sets course to limp home, the British seize the moment handed to them (game translation: their initiative rolls placed them all at the end of the turn) and put the noses of their deHavillands down and aimed southwest for the nearest lines. Time for an evaluation.
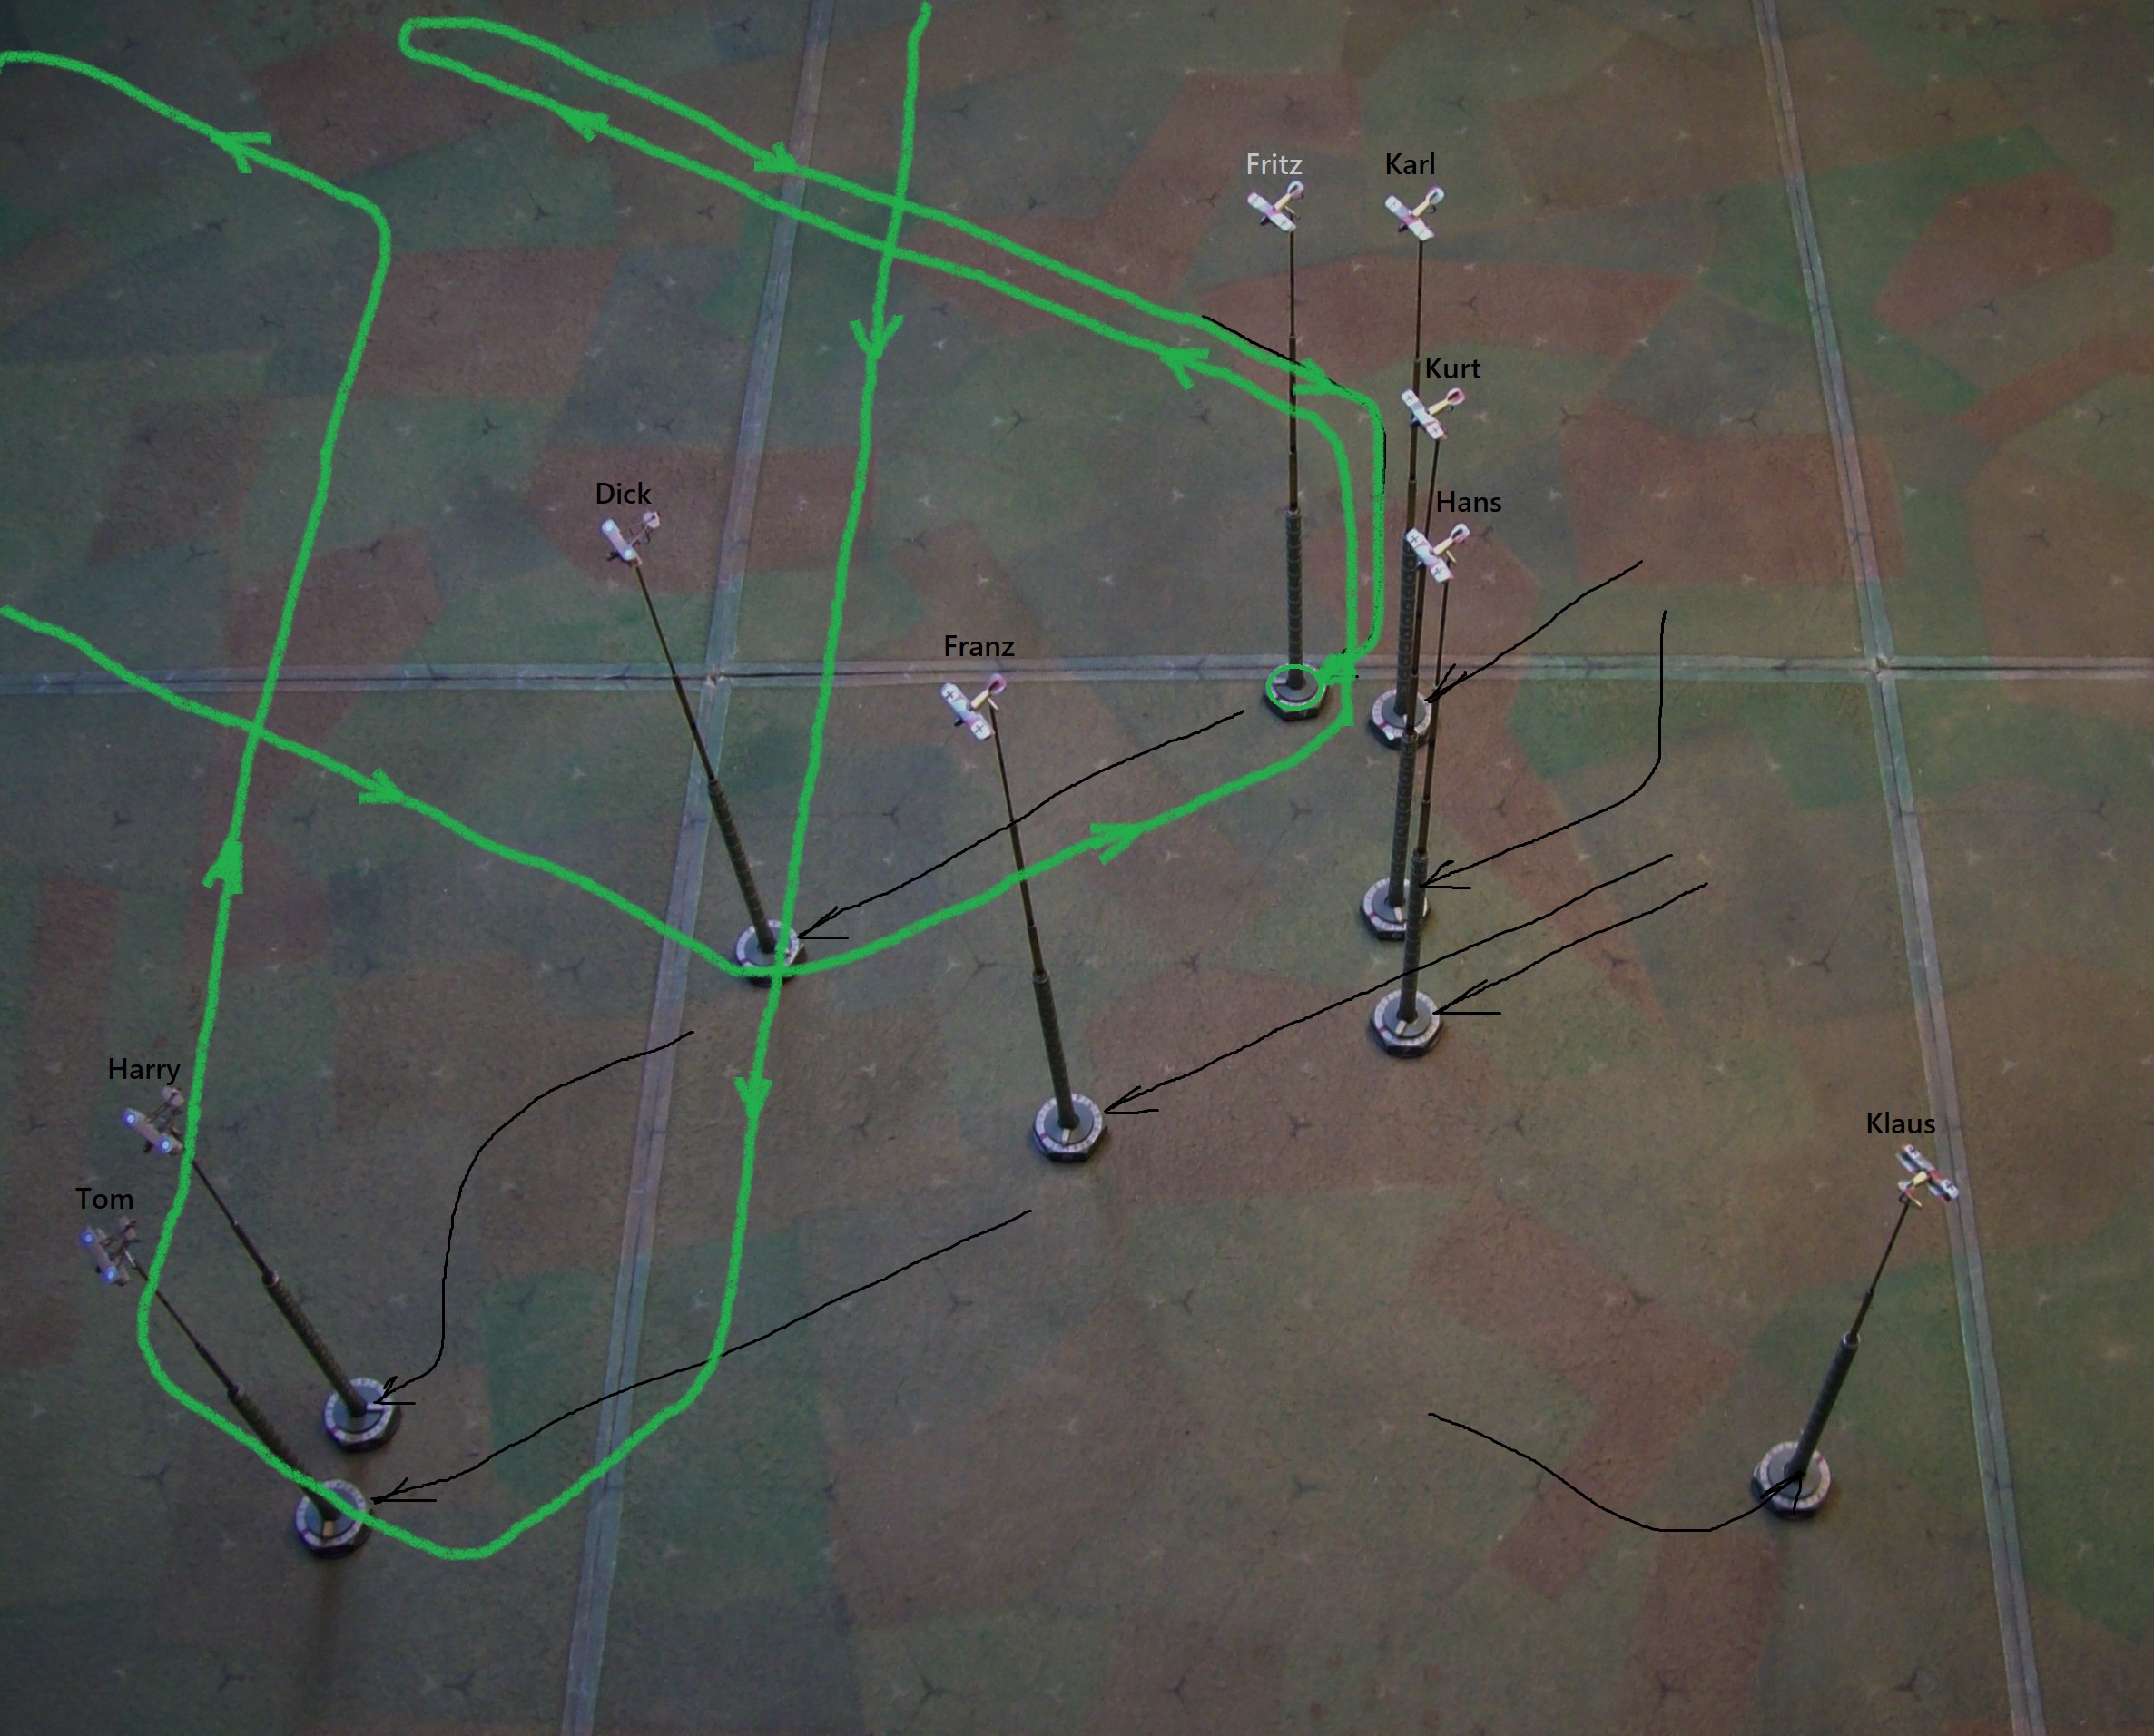
Although the Albatros would hold a speed advantage in a race, the British in this case got the drop on the Germans and had enough altitude to provide a good chance for staying out of gun range until well across the lines, where the now-leaderless Germans would perhaps choose to forgo continued pursuit. Such an outcome is certainly not guaranteed but I decided that it was good enough to call the game and move onto something else, even though poor, unfortunate Fritz had once again worked his way back into the fight…
Just for laughs, here’s a shot of the end which shows (most of) Fritz’ path over the course of the game:
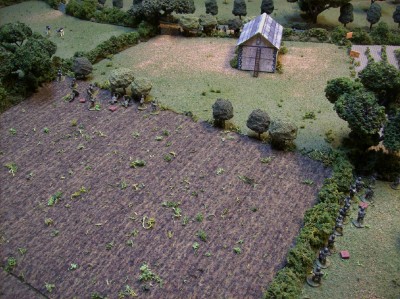
The action is based on the US 117th Rgt moving through the bocage after crossing the Vire River on 7 July, meeting ad hoc delaying elements of Kampfgruppe Heinz set up around a farm complex on a hill.
Rules = Chain of Command by TooFatLardies. 15mm minis on a 5.5′ (E-W) x 7′ (N-S) table
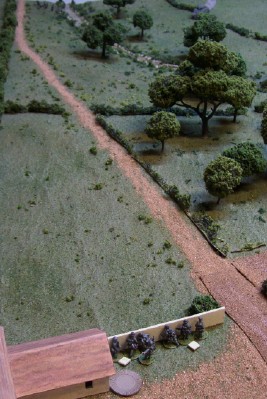
US starting (east) edge:
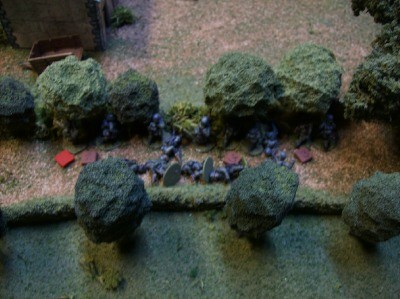
German starting (west) edge:
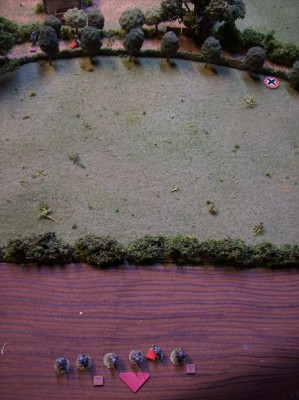
German left (north) flank edge
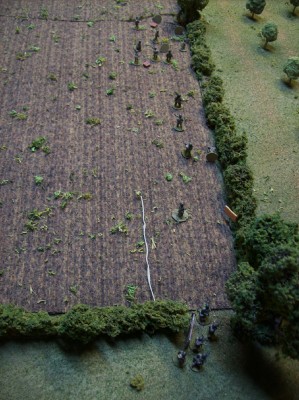
German right (south) flank edge:
US Forces: The regular platoon has a 30-cal MMG and 60mm mortar in support to provide firepower against the expected hedgerow defenses, as well as three engineer teams (attached to help the tanks get through the hedgerows…but the tanks haven’t made it across the river yet).
German Forces: The ad hoc platoon has been divided by the SL into two squads commanded by JLs with two 5-man LMG teams each, along with a ‘fire-brigade’ team with 8 rifles – hopefully the soggy ground will keep the Amis’ tanks away so that the panzerschreck team isn’t needed. In support, a regular infantry squad provides another mobile force (along with -more importantly- another JL) and an adjutant (left in primer grey to indicate non-deployable status – not because I didn’t get around to painting it…no sir) allows the SL to be in the thick of things if needed. Two minefields round out the defense – these will (hopefully) narrow the 250-meter frontage a bit, and allow the LMG’s firepower to dominate the remaining approaches.
Early US deployment. The Platoon Sgt supervises as a lot is put in place: MMG and 1st Squad BAR on overwatch, engineers to clear a path through the minefield, and 2nd Squad ready to go through the gap. The mortar team is set up (off-camera) to the north below orchard.
(Terrain Note: I screwed up placing the minefield. A main reason for denoting mines with corner markers is the flexibility they allow in adjusting to scenario-specific terrain. I should have thinned it out so that it extended the full width of the field…duh. I can rationalize it by saying they started on the north end and ran out of mines, but…still a bad move on my part. oh well…)
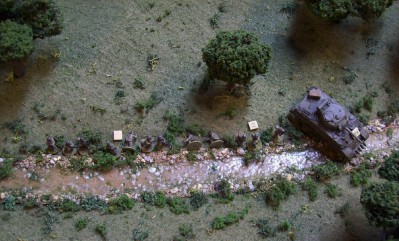
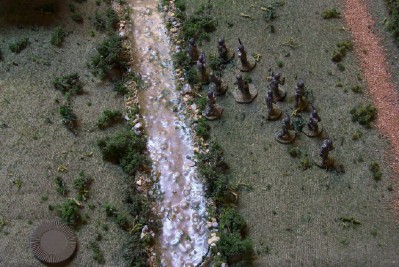
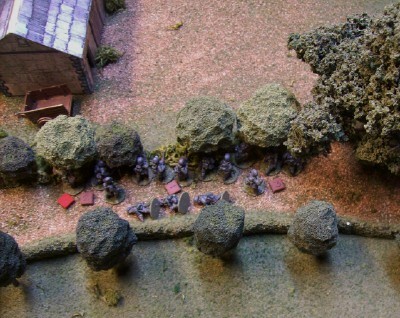
Germans deploy into sunken road: The First Squad to just north of the barn (the teams will shift south to end up on either side of the barn) and the Support Squad to the bend in the south. Visibility in the light rain only reaches to around the middle of the large plowed field / pasture in front of them (respectively), so both squads went on overwatch and waited.
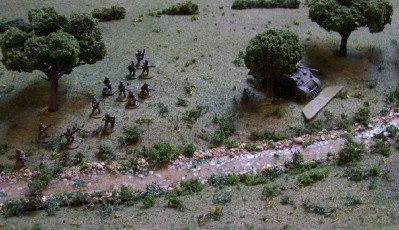
Scouts from the US 1st Squad advancing to around halfway up the field on the left discovered the German presence by coming under fire. One man was killed and the other broke back to his friends – US morale slipped a point. A path cleared through the minefield allowed the 2nd Squad to move up on the north side of the field, advancing much faster than the (more cautious?) 1st Squad. They lost one man early on from an ambush by an LMG team popping up at the SW corner of the field, but pushed on.
The German view of the US advance. The Support Squad Leader has shifted his LMG team north to the other side of the gate so that they could add their fire on the advancing Americans. The US 1st Squad is obscured by the rain, so the 2nd Squad (on the German’s left) takes some shock as they plod on. The US mortar regularly drops rounds into the sunken road, killing one and inflicting enough shock to keep the German JLs busy.
(terrain-modeling note: The two ‘stumps’ seen near the Germans -on the left behind the team and at the pasture corner near the gate- are the lower parts of larger trees. The upper canopies have been removed for the photo and for access to the figures beneath.)
The US 1st Squad can almost make out the treeline beyond the barn when the rain suddenly becomes heavier and the visibility drops, leaving the poor 2nd Squad to suffer under the attention of two LMG teams – a man is killed, the JL is knocked out, and the shock piles on until the unit is pinned in the mud…
While the Germans concentrate on mauling the 2nd Squad, the US 1st Squad uses the distraction to move smartly up the field and -once in range- blaze away as they go with all guns.
This marching fire – along with a few more rounds from the mortar- kills two of the Germans, wounds the 1st Squad JL, and puts enough shock on the remainder to put them in jeopardy of being pinned. The Support Squad JL orders his rifle team to quit watching the cows in the pasture and shift over to fill the gap in the lines…
Worry over the state of his 2nd Squad causes the US Lieutenant to deploy his remaining (3rd) squad to the orchard with orders to double-time across to aid them.
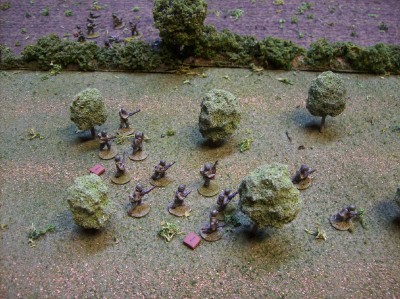
The German Unterfeldwebel -seeing the possible threat to his left flank- matches the US move by deploying his 2nd Squad from the farm’s outbuilding and having them take up position on the hedgerow next to the overgrown field north of the barn.
The next handful of phases sees a lot of bullets fly across and into the plowed field as the US 3rd Squad joins the others in firing on the Germans in the sunken road from its position along the hedgerow on the north side of the field . The US 1st Squad moves up slowly but steadily (using ‘marching fire’), the mortar team plunks in a few rounds, and even the pinned 2nd Squad manages to get in a hit. The Americans take return fire from the Germans, but luck is with them as the accumulation of casualties/shock on the Germans is greater.
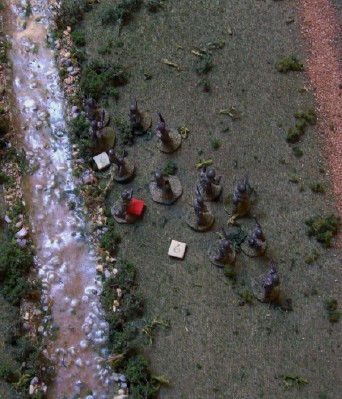
The situation just after the US 1st Squad moves up to close range:
The German support squad interrupted and fired: Three of the Americans were killed, but the JL was unscathed and directed return fire, killing the assistant gunner of the German 1st Squad LMG team (leaving the weapon manned by a single soldier) along with inflicting two more points of shock on the supporting squad’s rifle team.
The firing continues (with an interrupt by the US 1st Squad that pins the German supporting squad) and the Americans continue their luck with the dice – it seems as though the 1st Squad’s charmed life is but one bad (or even an average?) roll away from disaster but they survive. The Germans shift the LMG team from the other side of the barn to bolster the position, but their move is not enough to put them into LOS of the Americans.
A double phase by the Americans puts enough fire into the sunken road to -in addition to killing the remaining 1st Squad LMG gunner- pile on enough shock to break the supporting squad, which retreats to within 2″ of the table edge.
The loss of the LMG team and the breaking of the supporting squad drives the German Force Morale down to five.
The US Platoon Sergeant – perhaps hearing a cheer go up from his men as they see the Germans retreat (or more likely just gets sick of sitting at the back line not being able to see anything through the rain) – orders the engineers to move ahead up the field, tells the 30-cal team to pack up their gear and follow him, and runs through the gate and into the field towards the sound of gunfire.
- - - - - - - - - - - - - -
Side Note: Did anyone else wonder what the German 2nd Squad to the north was doing while their countrymen in the sunken road were involved in a heavy firefight? My bad…
It turns out that they -and not the reduced support squad in the road- could have interrupted/fired on the US 1st Squad as they advanced to the west edge of the field. TBH, playing both sides led me to forgetting some things/units and getting wrapped up in the immediacy of the firefight. Oh well…
Rather than turn the clock back and replaying the missed opportunity I’ve decided to stipulate that the rain became particularly heavy in those few moments, reducing visibility to less than 75yds, and thus preventing the Germans on the north side from seeing the Americans move up – That’s my story and I’m sticking to it!
- - - - - - - - - - - - - -
So, (now that the rain has eased up a bit…) the German 2nd Squad fires on the Americans at the edge of the field
…and fires again
…and again.
Three activations in as many phases pile on shock and casualties that immediately pin (and knock out the JL), and then whittle down the US 1st Squad until nothing remains but bodies in the mud – seems the squad used up all of its luck with the dice in the previous firefight. The result is a three point loss of American Force Morale.
At the same time, the German Unterfeldwebel emerged from the stone outhouse to stop the support squad from continuing their run from the battlefield: Some stern words about duty (along with additional cajoling from the Obergefreiter) convinced them that the fight wasn’t over and that they should stick around to play their part.
The American Platoon Sergeant did some rallying as well as he moved through the US 2nd Squad pinned in the middle of the plowed field.
Both leaders succeeded in reducing the shock on their respective units so that when the Americans ended the turn both squads (as well as the knocked-out US squad leader) were ‘back in business’.
A picture of how things stand:
While things don’t look too bad (although far from good…) for either side, the American Force Morale of two bodes far worse for them than the one of five does for the Germans.
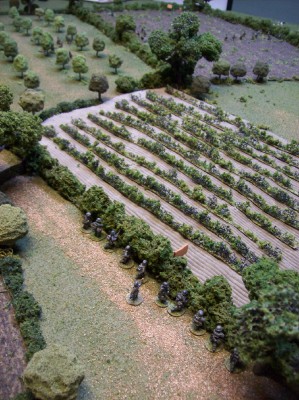
Just a few more phases to play out: Both sides shift forces a bit, with the German 2nd Squad moving around the corner of the hedgerow into the road on the west side of the overgrown field and the American 3rd squad takes a position behind the hedgerow on the west side of the orchard while the 30-cal MMG team moves up to the corner of the plowed field and sets up behind the scrub.
Unfortunately for the 30-cal team the scrub only gives light cover, so they present a better target. The Germans take advantage of this and concentrate three activations of the 2nd Squad (which includes an interrupt) on firing at the MMG team. All of the return fire by the Americans does little to hinder this, and -surprise surprise- the MMG loses a man and is pinned. Worse for the Americans: The attached Platoon Sergeant is wounded to mark the end of the game as the US Force Morale drops to zero.
AI or not, I can’t see much to admire of my play in this game as both sides made some pretty glaring errors – the worst, of course, was the American’s failure to concentrate their attack while under-utilizing their mortar and MMG teams. But…I got to put some toys on the table and had fun, so I’ll call it a win.