The first encounter of the day was between B Flight of 25 Squadron (5x Fe2b) and Jasta 30 (5 aircraft: 2x Albatros DIII and 3x Albatros DII). The British were on their way back across the lines after completing a recon mission and were intercepted a couple miles shy of the trenches by the Germans. Jasta 11 was also in the area but didn’t spot anything in the rain and turned south to continue their patrol while the encounter took place.


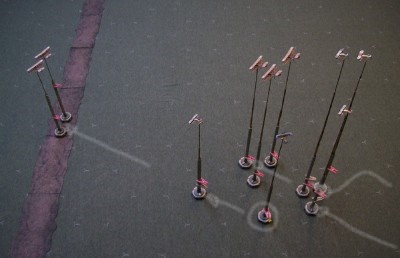
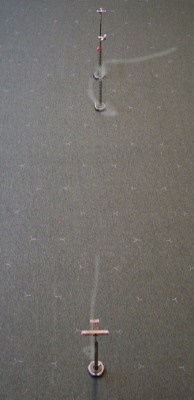
The encounter was played out in the beginning at a scale of 1200′ hexes in 12 second turns. When the range closed the scale was halved to 600′ hexes / 6 second turns. The photo above shows the initial placement of the models. The lower pair of Fe2s are at 3500′ while all the other aircraft are just below the cloud deck at 4000′. A German AA battery fired on the British doing minor damage to Harold, the Flight leader. It should be noted that Harold’s nerves were a tad frayed this morning (game terms = -1 ‘pluck’), and the AA hit hasn’t done much to improve his attitude towards the coming fight which looks to be a bother that he would just as soon to have not happen so he could get back to base for breakfast.

The two Fees with the vital photos dive and make for the trenches while their three mates stay above/behind to cover them. The Germans detach two aircraft to dive and go after them, but the British get the drop initiative-wise and cut in behind to make their escape – the German pair makes a tight turn and continues pursuit.
Things get a bit messy above when Siegfreid gets the bit in his teeth and breaks formation to make his own attack – his guess is wrong and he ends up farther from his prey than if he’d stuck to his leader. Harold leads the British top cover in a diving s-turn to perch above the lower Huns.


Siegfreid turns back to his leader, but has no interest in joining the group and sticks with his own plan to stalk the three Fees, concentrating his attention on lining up the leftmost as his target.
As the lower British pair leads the diving parade towards the trenchline, Harold begins plotting an attack on the Germans beneath him.
Walter (leading the lower pair of Albatros) spots the threat and chooses to spiral up to their level, leaving Bruno alone to pursue the fleeing Tommies – ‘Fine, more glory for me’, thinks the very eager young rookie, who continues ahead.
Harold is caught out by Walter’s maneuver and loses sight of him, and is fruitlessly scanning the sky as the three Germans behind close in. Siegfreid is the only one that’s made it to within firing range as the other pair (Sq Ldr Johann and wingman Gottfreid) are still too high for effective fire.
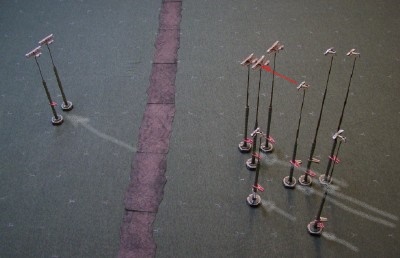
(Modelling Note: Starting with the righthand photo above, all models have been shifted up on the stands – there are no more extensions possible. The two leading Fe2s are now at 1000′, and don’t have much more room to dive…)
First blood. As the diving race continues Siegfreid’s independence pays off as he approaches from slightly below his diving target whose observer/gunner’s attention is on the Albatros above, and lets fly with both barrels from long range.
Most of the rounds miss or go into the nothing that makes up most of a WW1 aircraft, but a couple find their way into the big Beardmore engine behind the British crew. Good news for them: It’s still running and not smoking or on fire or anything.
Bad news for the cohesiveness of the British formation: The shocked pilot, Ronald, sends the Fe2 on a random path of violent maneuvering with Siegfreid in pursuit, firing off short bursts as opportunity allows but not landing any more hits.

Walter turns to see if he can help, and Johann leads Gottfreid closer to the diving Harold. The British leader is still searching the sky – his observer has also, unfortunately, failed to spot anything.
Harold’s search ends badly. His remaining wingman – not distracted by searching the sky and just fixated on getting the most speed from his mount – has moved well ahead out of range of the German pursuit, leaving his left-behind leader to suffer under the fire of Johann. The German leader’s bullets -while not hitting anything like the engine or crew- find their way to many of the little bits of vital between the nothing (things like longerons, spars, control fixtures…) and what was an Fe2b is now a collection of wood, metal, and fabric held aloft by little more than hope.

No longer able to sustain the great speed, the poor Fee folds up when Harold tries to wrest it from its dive. Back across the lines, Ronald gets the drop on Siegfreid, sees the trenches, and dives for them, thankful that the Beardmore seems to be -for the moment at least- accommodating the extra bits of German metal it’s carrying.

As the pursuing Germans fly over the wreckage of Harold’s crash, the other British dive down in an attempt to preserve their lead – but the ground is coming up fast and they may have to turn to face the enemy.
Such is not to be, however, as the design fault of the Albatros DIII’s single lower spar manifests as Johann feels a shudder when he pulls out of his dive and sees a threatening ripple in the fabric of his starboard wing.
He decides that having a single kill to his credit for the sortie is enough for a morning’s work and eases his ‘craft on a course for home. The two others in the pursuit dutifully follow their leader.
The action to the southeast also peters out as Ronald manages to coax the engine into staying in the game and he maintains a lead on his pursuers.
Walter decides that chasing the British off suffices as ‘mission accomplished’ and turns back to his own side of the lines. Eager Siegfreid would like to finish off the wounded Fee, but chooses (for once) to obey his superior’s signal and follows Walter east.
Unfortunately for Siegfreid the pair’s passage over the trenches attracts some AA fire which severely damages his controls. The landing back at the airfield is a bit nerve-wracking but he manages to put the Albatros down safely. Jasta leader Johann also succeeds in landing his damaged plane, but the two will be left out of the next encounter as a call comes in to meet the threat posed by two more British flights that have crossed the lines. The other planes have been tucked away from the coming storm, so the duty falls to Walter to lead Gottfreid and Bruno back up into the sky.
The loss of Harold is a hard blow to 25 Squadron – a new leader for B Flight will have to be promoted from the ranks – but the two camera-carrying planes returned to base with good-quality plates of all of the assigned terrain and so one more mission can be chalked up as successful.
