The battlefield for the second attack is expanded* to include the approach by the 1st Battalion along the secondary road on the left/south.
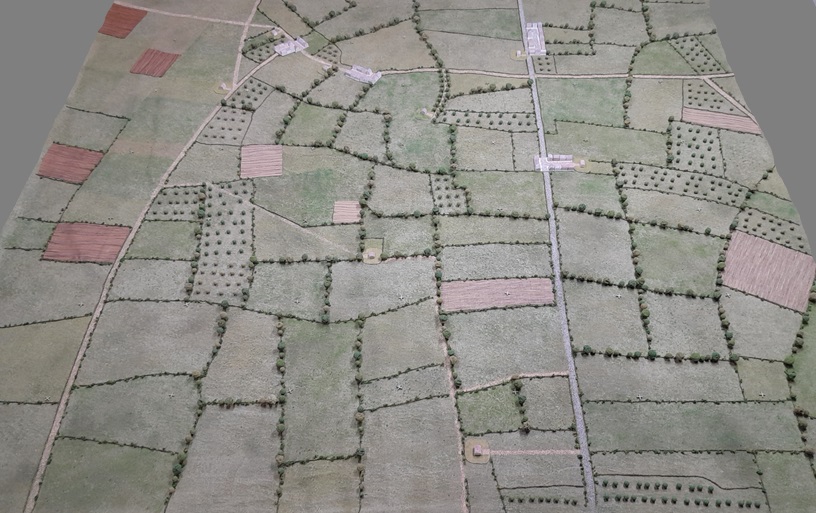
-see …Go Big! – Campaign Game Three, Map B for table details.
The Americans
The 3rd Battalion (facing three turns of restricted deployment) will start 20 minutes before the 1st comes on. Companies A and C will attack in column (with C in the lead) south of the highway.
The tanks won’t come on until the table is cleared to the farm and orchard in the center where they and Company B will consolidate, take the highway BUA, and push on through the town.

The Germans
The Germans try to get as much done to strengthen and organize the defense and are therefore in the middle of the next task in their preparations when the attack resumes. (game effect = Like the U.S. 3rd Battalion, the first three turns will see them facing a deployment test to get troops on the table.)

Company C has abandoned the trench and BUAs that were targets of the American mortars. A new trench has been dug in the orchard south of the highway. Luckily, damage to the Stugs was superficial and the crews say that -if left undisturbed to work- they should be available for action by half past the hour…perhaps earlier?
To the south, Company B has moved its HQ into the orchard boundary behind the trench where the Pak38 is positioned.
In addition to the trench, they’ve put a CP into the big orchard again, hoping to threaten the flank of any attacker that moves up the road.
Company A -moving up from Osmanville- will enter on the edge of the table at the highway west of Arthenay. The deployment will be treated like a consolidation, with the HQ moving on with two CPs.
I am still without an opponent, and so face solo play of three battalions…ugh. Needless to say, the mistakes -both tactical and of the rules- will, I’m sure, be more than plentiful, so consider yourselves well warned!
The Game Begins…
The Germans bring Company A on and use the first two turns to move them up quickly.
The U.S. 3rd Battalion’s Company C -which was to lead the attack- is ‘hesitant’, so only two patrols of Company A arrive (-looking for signs of the Company C men ahead of them…?).
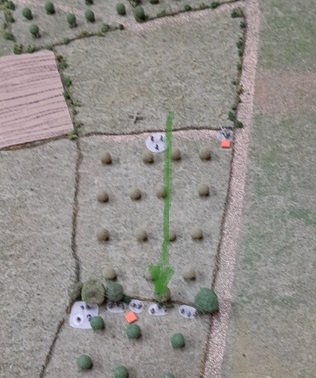
Their CP placed next to the highway tries a flanking move around the the Ost Company* that had deployed in the new trench, but the Machinegun Platoon placed in the orchard behind puts a stop to it.
*the four sections left of it that got caught out there while digging!
The American attempt to deploy a platoon on the other CP fails.


With the German HQ of Company C ‘hesitant’ on the second turn, the American Company C tries to make up for lost time by moving a CP up and then deploying two more near the farm, but has no success getting boots on the ground.
The Company B Germans that had been deployed in the orchard to the south took them under fire without effect. The rounds dropped on the orchard from the American Company mortars also did nothing.
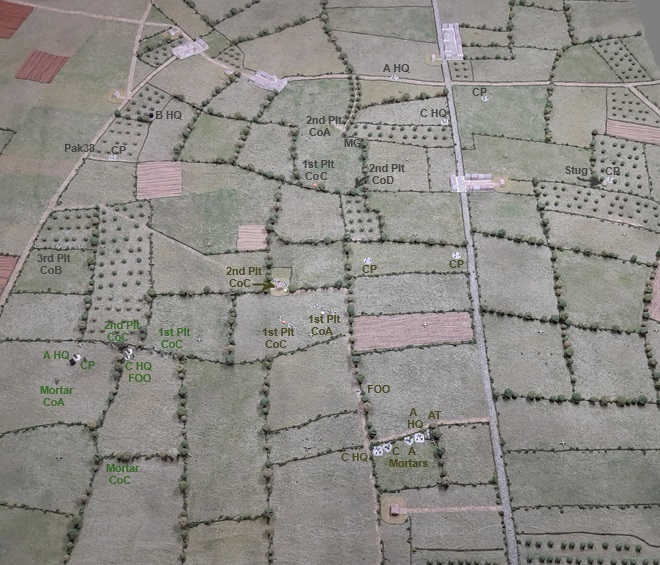
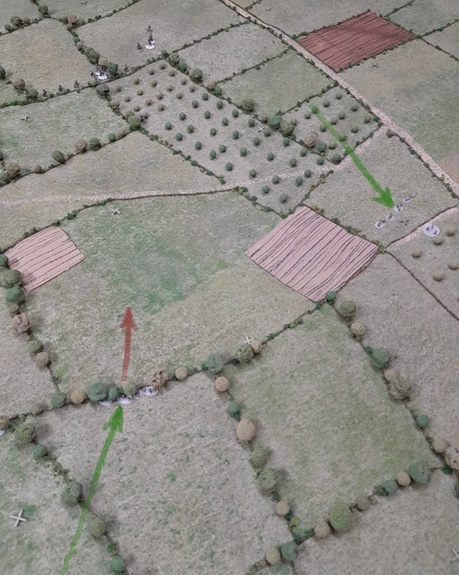
Situation at end of turn two:
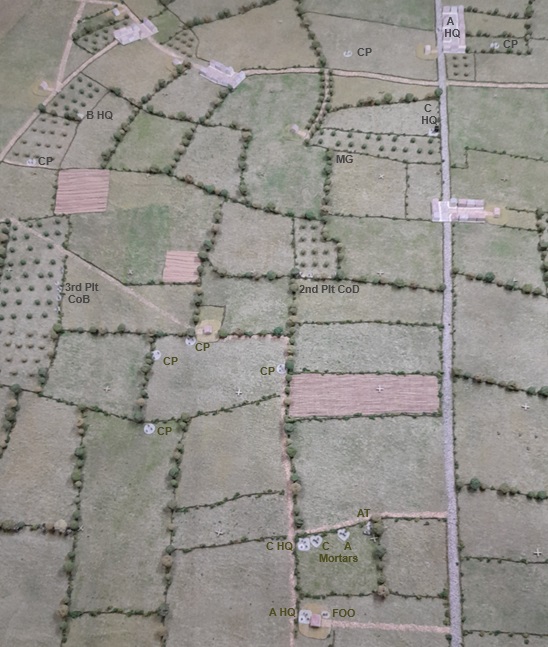
Over twenty minutes has passed, so the 1st Battalion will come on in the next turn. The German CO is disappointed to learn that there is no sign in Osmanville of the 915th Regiment on their way to the bridge, so withdrawal is not in the cards yet.
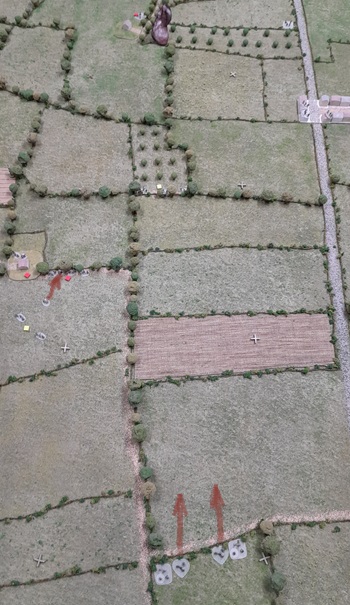
The 1st Battalion deploys in the south with Company A on the left and C on the right, each with a mortar section and CP – Co.C also has a platoon and the Battalion FOO. Their plan is to secure the big orchard and use it as a base to move into St.Germain. Company A will clear the orchard while C is tasked with watching the higher ground to the right. They will operate under a deployment restriction for one turn – This will mark the last turn with such tests for all forces on the table.
NOTE: Because I don’t have enough 6mm figures painted/based for two Battalions, my 15mm minis based for “Chain of Command” will be used for the 1st Battalion. This was the route I was set to go down when first planning to play “O Group”, but decided that the visual incongruity of figures on the table that were 7.5x too large (6mm are ‘just’ 3x) was -imo- a hindrance to play worth the trouble to avoid.

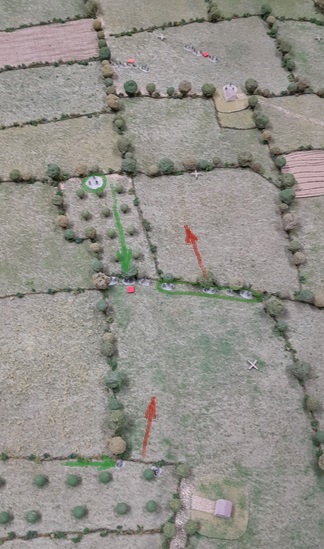
1st Battalion gains the initiative, but Company C isn’t quite ready yet (its HQ is ‘hesitant’).
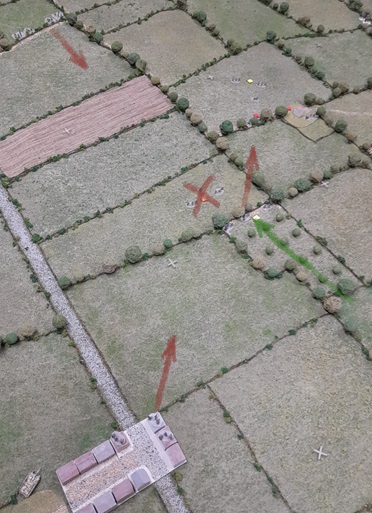
Company A moves up and deploys two CPs behind the Germans in the orchard. The Pak38 is revealed and takes out one of them -reactfire from the Company mortar inflicts a point of shock on the gun position.
The Germans fail to deploy troops into the trench by the gun.
The Germans in the orchard (3rd Platoon of Co.B) shift over to face the threat from the east and eliminate the CP (by contact).
On the next turn, the HQ of U.S. Company A is now ‘hesitant’ (shown by replacing the msgr fig with black marker – lots of ‘1s’ being rolled in the Command Phase this game!), so Company C moves up. Its 2nd Platoon is deployed at the hedgeline next to the 1st, and a CP is placed ahead of them in the orchard.

It looks like things are developing more to the south than up on the highway (and there’s no word from the ‘hesitant’ Co.B HQ over there?), so the Germans of Company A shift to the right and deploy their 2nd Platoon.

The Ost Platoon in the trench panics and shoots at the unknown movement to its front but without effect.
The Machinegun Platoon to their rear, however, does better, and continues hosing down suspected enemy locations: It takes out another CP in a field down the hill (-that was, perhaps, on the wrong side of the treeline?).
The 1st Platoon of Company A (wondering how it got into the front of the fight…) deploys and returns fire on trench, scoring two hits -reactfire from the trench (directed by the HQ of Co.C) does the same to the Americans.
U.S. Company C moves up a CP and deploys its 1st Platoon to put more fire into the trench, suppressing the platoon there and taking out a section. Rounds from both mortar sections add hits but fail to cause further casualties.
The deployment attempt on the CP that moves into the farm fails.

The Germans respond by deploying a platoon into the treeline and firing on the Company A men, but miss.
Thinking to get more reliable troops up front, the Germans withdraw the wounded Ost Platoon from the trench to behind the orchard (-an American attempt to drop opportunity fire from their Company mortars fails) and deploy a CP to the trench where a fresh platoon will (hopefully) be deployed.
The Machinegun Platoon shifts to the right and fires on the Company C platoon east of the farm, suppressing them and taking out an attached MG.
A US platoon from Company C (the 2nd) deploys into the farm and fires at the enemy in the treeline – that and a few rounds from the mortars ends up putting two points of shock on the Germans, while return fire inflicts a single point on the farm.
The pinned 1st Platoon in the middle of the field rallies while -more importantly- the Company A platoon manages to take out the newly-deployed German CP in the trench.


The Company C CO takes advantage of the trench’s emptiness to deploy a CP near it.
Bolstered by the progress, the Company A HQ moves up and places a CP as well.
The FOO (ordered to get where he can direct fire onto that annoying MG position) heads down the track to find a good spot from which to do his job.
The lack of action north of the highway has allowed the Stug crews to work in peace (-they’ve also been lucky to have evaded detection by the American AT-gun position).
The end of the turn sees them reporting that they are fit for duty and ready to enter the battle.

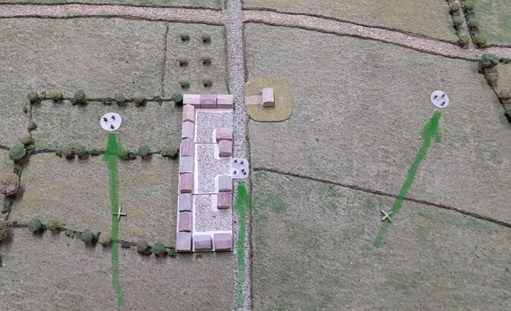
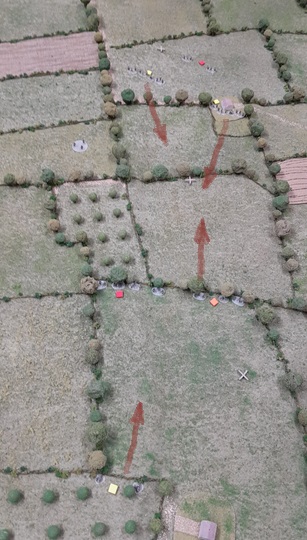
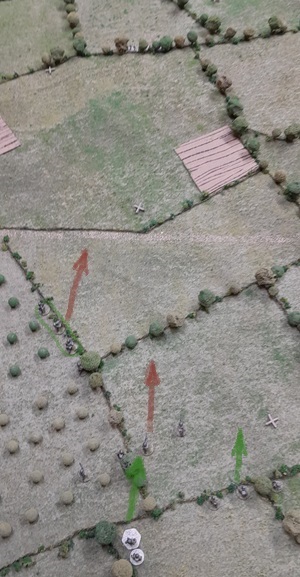
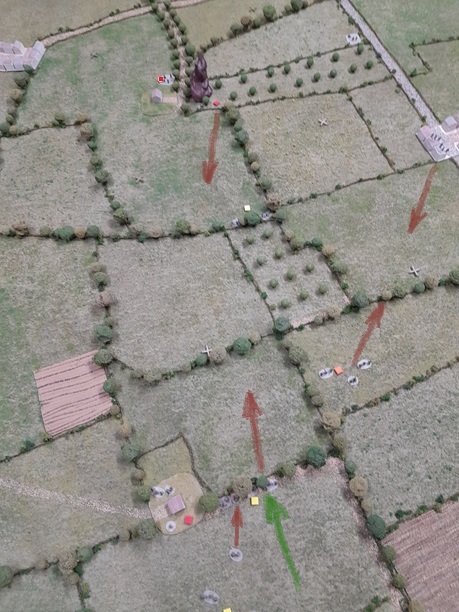
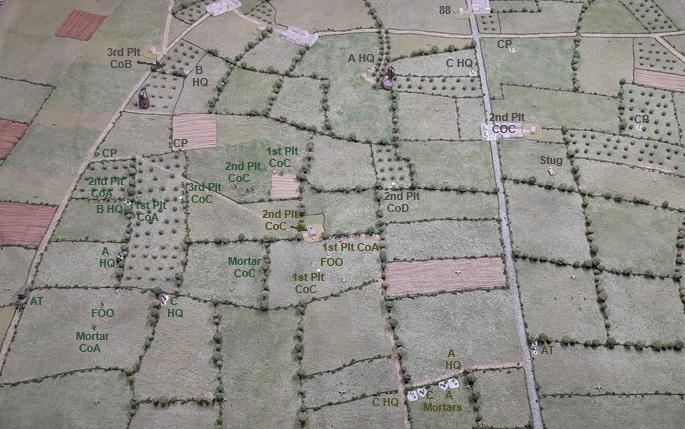
Situation at end of turn 4:
The next turn sees no HQ on either side ‘hesitant’ for the first time in the game. The bullets fly all across the center of the battlefield as the Americans attempt to secure the area so that the armor and third Company(B) can join the fight.
In an attempt to take out the crippled Company C platoon, the German MGs continue their fire. The platoon in the treeline rallies off a point of shock and joins in – The result for the Americans is the loss of a section and the remaining men being pinned in the middle of the field.
U.S. reactfire from the farm puts a point of shock on the machineguns, while the nearby Company A 1st platoon manages to take out a section from the German platoon (1st of Co.C) in the treeline.
The MG Platoon may be the bigger threat, but the wounded German platoon in the treeline is a more attractive target so the Americans in the farm shift their fire to join that of the Co.A 1st Platoon, eliminating a Panzerschreck team. In response, the German MGs take out a section in the farm.
The U.S. Company mortars then take out a section from the Germans in the treeline, causing a rout test – which fails. The resulting Command Crisis removes two orders from the German HQ, and the Americans deploy a platoon up near the trench.
The wounded American Co.C 1st Platoon in the field rallies as the Battalion FOO arrives on scene.
To counter the threat, the Stug moves up the swale (careful to stay out of sight) to a position near the BUA, into which a CP and then the 2nd Platoon, Co.C, deploys.
The Americans move their CP to the north on the flank of the Germans.
The Ost Platoon west of the trench-orchard has rallied off most of its shock and now only has one point.

The German 1st Platoon of Co.A moves up to the treeline (behind the brow of the hill and so out of sight of the U.S.-held farm) and fires on the 1st Battalion CP in the large orchard to no effect.
The Company A HQ (off-camera) moves towards the farm where it plans to set up shop, but fails to reach it. The 3rd Platoon of Company B withdraws from the orchard but doesn’t quite reach its intended destination of the trench.
The troops in the open attract the attention of the Company A mortars as well as a strike from the Battalion’s battery called in by the Company HQ (since the FOO can’t see anything…). Both strikes fail to harm the infantry, but the Pak38 crews take two points of shock as ‘collateral damage’.
The CP by A HQ moves up and the 1st Platoon deploys to it, and a new CP is placed up at the edge of the far orchard (where the German platoon had been).
The FOO moves over to find out what his guns are firing at…

Working to secure the Battalion’s flank, Company C deploys its 3rd Platoon to the CP at the edge of the orchard and has the 1st move up (a paltry 2″, so they can’t all shoot) and they both fire on the Company A Germans in the treeline – they suppress the platoon but cause no casualties.
The 1st Platoon then also moves up (again: just 2″…are they afraid of stealing the glory for themselves…?) to be beside the 2nd.
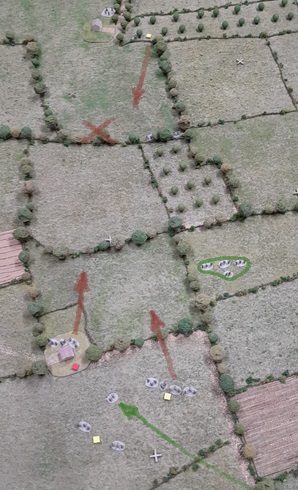
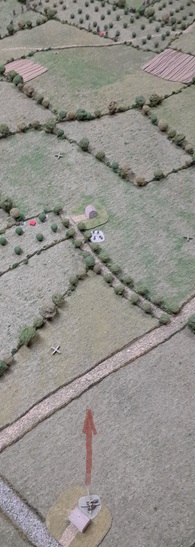
The suppressed infantry couldn’t respond, so the Germans revealed the 88 situated back at the edge of Arthenay. It can finally see something(!) but its fire down into the orchard has no effect.
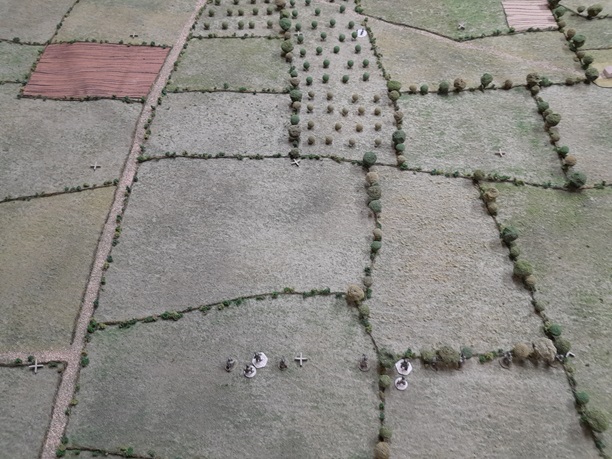
(The photo also indicates the past movement and current position of the Company A HQ.)

Another turn with nobody ‘hesitant’, so things move along briskly…

Company C of the American 1st Battalion puts its training to use as all three platoons use ‘marching fire’ to advance and shoot at the Germans in the treeline: Seven hits from the fusillade leaves a single section (which routs) and triggers a second FUBAR for the defenders.
Reactfire from the 88 puts just a single point of shock on the 3rd Platoon in the orchard.
More rounds from the 88 in the German phase suppress the Americans in the orchard but cause no casualties.
On the American’s left flank, the FOO takes over directing the Battalion mortars which hit the infantry in the open, causing two points of shock as well as suppressing the Pak38 position. The Company mortars drop some rounds in as well but to no effect.
Company A deploys a platoon onto the CP at the edge of the orchard and moves the 1st up (slowly…) to end up beside them.
The German infantry skips over the trench (and abandons the poor AT crews…) and decides to run back all the way to the HQ in the rear-most orchard…just to double-check that they haven’t missed the (expected) order to withdraw, perhaps?
Up the hill, the Germans work to stem the tide. The platoon in the BUA on the highway puts fire into the exposed American platoon near the trench: Two rounds of fire (with the Company HQ ordering the second) takes out a section and pins the remaining men, who manage to rally off a point of shock when the fire subsides.
The Machinegun Platoon fires on the farm, taking out a section and triggering a rout test which is held off by the American HQ. Still, the losses are enough to cause a FUBAR for the U.S. 3rd Battalion.
Return fire from the U.S. Company mortars manages to suppress the MGs. A strike by the Battalion mortars misses the MGs but hits and suppresses the Company A HQ (which hadn’t made it into the farm yet…) resulting in the loss of an HQ order from the Command Crisis.
The 1st Platoon of Company A moves up to add to the mortar’s effect but misses.
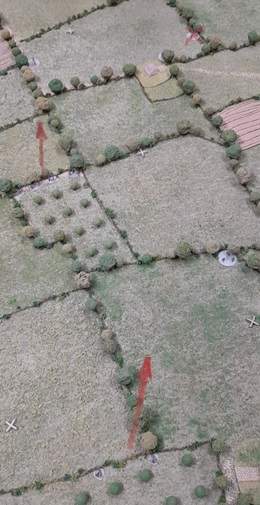
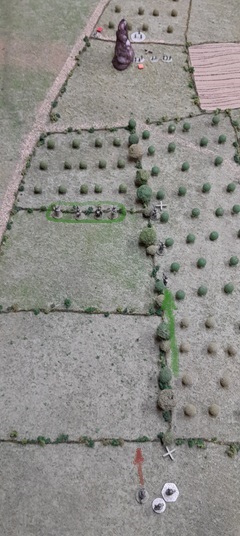
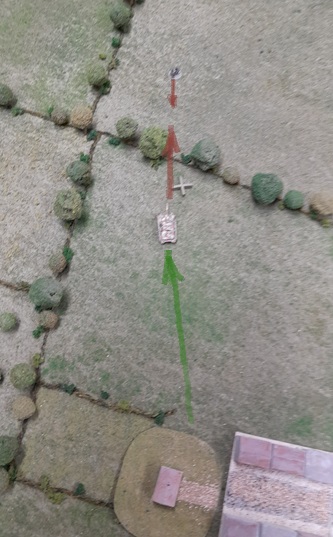
A bazooka team takes advantage of the distraction caused by all of the activity to the south to sneak up on the Stug, but misses the shot.
(NOTE: The placement of the figure is only done for the photo to indicate the 5″ movement-roll that it made to allow for the attack.)

During the turn’s Regroup Phase, the Americans on the left move up the Company A HQ and Company C mortars, while on the right the 57mm AT crews (-hearing that there’s a panzer or something hiding up ahead that they can’t see?) limber up and move out onto the highway. The German AT crews in the south manage to rally from the barrage they’d suffered under, only to discover that they’re all alone…
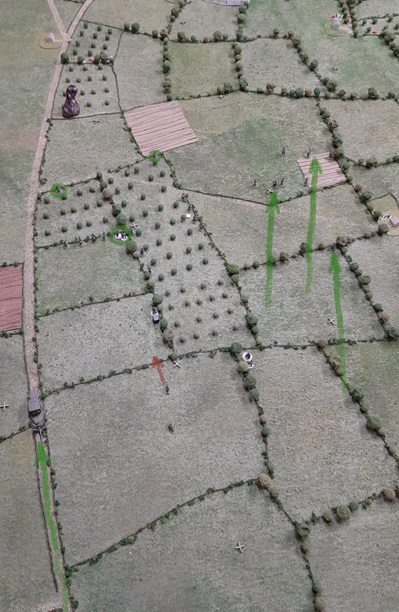
Situation at end of turn six:

Things are looking a bit grim for the German CO. Another quarter-hour needs to pass before he can expect an update from Osmanville on the progress of the evacuation. (They could spend an HQ order in the coming turn to make an attempt to find out how things are going, but they don’t have any to spare.)
Although crippled by two FUBARs the German defense is holding fairly well up near the highway (where the American Battalion suffers from its own FUBAR). In the south things aren’t going so well and the defenders are hoping for a bit of Yankee caution to drag the battle out just a while longer until a withdrawal can be effected.
Fate (i.e.: dice!) seems to smile on the Germans as the next turn sees the HQ of the American Company A on the far south become ‘hesitant’. They might just pull this off! It would certainly help if they had more than just two HQ orders available…
The American 1st Battalion gains the initiative. Their FOO drops a barrage onto the trench which takes out both the AT gun and CP.
With the area secure and the phase line reached, Company B HQ consolidates into the angle of the orchards and places two CPs on the western edge. The attached 57mm AT gun drives onto the table as well.
Company C moves up its mortars and 1st and 2nd Platoons, while the 3rd rallies from the attention given it by the 88, whose redirected fire goes over the heads of the advancing 1st Platoon.
While their right flank collapses the Germans work to hold the high ground up near the highway.
The Machineguns rally and fire down on the advancing 1st Battalion, inflicting two points of shock. The U.S. Company A men in the treeline near the farm reactfire at the Germans but miss.
The German Company A HQ shakes off the effects of the mortar barrage.
Farther north, the Germans in the BUA fire again on the American platoon in the field in front of the trench, killing another section and causing a platoon rout.
The resultant FUBAR and Command Crisis triggers no loss of HQ orders for the Americans, but does allow the Germans to move the Ost Platoon back up into the trench, from where they fire on the opposite treeline and suppress the Company A platoon there.
Reactfire from the Company A mortars has no effect on the trench.
To finish cleaning up the north side, the Stug motors over to the Bazooka team and takes it out with HE fire.
(The Americans were given a chance for opportunity fire to get off the first shot, which they did -and hit- but the Germans rolled box-cars for the effect, so…bye bye bazooka.)
The Germans choose to save their last orders (two in HQ) to react to the coming American Phase…
…which doesn’t last long as the 3rd Battalion’s FOO drops another barrage on the German MG position, suppressing it (as well as the nearby Company A HQ which -it seems- will never set up in that farm…) and taking out one of the sections.
“Hit ’em while they’re down”, say the Company A and C mortar sections, and with a single hit that takes out the remaining MG section and triggers the third FUBAR for the Germans, the game ends.
To rub it in, the resulting Command Crisis sees the loss of the two HQ orders the Germans had saved, so they don’t even get the satisfaction of a parting shot…
jfl, the remaining American orders were used to have the AT gun set up and fire on the Stug. It missed, but…may as well use the HQ orders, right? The second shot hit and caused two points of shock. The remaining HQ orders were used in an attempt to take out the Ost Platoon in the trench with the 1st Platoon of Company A and the Company C men in the farm but both failed.
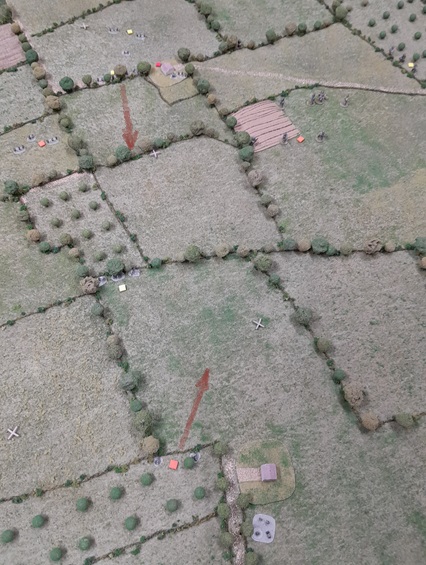
Situation at the end of the game:
That last turn put just five minutes on the clock, so the total game time ended up being 61 minutes = the Americans win the campaign in a little under eleven hours. The evacuation roll for the 915th Regiment at 1800hrs was passed, so the Germans succeeded in delaying the attack long enough to allow the troops behind them to reach safety – they just didn’t manage to save themselves.
— return to campaign main page —
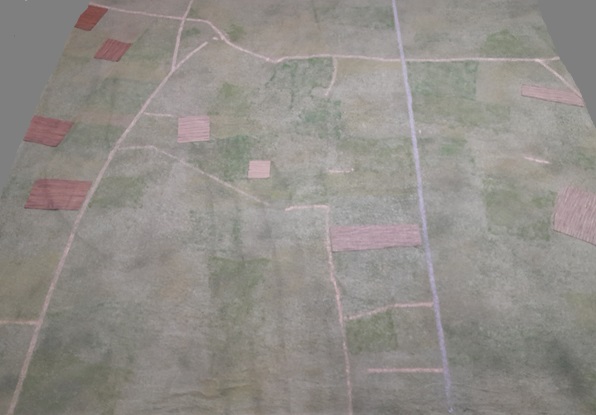
More jfl – A photo of the table after it’s been stripped of BUAs, trees, and hedges: