Using O-Group to (sort of) play the CoC campaign
The “29, Let’s Go!” PSC seemed to be a perfect fit for a battalion-level game, so when I finally got around to getting “O-Group” on the table it was within a modified, ‘big’ version of that campaign.
So instead of platoons…

…the battlefield expands to hold battalions.
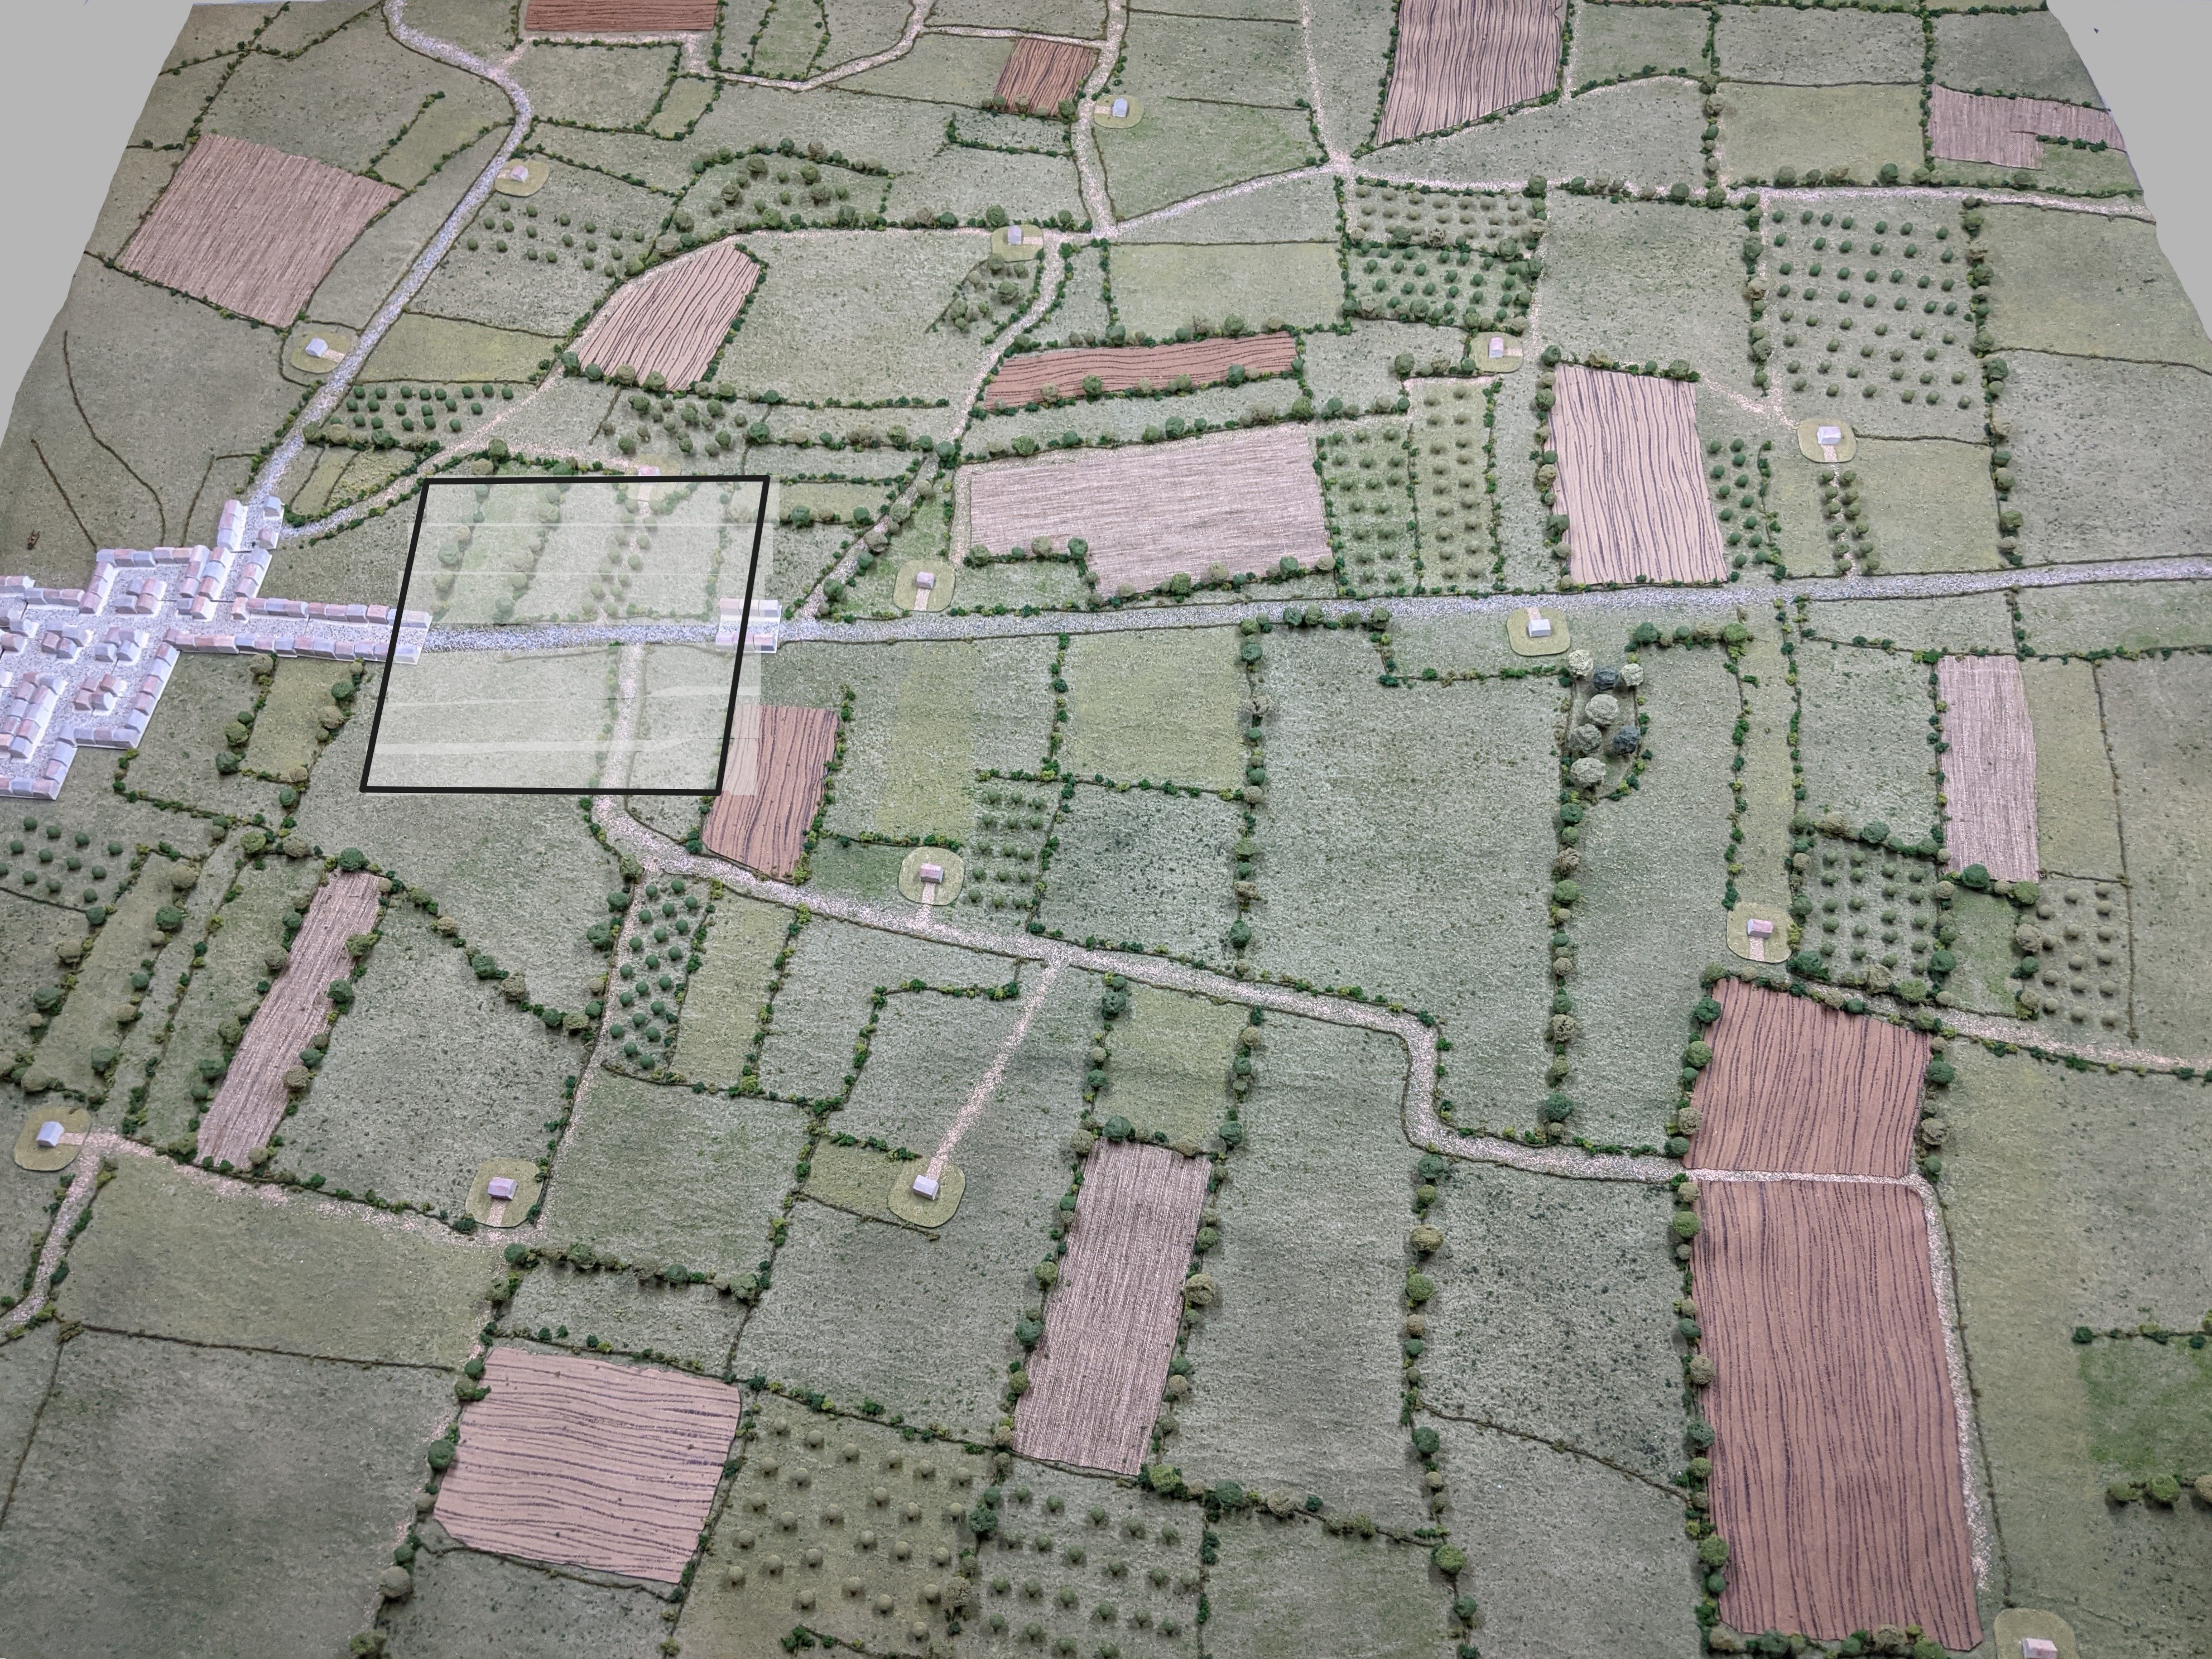
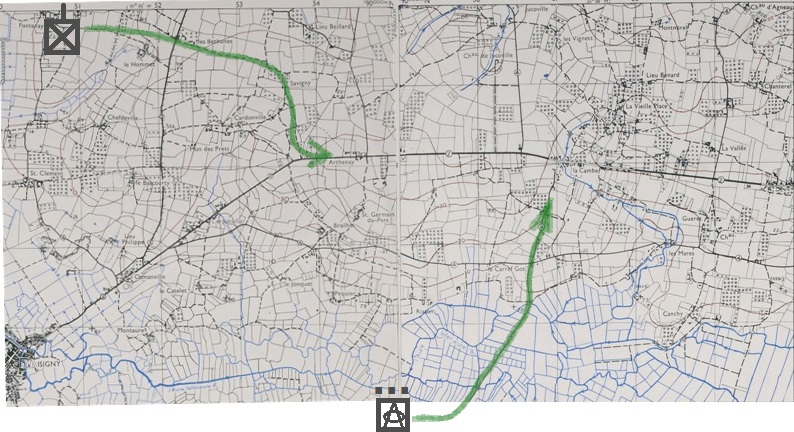
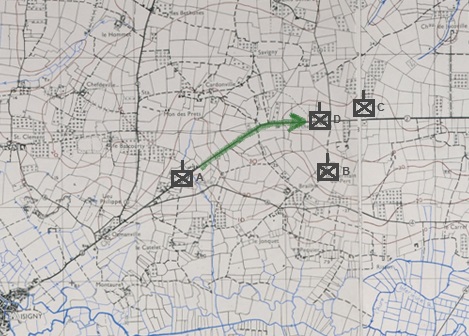
The highlighted rectangle roughly shows the area of the first CoC scenario “Probe at La Cambe”.
Like the CoC campaign, this follows the 175th Regiment on the 8th of June as they attack down the Bayeux-Isigny highway to secure the bridge across the Aure River.
Americans
The American player has the use of three Infantry Battalions along with two companies of Shermans (attached from the 747th Tank Battalion). A limited amount of support from the Regiment’s Artillery and AT units may become available as the day progresses and they get sorted off of the beach, along with potential aid from the channel via a naval bombardment/pre-game barrage, but for the most part the Regiment will have to complete its mission with the force it starts the day with.
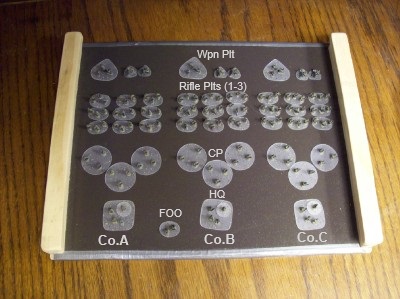
US Infantry Battalion – 6mm (H&R) figs on (semi)clear .030″ bases. The small, single-fig bases (magnetically) attached to each HQ stand represent use of the Company HQ Order – either placed with the Battalion HQ, with a unit on the table (that is given a second order), or (if the HQ is ‘hesitant’) replaced with a marker.
( Some blather regarding my ideas about figures, basing, and terrain can be found here. )
From the briefing for the American player:
While the morale tracking of pint-sized campaigns is not used, the opinion of the 175th’s CO, Colonel Goode, will influence the game as it does in “29, Let’s Go!” by forcing a delay of the attack if losses/setbacks cause him to become worried about proceeding. His outlook will also affect the overall shape of the attack (i.e.: Where the Battalions will go) and allocation of supports (i.e.: Who gets what kind of help) – This is meant to place the player (acting as a Battalion CO) ‘in the middle’ of the command problem, with both the objectives/resources from above as well as performance/outcomes from below out of the player’s control, being determined by the dice either at Regimental HQ or with his Companies on the battlefield.
Germans
The German player’s mission is to protect the withdrawal of forces through Osmanville to Isigny. While they -as Battalion Commander- do not have to deal with the difficulties imposed by a character like Col.Goode, they have their own restrictions imposed in the form of the progress of the withdrawal (which is diced for randomly and thus lies outside of their control) along with having their force being both outnumbered and thinly spread.

The Germans will defend with four companies of the 914th Regiment (one of which is an Ost unit). They begin the campaign centered in LaCambe, Arthenay, Fontenay, and Osmanville (with the Battalion HQ). These locations -as well as which Company was in which town- were determined randomly, as were the supports available at that location drawn from a pool which included AT gun sections (Pak38 or 40), Infantry gun sections (IG18), MG platoons, and mortars (120mm). Also placed randomly in the campaign area are two PanzerJager units (a platoon each of Marders and Stugs). Once the campaign/day begins the German player can attempt to move these forces within the area but such movement is subject to interdiction by Allied fighter-bombers. Other units not under the player’s direct command (such as Flak batteries and other rear-echelon static positions) will be included should a game occur in their location.
NOTE: These games represent the first time for both players with the rules. There were many (many!) mistakes made – both in dealing with the rules as well as tactical decisions (I tell myself that I goofed with the rules when concentrating on command, and made a hash of the battle when thinking too much about the rules!) – exacerbated, I’m sure, by playing the game remotely/online (via Discord in bits of an hour here and a couple there as schedules allowed over the course of a month – not at all ideal!). Those familiar with the rules will spot goofs made, and those without knowledge of the game should assume that anything unattractive that they see be attributed to the errors made by the players rather than to the rules!
Also: Readers should understand that the games are not ‘by the book’ scenarios (and the play is littered with my usual impulsive tinkering…) so that what is described likely pushes the limits of the rules well beyond the designer’s intent – another reason to lay blame on me for anything that doesn’t look quite right.
With those caveats in hand (and many more left undisclosed…) it’s time to roll dice!
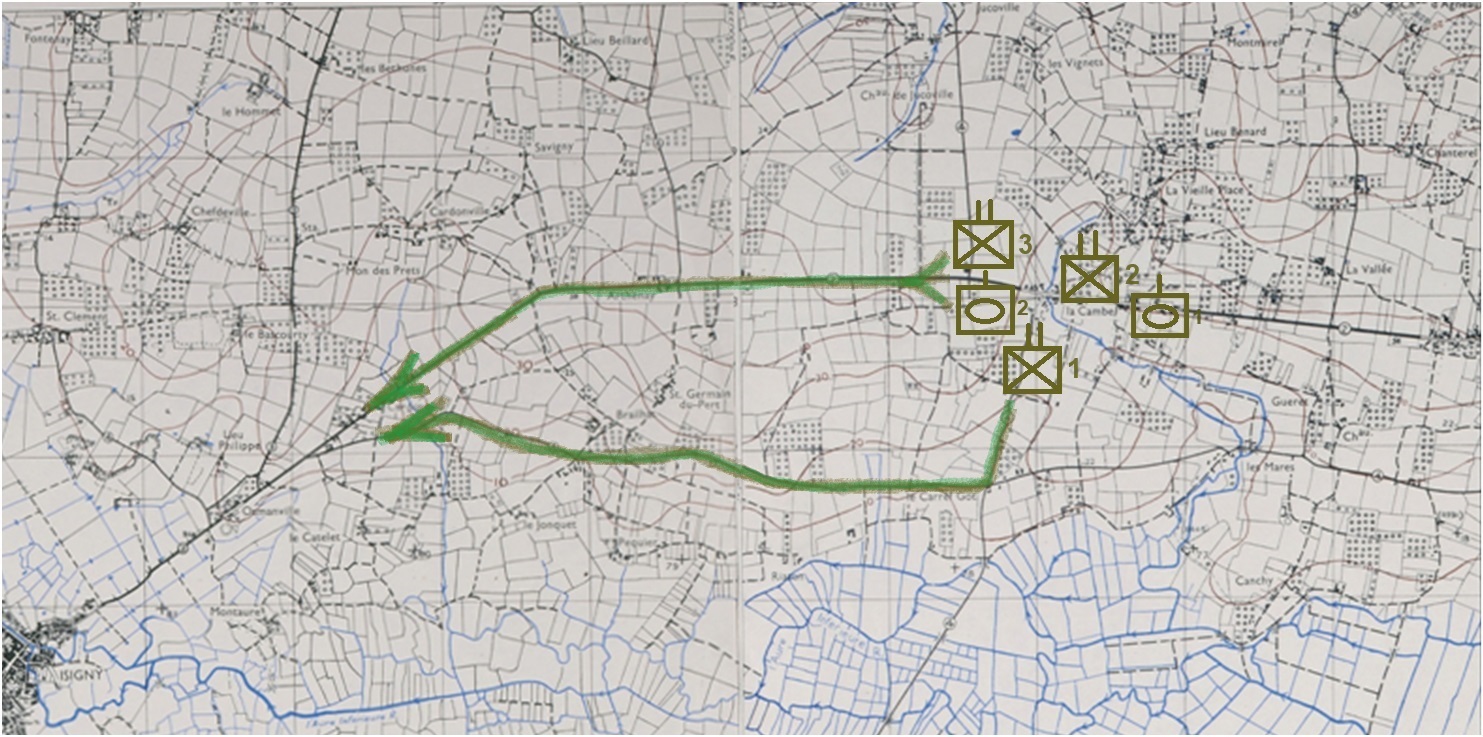
GAME ONE – MAP A
The first game deals with the beginning of the American attack as they run into the Germans blocking their advance east of La Cambe: …Go Big! – Campaign Game One, Map A.
SPOILER ALERT! Reading further will reveal the results of the first game.
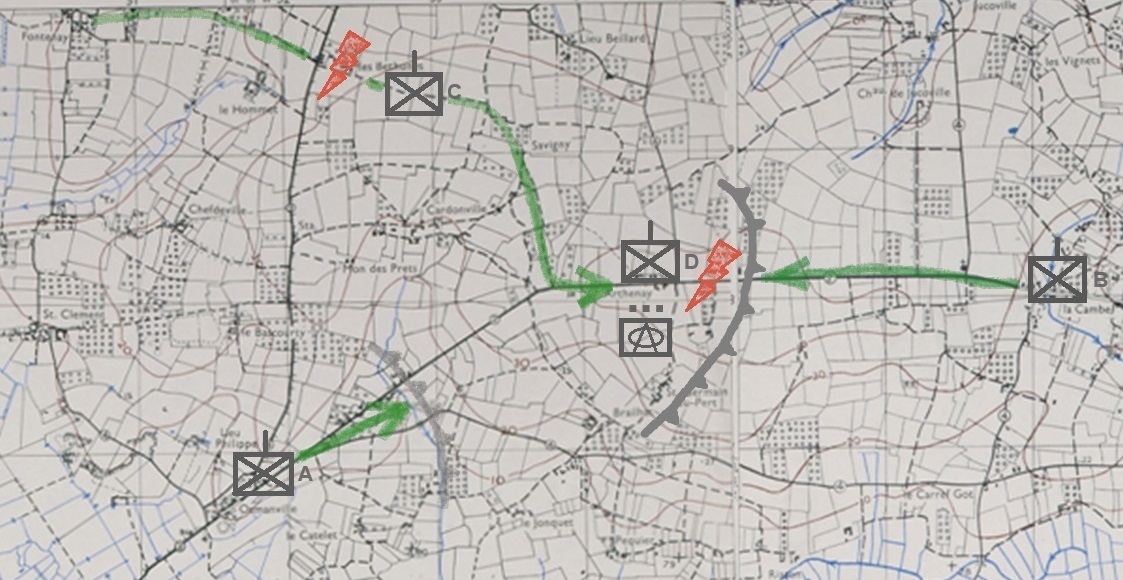
It’s now two-and-a-half hours later (0930hrs). While the Americans regroup and plot their next moves, the German player assesses the situation. The evacuation of forces along the coast to the north and west is just now underway -units won’t be crossing the bridge in Isigny for at least another two hours- so pulling back from La Cambe is not a viable option (yet!). Also, though they can’t be repositioned, both 88s are still in place and will (hopefully) keep the Yankee tanks at arm’s length – and since they can’t be brought with in a withdrawal it seems a waste to abandon them after only a single battle. So: With much of the force intact (losses were, thankfully, minimal – though the IG18 will be missed) they ready themselves to fight again on the same ground.
Orders go out to the Company in Fontenay to begin moving southeast to the Arthenay area (via Savigny) and -more critically- for the Marder platoon south of the inundated area to move up Highway 4 (via Douet) to reach the corner of the battlefield south of La Cambe. Both movements risk attracting the attention of the Jabos that seem to be everywhere in the sky (where is the Luftwaffe?) but they’re doing little good in their present positions, so…
In the American camp: Learning of the defeat in front of LaCambe (which included the mauling of one of the supporting tank companies and strafing by the RAF!) has upset Colonel Goode and he’s now “troubled”. Another loss could see him call a halt to the attack, so the Americans call up a fresh Battalion -the 2nd- to take the town.
GAME TWO – MAP A
It takes the 2nd Battalion HQ the better part of two hours to change plans from “March down the road” to “Attack and take the town”, so it’s going on half-past eleven by the time they’re ready to mount an attack. …Go Big! – Campaign Game Two, Map A
Second Game Done — Don’t read further if you don’t want to know what happened yet.
It took less than an hour for the 2nd Battalion (with help from the reserve Company of the 1st) to overwhelm the German defenses and take La Cambe. Col.Goode responded well to the news and is happy to order the 3rd Battalion (with the 2nd Tank Company) down the road in pursuit of the retreating enemy (once they get sorted from the mess on the road down from the beachhead and make their way through town).
Fighting by the 115th Regiment behind him (at Longueville and Canchy) and the German presence to the south keeps him concerned, however, so he holds the 2nd Battalion and the 1st Tank Company in La Cambe (ostensibly to clear and secure the town…not to guard his HQ…) and orders the (mostly) recovered 1st down to move west along the secondary road that runs just north of the inundated area to watch/cover his flank.
For the Germans, news of the defeat at La Cambe is tempered by the welcome sight of units of the 726th Regiment and an artillery battery moving through Osmanville on their way to the bridge at Isigny.
The Ost Company(D) at Arthenay has been busy digging a defense line there: Holding that high ground is vital to preserving the evacuation corridor, and learning that much of Company B is making their way back to it from La Cambe is heartening (though hearing that the Marders are not with them is disappointing). Company C reports making it to Arthenay, but included is word that a Jabo strike near les Bethunes eliminated a section from 2nd Platoon and reduced the 3rd Platoon to a single section. The dreaded fighters were busy over Arthenay as well where they took out four sections of the Ost Company along with one of the Stug sections there ( -it seems those flyboys didn’t take Col.Goode’s request to heart).
With an eye towards the next (perhaps final?) move, the German CO sends Company A to begin preparing a fallback line just east of Osmanville where he plans to make a last stand with whatever survives to protect the withdrawal – which will hopefully continue apace so that he can get (at least some of) his own force to safety.
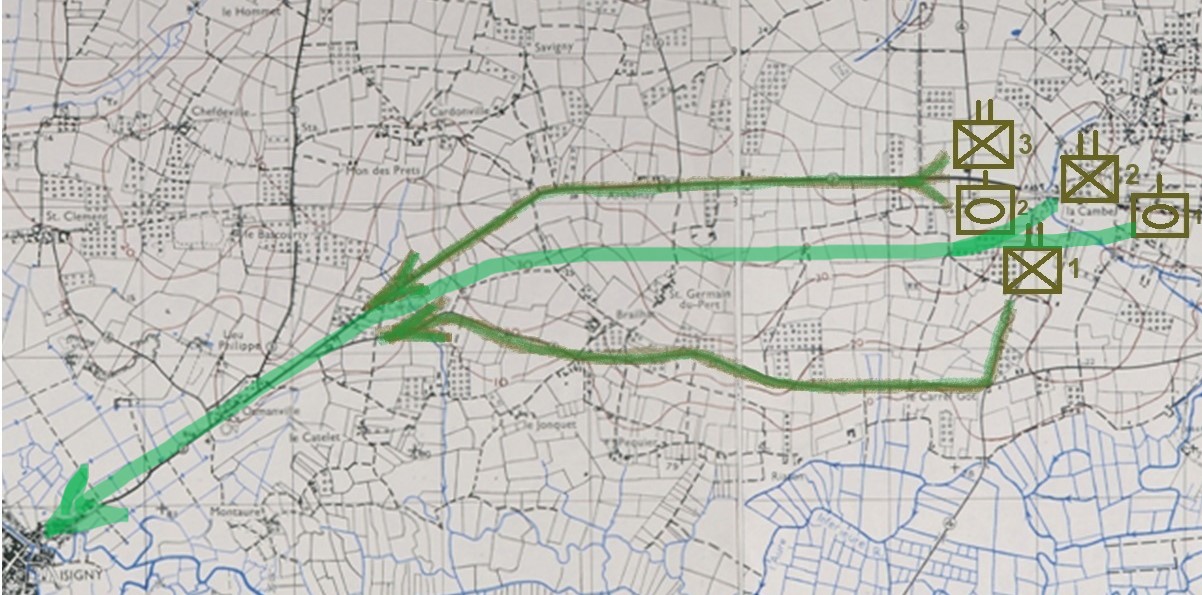
GAME THREE – MAP B
The American Commander* of the 2nd Tank Company is not at all interested in charging down the highway without close support from the infantry, so a bit over an hour passes before they and the 3rd Battalion make their way through La Cambe and cautiously advance around a kilometer to the west where they detect the presence of the Germans outside of Arthenay.
In contrast to the armor CO, the 3rd Battalion leader* is eager to get into action (and sees that almost half the allotted time for the mission has passed already). He overrides the advice of his staff that wants to take a bit more time to plan (and perhaps wait until contact/coordination with the 1st Battalion to the south can be made?), and he orders his Companies to attack right off the march = easier said than done, and it takes most of an hour before the men get their orders and deploy for battle. The clock shows 1430hrs as the game begins. …Go Big! – Campaign Game Three, Map B
*NOTE: Since my opponent is still unavailable, I’ve turned to dice to determine the mood/mindset of the commanders of each side. The resulting campaign choices may not make the most sense, but since the goal of the exercise is to experiment with the minis/rules (and make way for the next shiny…) it’ll have to do.
The usual ‘don’t look if you don’t want to know what happened in the third game’ warning.
That battle would elicit a remonstration by Treebeard: “Do not be hasty”. At least it didn’t use up (waste) too much time: It’s 1520hrs when the (none-too-pleased) 2nd Tank Company CO meets with the 1st and 3rd Battalion HQs to make a real plan of attack.
The quick defeat seems to have not had a negative impact on Col.Goode’s outlook. In fact, it actually -surprisingly- improved a bit, making him more amenable to requests for support or suggestions on how best to proceed (perhaps he had a very nice long lunch in La Cambe?). This prompts the more-cautious 1st Battalion CO to suggest waiting for the Regiment’s 105mm-howitzers to get set up (if they can be found, that is) or perhaps even asking the Navy (whose big guns are already close enough…) for help in softening up (if not outright eliminating?) the German positions in front of them?
The 3rd Battalion CO isn’t keen to increase the delay any more than is necessary to form a plan of attack and get both commands into position for a coordinated attack. The fact that they only have six hours of daylight left to complete their mission decides the issue: The two HQs will get a plan formed as quickly as possible to push side-by-side through the Germans here and then move on to take and clear Osmanville. The 2nd Battalion (and 1st Tank Company) will then pass through to enter Isigny and secure the bridge.
The plan is made, orders are cut, details are distributed down through the chain of command, and the men move into position. 1st Battalion will be ready to step off a few minutes past 5pm (1710). 3rd Battalion -at the goading of its CO- is set to go twenty minutes earlier…though it will suffer from the same deployment difficulties it faced in its first attack – the men are not thrilled about going through that chaos again. They’ll obey their orders and begin the attack when told…but the start may not be as vigorous as the CO would wish.
Flt.Lt.Mulligan made a pass over the readying 3rd Battalion, but thankfully identified them as friendlies and didn’t attack. The men of the 1st (who had no fond memories of the Typhoon…) were getting their guns pointed skyward, ready to express their displeasure should the pilot wing over their location, but the dice spared all from such an encounter!
The German Commander used the time granted to assess the situation. He was happy to see the last of the artillery pass by and make its way to Isigny, but the infantry scheduled to move through Osmanville next (elements of the 915th Regiment) haven’t shown up yet. Once they are safely evacuated (news of which is hoped to be received at 1700hrs) his rearguard can detach and make its own way across the river.
News of a second American Battalion joining the attack at Arthenay leads to the conclusion that the position there will be overwhelmed easily. Rather than use the (incomplete) fallback position being prepared by Company A, it is decided to have them reinforce the existing defence to the east in the hope that the full Battalion can deal another bloody nose to the Americans, forcing them to take time (as they are doing now) to recover and regroup before continuing the attack. This would (hopefully) allow the Germans to slip away and get to safety across the river.
Game Four – Map B
The clock ticks towards 1700hrs as the forces gather for the battle that will likely determine the result of the campaign. …Go Big! – Campaign Game Four, Map B
Well, that’s that. I may scribble some final thoughts on the exercise, but for now will post the final battle and move on to something else (-after taking down the table…always a slightly depressing task…oh well).

Your tables look brilliant – like a wartime photo recon picture.
LikeLike
Thanks – using contemporary recon photos as a guide helps! The goal is a better ‘overall battlefield’ picture for the players (with lots of space!) which aligns with my soapbox-subject of having games concentrate on modeling the action rather than the pieces-parts.
LikeLike
your table looks great.
how do you make your trees and hedges?
LikeLike
Thanks. It’s certainly not a ‘portable’ system (and -as for game two- not easily adjusted!) but is a satisfying part of the hobby for me.
The trees are of three types: The smallest, orchard-trees are just map pins with a heavy slopping of latex paint and a sprinkling of fine/grass groundcover. Those in the field boundaries are craft ‘pompoms’ with a straightpin ‘trunk’ that are dipped/squeezed in latex and sprinkled with groundcover. Most of those in the ‘woods’ are my 15mm orchard trees = latex-paint-soaked-cushionfoam ‘lumps’ done the same way but with the addition of a styrene tube slipped over the pin for a more substantial trunk. Using three or four paint colors (DIY/hardware store ‘oops!’ stock is cheap!) and a variety of groundcovers provides a nice mix.
The hedges are just yarn +groundcover(and trees) to create three levels of terrain: A few bits of foliage = just a field boundary used as a movement bound, more foliage = cover, and adding trees serves to make it rough for vehicle movement.
LikeLike